How to Print
Printing from the printer driver
 Handling paper
Driver settings for Windows
Driver settings for Mac OS X
Driver settings for Mac OS 9
This section guides you through the procedures for basic printing from the printer driver.
 |
Note:
|
Handling paper
Refer to the section below for details on loading paper.

[Top]
Driver settings for Windows
 |
Open the file you want to print.
|
 |
Access the printer driver.
|
 |
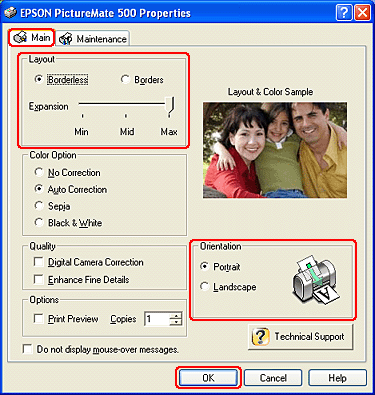
Click the Main tab, and select Borders or Borderless for your print layout.
|
 |
Select Portrait (tall) or Landscape (wide) to change the orientation of your printout.
|
 |
Click OK to close the printer driver settings dialog box.
|
 |
Print your data. After finishing all steps above, start printing. Print one test copy and examine the results before printing an entire job.
|
 |
Remove each sheet from the output tray as it is printed.
|
[Top]
Driver settings for Mac OS X
|
|
Open the file you want to print.
|
|
|
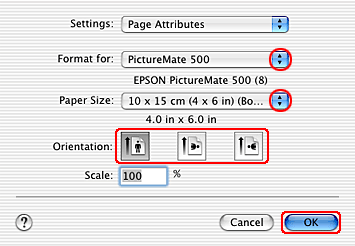
Access the Page Setup dialog box.
|
|
|
Select PictureMate 500 as the Format for setting.
|
 |
Make the appropriate Paper Size and Orientation settings.
|
|
|
Click OK to close the Page Setup dialog box.
|
|
|
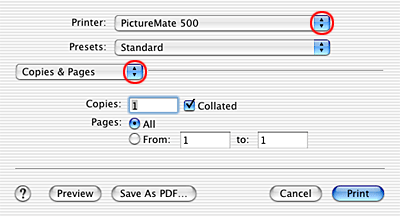
Access the Print dialog box.
|
|
|
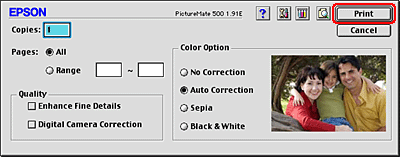
Select PictureMate 500 as the Printer setting. Then make the Copies & Pages settings.
|
 | |
Note:
|
| | |
The Copies & Pages settings available are a standard feature of Mac OS X. See your operating system's documentation for details.
|
|
|
|
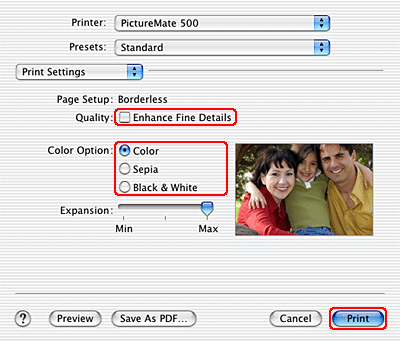
Select Print Settings from the pop-up menu.
|
 |
Make the appropriate Quality and Color Option settings.
 See Print Settings See Print Settings
|
 |
Click Print to start printing.
|
| |
Note:
|
| | |
Print one test copy and examine the results before printing an entire job.
|
|
 |
Remove each sheet from the output tray as it is printed.
|
[Top]
Driver settings for Mac OS 9
|
|
Open the file you want to print.
|
|
|
Access the Page Setup dialog box.
|
|
|
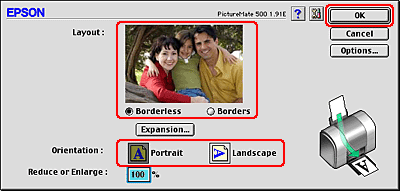
Select Borderless or Borders for your print layout.
|
|
|
Select Portrait (tall) or Landscape (wide) to change the orientation of your printout.
|
|
|
Click OK to save the settings and close the Page Setup dialog box.
|
|
|
Access the Print dialog box.
|
|
|
Make print settings. See the following section for details on the print settings.
See Print Dialog Box
|
|
|
Click Print to start printing.
|
| |
Note:
|
| | |
Print one test copy and examine the results before printing an entire job.
|
|
|
|
Remove each sheet from the output tray as it is printed.
|
[Top]

