Printing / Various Printing Options
Pages Per Sheet Printing
 Driver settings for Windows
 Driver settings for Mac OS X
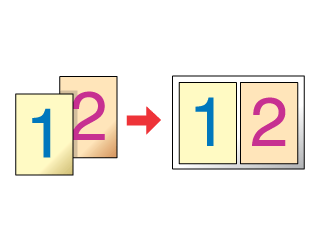
Pages Per Sheet printing allows you to print two or four pages on single sheets of paper.
 |
Note:
|
 | |
This feature is not available when selecting the Borderless check box on the Main menu (Windows).
|
|
Driver settings for Windows
 |
Access the printer driver.
|
 |
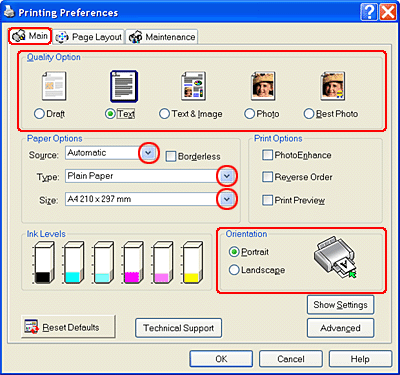
Click the Main tab, then select one of the Quality Options recommended below. For details of other Quality Options, see online help.
|
-
Draft for rough drafts with reduced print quality
-
Text for text-only documents with higher text quality
-
Text & Image for higher quality documents with text and images
-
Photo for good quality and speed
-
Best Photo for the best print quality
 |
Select the tray where paper is loaded as the Source setting.
|
-
Automatic or Back for the back tray
-
Automatic for the front tray
 |
Select the paper type loaded in the tray as the Type setting.
|
 |
Select the paper size of your file as the Size setting. You can also define a custom paper size. For details, see the following section.
|
 |
Select Portrait (tall) or Landscape (wide) to change the orientation of your printout.
|
 |  |
Note:
|
 |  | |
For more print settings, click Advanced. Click Help for more information.
|
|
 |
Click the Page Layout tab and select the Multi Page check box. Then, select Pages Per Sheet.
|

 |
Make the following settings for Pages Per Sheet printing.
|
|
2, 4
|
Prints two or four pages of your document on a single piece of paper.
|
|
Print Page Borders
|
Prints frames around the pages printed on each sheet.
|
|
Page Order
|
Allows you to specify the order in which the pages will be printed on the sheet of paper. Some settings may be unavailable, depending on the Orientation setting on the Main menu.
|
 |
Click OK to close the printer driver window.
|
After completing the steps above, print one test copy and examine the results before printing an entire job.

[Top]
Driver settings for Mac OS X
 |
Access the Page Setup dialog box.
|
 |
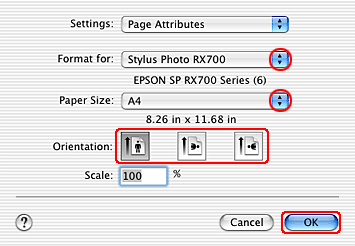
Select Stylus Photo RX700 as the Format for setting.
|
 |
Make the appropriate Paper Size and Orientation settings.
|
 |
Click OK to close the Page Setup dialog box.
|
 |
Open the Print dialog box.
|
 |
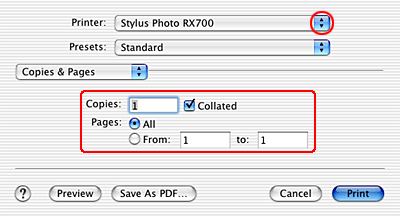
Select Stylus Photo RX700 as the Printer setting, then make the Copies & Pages setting.
|
 |  |
Note:
|
 |  | |
The Copies & Pages settings available are a standard feature of Mac OS X. See your operating system's documentation for details.
|
|
 |
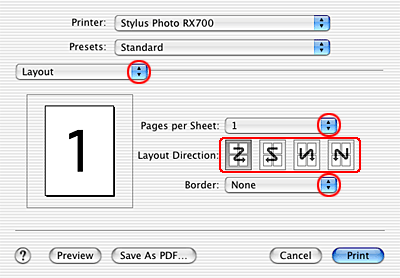
Select Layout from the pop-up menu.
|
 |
Make the following settings.
|
|
Pages per Sheet
|
Prints multiple pages of your document on a single piece of paper. You can choose from 1, 2, 4, 6, 9, or 16.
|
|
Layout Direction
|
Allows you to specify the order in which the pages will be printed on the sheet of paper.
|
|
Border
|
Prints a border around the pages printed on each sheet. You can choose from None, Single hairline, Single thin line, Double hairline, or Double thin line.
|
 |  |
Note:
|
 |  | |
The Layout settings available are a standard feature of Mac OS X. See your operating system's documentation for details.
|
|
 |
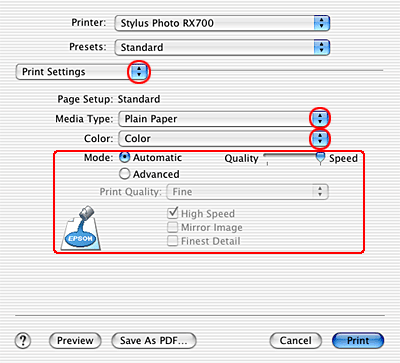
Select Print Settings from the pop-up menu.
|
 |
Make the appropriate Media Type, Color, and Mode settings. See online help for details of Print Settings.
|
After completing the steps above, print one test copy and examine the results before printing an entire job.

[Top]
 Driver settings for Windows
 Driver settings for Mac OS X
Driver settings for Windows
Driver settings for Mac OS X


