Printing / Various Printing Options
Poster Printing
 Driver settings for Windows
 How to make a poster from your printouts
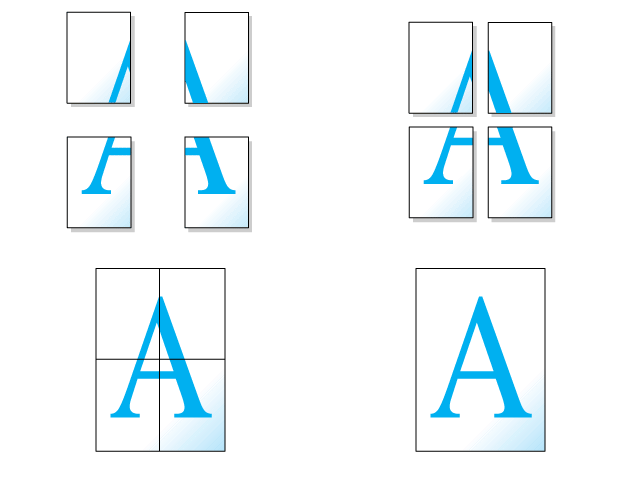
Poster printing allows you to print poster-size images by enlarging one page to cover several sheets of paper.
 |
Note:
|
 | -
This feature is not available with Mac OS X.
|
|
 | -
This feature is not available when selecting the Borderless check box on the Main menu (Windows).
|
|
Driver settings for Windows
 |
Access the printer driver.
|
 |
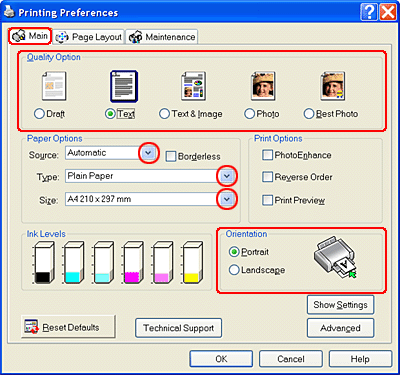
Click the Main tab, then select one of the Quality Options recommended below. For details of other Quality Options, see online help.
|
-
Draft for rough drafts with reduced print quality
-
Text for text-only documents with higher text quality
-
Text & Image for higher quality documents with text and images
-
Photo for good quality and speed
-
Best Photo for the best print quality
 |
Select the tray where paper is loaded as the Source setting.
|
-
Automatic or Back for the back tray
-
Automatic for the front tray
 |
Select the paper type loaded in the tray as the Type setting.
|
 |
Select the paper size of your file as the Size setting. You can also define a custom paper size. For details, see the following section.
|
 |
Select Portrait (tall) or Landscape (wide) to change the orientation of your printout.
|
 |  |
Note:
|
 |  | |
For more print settings, click Advanced. Click Help for more information.
|
|
 |
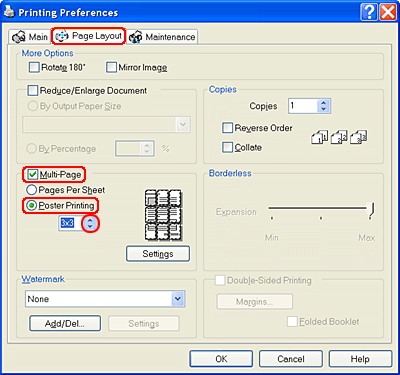
Click the Page Layout tab and select the Multi Page, then select Poster Printing. Click the up or down arrow to select 2x2, 3x3, or 4x4.
|
 |
Click Settings to adjust the way your poster will be printed. The Poster Settings dialog box opens.
|
 |
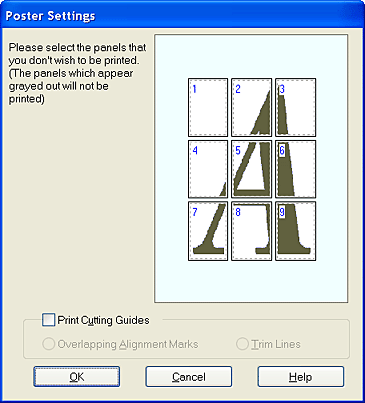
Make the following settings.
|
|
Print Cutting Guides
|
Select this check box to turn the cutting guide options on.
|
|
Overlapping Alignment Marks
|
Slightly overlaps the panels and prints alignment markers so that the panels can be aligned more precisely.
|
|
Trim Lines
|
Prints border lines on the panels to guide you when trimming the pages.
|
 |  |
Note:
|
 |  | |
If you want to print only a few of the panels without printing the entire poster, click the panels that you do not wish to print.
|
|
 |
Click OK to close the Poster Settings dialog box.
|
After completing the steps above, print one test copy and examine the results before printing an entire job.

[Top]
How to make a poster from your printouts
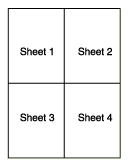
Here is an example of how to make a poster with 2x2 selected under Poster Printing and Overlapping Alignment Marks selected as the print cutting guide. Refer to the accompanying illustrations as well.
 |
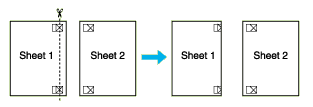
Cut off the margin of Sheet 1 along a vertical line through the center of the top and bottom cross marks, as shown in the illustration below.
|
 |
Place the edge of Sheet 1 on top of Sheet 2 and align the cross marks, then temporarily tape the two sheets together from the back side.
|

 |
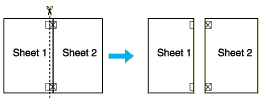
Cut the taped sheets in two along a vertical line through the alignment markers (this time, a line to the left of the cross marks), as shown in the illustration below.
|
 |
Align the edges of the paper together using the alignment markers and tape them from the back side of the paper.
|

 |
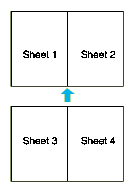
Repeat the instructions from step 1 to step 4 to tape Sheets 3 and 4 together.
|
 |
Repeat the instructions from step 1 to step 4 to tape the top and bottom faces of the paper.
|
 |
Cut off the remaining margins.
|
 |  |
Warning:
|
 |  | |
Be careful when using sharp tools.
|
|

[Top]
 Driver settings for Windows
 How to make a poster from your printouts
Driver settings for Windows
How to make a poster from your printouts


