How To
Scan Multiple Images at Once
 Scan multiple images in the Full Auto Mode
Scan multiple images in the Home Mode
Scan multiple images in the Professional Mode
You can scan multiple photos and documents placed together on the document table, or film and multiple slides as separate images at once.
 |
Note:
|
 | |
Depending on the application, you may not be able to scan multiple images.
|
|
Scan multiple images in the Full Auto Mode
Follow the steps below to scan multiple images in the Full Auto Mode.
 |
Place your materials on your scanner.
|
| |
Note:
|
| | |
Position each photo at least 20 mm apart from its adjacent photos.
|
|
 |
Start EPSON Scan.
|
EPSON Scan automatically previews the images, and recognizes the document source and type.

 |
After EPSON Scan has previewed and recognized the document type, the following window appears.
|
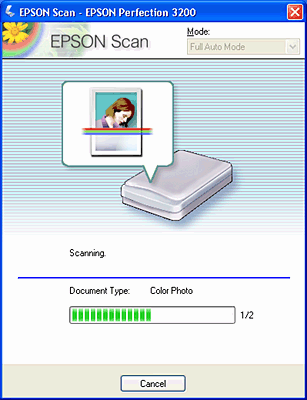
EPSON Scan automatically locates the target images and modifies their skew, and then starts scanning. You can see the number of scanned images.
The scanned images are sent to the application or saved to the specified folder.
|
Note:
|
| -
If EPSON Scan cannot recognize the correct document source, you can specify the document type in the Options dialog box. For details, see the online help.
|
|
| -
Depending on the image you want to scan, you may not get the expected scanned image. In this case, scan the image in the Home Mode or Professional Mode.
|
|

[Top]
Scan multiple images in the Home Mode
Follow the steps below to scan multiple images in the Home Mode.
|
|
Place your materials on your scanner.
|
| |
Note:
|
| | |
Position each photo at least 20 mm apart from its adjacent photos.
|
|
|
|
Start EPSON Scan.
|
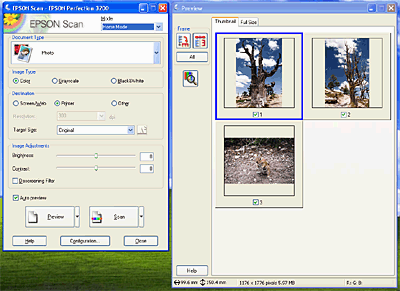
EPSON Scan automatically previews the images, which appear in the Preview window.
| |
Note:
|
| | |
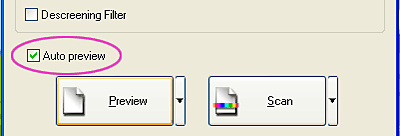
If the Auto preview check box is selected, preview scanning automatically starts when you access the Home Mode. If this check box is cleared, previewed image does not appear automatically. Click Preview.
|
|
|
|
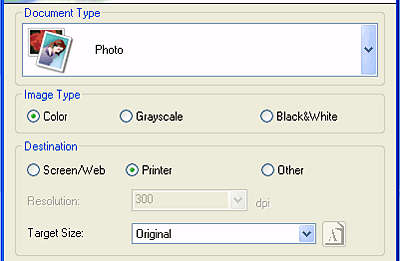
Specify the Document Type, Image Type, and Destination settings to match your images. If necessary, preview the images again by clicking Preview.
|
| |
Note:
|
| | |
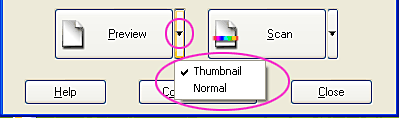
When you select Photo, Positive Film, Color Negative Film, or B&W Negative Film as the Document Type, you can select a preview method: Thumbnail Preview or Normal Preview. Click the small arrow to the right of the Preview button and then select Thumbnail or Normal.
|
|
 |
In the Thumbnail Preview window:
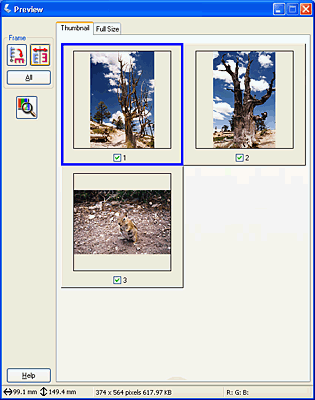
EPSON Scan automatically locates the frames of the film and multiple photos, and then preview the images as thumbnail images. Select the number check box of an image you want to scan.
|
In the Normal Preview window:
Create marquees on the previewed image to select an area you want to scan. You can create up to 50 marquees. For more details, see Using Marquees.

| |
Note:
|
| | |
When the output size of the scanned image is already decided, select an appropriate setting from the Target Size list. A marquee proportionate to the measurements of the Target Size setting appears in the Preview window. You can move this marquee to the area of the image you want to scan. For more details, see the online help.
|
|
 |
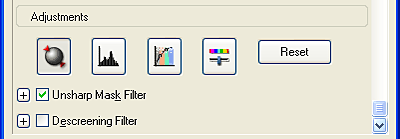
Make adjustments using the image quality adjustment tools, if necessary.
|

 |
Click Scan. EPSON Scan starts scanning.
|
The scanned images are sent to the application or saved to the specified folder.
[Top]
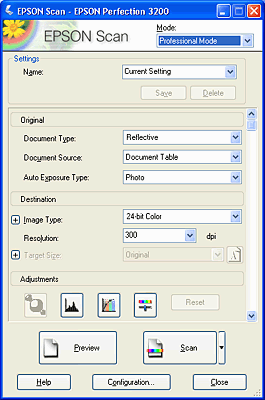
Scan multiple images in the Professional Mode
Follow the steps below to scan multiple images in the Professional Mode.
|
|
Place your materials on your scanner.
|
| |
Note:
|
| | |
Position each photo at least 20 mm apart from its adjacent photos.
|
|
|
|
Start EPSON Scan.
|
The following window appears.
|
|
Specify the Original, Image Type, and Resolution settings to match your images.
|

|
|
Click Preview to preview the images.
|
| |
Note:
|
| | |
When you select Transparency as the Document Type, you can select a preview method: Thumbnail Preview or Normal Preview. Click the small arrow to the right of the Preview button and then select Thumbnail or Normal.
|
|
|
|
In the Thumbnail Preview window:
EPSON Scan automatically locates the frames of the film and multiple photos, and then preview the images as thumbnail images. Select the number check box of an image you want to scan.
|
In the Normal Preview window:
Create marquees on the previewed image to select an area you want to scan. You can create up to 50 marquees. For more details, see Using Marquees.
| |
Note:
|
| | |
When the output size of the scanned image is already decided, select an appropriate setting from the Target Size list. A marquee proportionate to the measurements of the Target Size setting appears in the Preview window. You can move this marquee to the area of the image you want to scan. For more details, see the online help.
|
|
|
|
Make adjustments using the image quality adjustment tools, if necessary.
|
 |
Click Scan. EPSON Scan starts scanning.
|
The scanned images are sent to the application or saved to the specified folder.
[Top]


