|


|
Printing :
Home >
Maintaining Your Printer
If you find that the printout is unexpectedly faint or that dots are missing, you may be able to solve these problems by cleaning the print head, which ensures that the nozzles are delivering ink properly. You can clean the print head from your computer using the Head Cleaning utility in the printer driver or from the printer by using the buttons. For more information on using the printer buttons, see the Basic Operation Guide.
Follow the steps below to clean the print head using the Head Cleaning utility.
The message “Print head cleaning in progress.” appears on the LCD panel while the printer performs the cleaning cycle.
Below are two sample nozzle check patterns: Compare the quality of the printed check page with the sample shown below. If there are no print quality problems, such as gaps or missing segments in the test lines, the print head is fine.
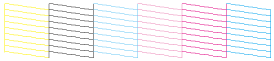 If any segment of the printed lines is missing, as shown below, this could mean a clogged ink nozzle or a misaligned print head.

If the nozzle check page does not print satisfactorily, you may need to repeat the head cleaning and print the nozzle check pattern again.
Follow the steps below to clean the print head using the Head Cleaning utility.
The message “Print head cleaning in progress.” appears on the LCD panel while the printer performs the cleaning cycle.
Below are two sample nozzle check patterns. Compare the quality of the printed check page with the sample shown below. If there are no print quality problems, such as gaps or missing segments in the test lines, the print head is fine.
If any segment of the printed lines is missing, as shown below, this could mean a clogged ink nozzle or a misaligned print head.
If the nozzle check page does not print satisfactorily, you may need to repeat the head cleaning and print the nozzle check pattern again.
|
 Using the Head Cleaning utility for Windows

 See
See 


 Top
Top