 |
 Notice for CD/DVD printing Notice for CD/DVD printing
 Accessing EPSON Print CD Accessing EPSON Print CD
 Positioning the CD/DVD Positioning the CD/DVD
 Printing on a CD/DVD for Windows Printing on a CD/DVD for Windows
 Printing on a CD/DVD for Mac OS X Printing on a CD/DVD for Mac OS X
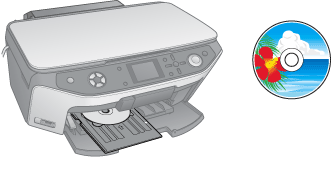
EPSON Print CD bundled with this printer allows you to create CD/DVD labels. After you create the CD/DVD label data, you can print on 12-cm CD/DVD and 8-cm CD/DVD with this printer. Follow the steps described below for CD/DVD printing.
When printing on CD/DVD, keep the following points in mind:
Notice for CD/DVD printing
-
Do not print on the CD/DVD before writing your data to it. If you do, fingerprints, dirt, or scratches on the surface may cause errors while writing data.
-
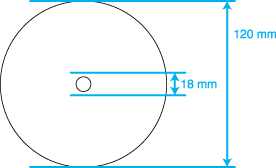
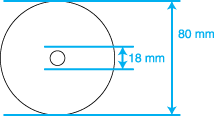
You can set the printable area of a CD/DVD using EPSON Print CD. Set the printable area to fit the printable area of the CD/DVD that you are printing on. When you make settings, note that improper settings may stain the CD/DVD tray, CD, or DVD.
|
12-cm CD/DVD
|
8-cm CD/DVD
|
|
|
|
To access EPSON Print CD, double-click the EPSON Print CD icon on your desktop.
 |
Note: |
 |
|
If the EPSON Print CD icon does not appear on the desktop, click Start, point to Programs or All Programs, point to EPSON Print CD, and then click EPSON Print CD.
|
|
To access EPSON Print CD, double-click the Macintosh HD (default hard disk) icon, the Applications folder, the EPSON Print CD folder, then the EPSON Print CD icon.
 |
Note: |
 |
|
To learn how to use EPSON Print CD, go to the Help menu.
|
|
Follow the steps below to insert the CD/DVD into this printer.
 |
Caution: |
 |
Note: |
 |
|
Before printing on a CD/DVD, it is necessary to clean the roller inside of the printer by making several copies without placing a document on the document table.
|
|
 |
Make sure that the printer is on.
|
 |  |
Caution: |
 |  |
|
Be sure to insert the CD/DVD tray while the power is on. Otherwise, automatic print position adjustment may not take place after inserting the CD/DVD tray.
|
|

 |  |
Caution |
 |  |
|
Do not touch the front tray when operating the tray lever.
|
|
 |  |
Note: |
 |  |
|
Before you move the tray lever, make sure no paper or other objects are on the front tray and the front tray is not extended.
|
|
 |
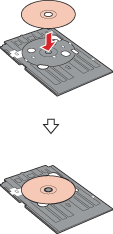
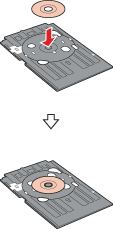
Place the CD/DVD on the CD/DVD tray with the label surface up.
|
 |  |
Note: |
 |  |
|
Use one CD/DVD at a time.
|
|
|
12-cm CD/DVD
|
8-cm CD/DVD
|
|
|
|
 |  |
Caution: |
 |
With the CD/DVD loaded printable side up, gently insert the CD/DVD tray along the base of the front tray until the marks on the CD/DVD tray and the CD/DVD guide match each other.
|

Printing on a CD/DVD for Windows
EPSON Print CD lets you print images on CD/DVD. The following instructions explain how to print on a CD/DVD using EPSON Print CD.
Making the Basic settings
 |
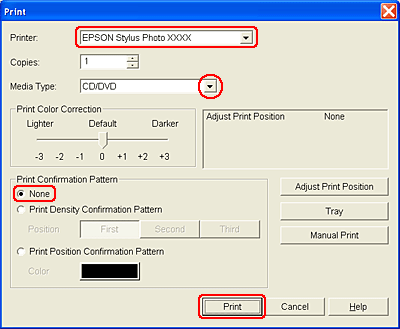
Click Print on the File menu. The Print dialog box appears.
|
 |
Make sure that your printer is selected as the printer.
|
 |
Select CD/DVD or CD/DVD Premium Surface as the Media Type setting.
|
 |
Select None as the Print Confirmation Pattern setting, and then click Print.
|
 |
Note: |
Making the Advanced settings
You can make more complex settings using the printer driver.
 |
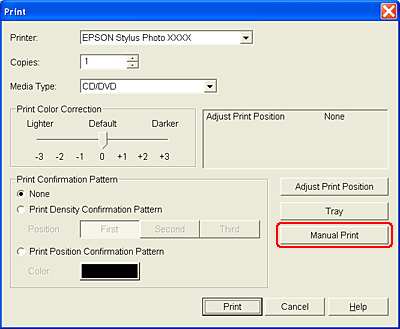
Click Print on the File menu. The Print dialog box appears.
|
 |
Click the Manual Print button.
|
 |
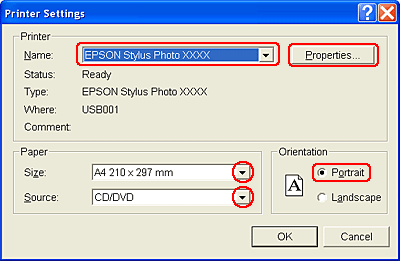
Make sure that your printer is selected as the Name setting.
|
 |
Select A4 as the Size setting.
|
 |
Select CD/DVD as the Source setting.
|
 |
Select Portrait as the Orientation setting.
|
 |
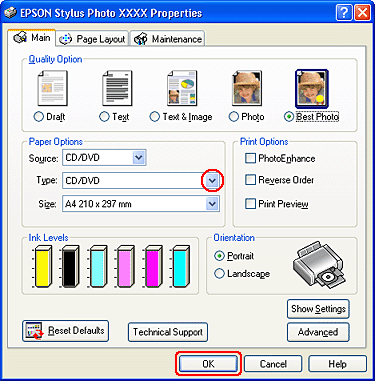
Click Properties to access the printer driver.
|
 |
Select CD/DVD or CD/DVD Premium Surface as the Type setting.
|
 |
Adjust other settings to meet your individual needs.
|
 |
Click OK to close the printer driver.
|
 |
Click OK to print the data.
|
Printing on a CD/DVD for Mac OS X
Making the Basic settings
 |
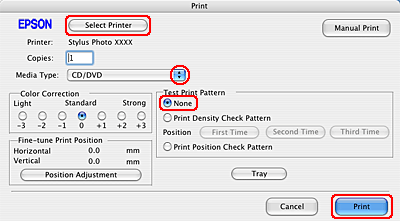
Select Print from the File menu. The Print dialog box appears.
|
 |
Click the Select Printer button.
|
 |
Select your printer from the printer list.
|
 |
Select CD/DVD or CD/DVD Premium Surface as the Media Type.
|
 |
Make sure None is selected as Test Print Pattern setting and click Print.
|
 |
Note: |
Making the Advanced settings
You can make more complex settings using the printer driver.
 |
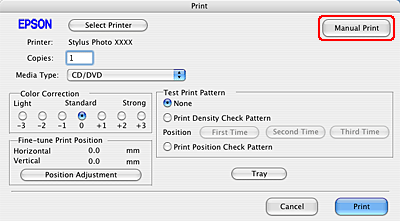
Click Print on the File menu. The Print dialog box appears.
|
 |
Click the Select Printer button.
|
 |
Select your printer from the printer list.
|
 |
Click the Manual Print button to access the Page Setup dialog box.
|
 |
When the following dialog box appears, click OK.
|

 |
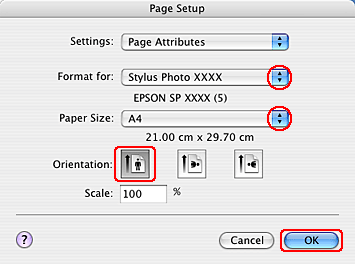
The Page Setup dialog box appears.
|
 |
Make sure that your printer is selected as the Format for setting.
|
 |
Select A4 as the Paper Size setting.
|
 |
Select Portrait as the Orientation setting.
|
 |
Click OK to access the Print dialog box.
|
 |
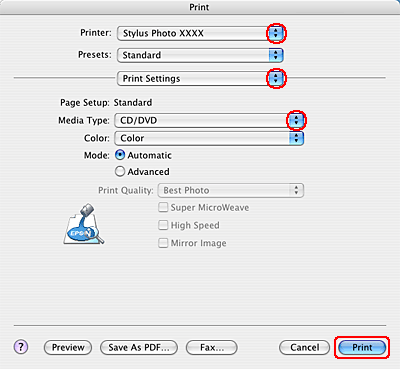
Make sure that your printer is selected as the Printer setting.
|
 |
Select Print Settings.
|
 |
Select CD/DVD or CD/DVD Premium Surface as the Media Type setting.
|
 |
Adjust other settings to meet your individual needs and click Print.
|
|  |


 Notice for CD/DVD printing

 Top
Top


 See
See 


 Start button to resume printing.


