How To / Printing on CD-R
Preparing data
 Accessing EPSON Print CD
Selecting CD-R size for printing
Making background image for label
Editing characters
Printing curved characters
Saving the label data
Accessing EPSON Print CD help
Printing on CD-R
Print cancellation in Windows
Cancel print job while printing
Print cancellation in Macintosh
EPSON Print CD lets you make CD-R labels. Sample images for label background are provided with the software and used in these instructions. Follow the instructions for how to use EPSON Print CD.
Accessing EPSON Print CD
For Windows users
To access EPSON Print CD, double-click the EPSON Print CD icon on the desktop.
 |
Note:
|
 |
If the EPSON Print CD icon does not appear on the desktop, click Start button, point to Programs (for Windows Me, 2000, NT 4.0, 98 and 95) or All Programs (for Windows XP) and point to EPSON Print CD, then click EPSON Print CD.
|
For Macintosh users
To access EPSON Print CD, double-click the Macintosh HD icon, then the EPSON Print CD folder then the EPSON Print CD icon.

[Top]
Selecting CD-R size for printing
For Windows users
 |
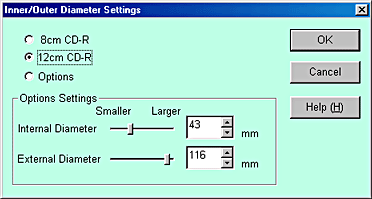
Select Inner/Outer Diameter Settings from the File menu. The Inner/Outer Diameter Settings dialog box opens.
|
 |
Select 8 cm CD-R or 12 cm CD-R and click OK.
|
For Macintosh users
|
|
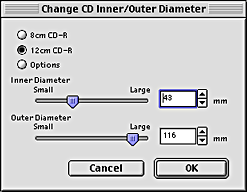
Select Change CD Inner/Outer Diameter from the File menu. The Change CD Inner/Outer Diameter dialog box opens.
|
|
|
Select 8 cm CD-R or 12 cm CD-R and click OK.
|
[Top]
Making background image for label
For Windows
|
|
Click the  button at the left of the edit toolbar. The Select Background dialog box opens. button at the left of the edit toolbar. The Select Background dialog box opens.
|
|
|
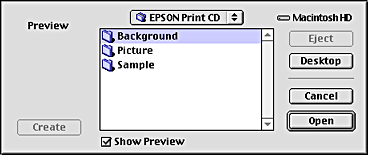
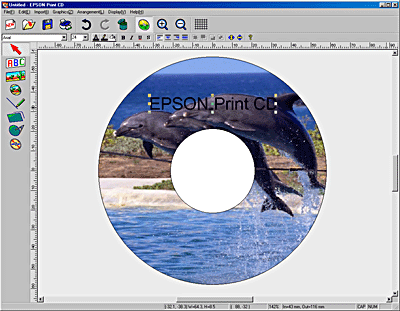
Click Edit Background tab, select the image that you want to use and click OK. The background image that you selected is displayed on the entire label.
|

| |
Note:
|
| | -
The above example uses an image that is included in the EPSON Print CD. When using images taken with digital cameras and saved on your computer, do not click Edit Background tab, but click File to select the folder that contains the images you want to use.
|
| | -
If sample background images are not installed at the time of installation because Compact installation is selected. In that case, insert the printer software CD-ROM into the CD-Drive.
|
| | -
To change background images, click button. The Background Option screen opens. Then click Select Image button on the screen.
|
For Macintosh users
|
|
Click  button on the Tool palette and Adjust Background screen opens. button on the Tool palette and Adjust Background screen opens.
|
|
|
Click Select Background. A window opens that lets you select a background image.
|

 |
Select the Background folder and click Open. The window that lets you to select background images is displayed.
|
| |
Note:
|
| |
The above example uses an image that is included in the EPSON Print CD. When using images taken with digital cameras and saved on your computer, select the folder that contains the images you want to use.
|
 |
Select the background image you want to use and click Open button.
|

 |
Click OK. The selected background image is displayed on the entire label.
|
| |
Note:
|
| |
To change the background image, return to step 1 and reset.
|
[Top]
Editing characters
For Windows
|
|
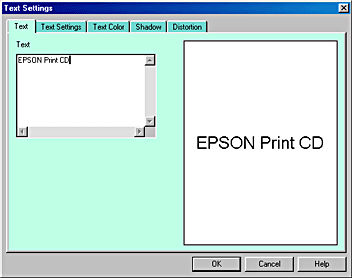
Click the  button at the left end of edit toolbar. The Text Settings dialog box opens. button at the left end of edit toolbar. The Text Settings dialog box opens.
|
|
|
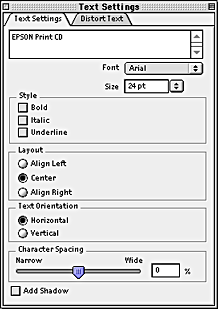
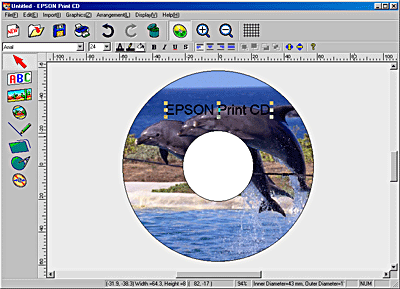
Click Text tab, type characters in the Text textbox and click OK. The characters typed are displayed on the label.
|
| |
Note:
|
| | -
To change the character style, click Text Settings, Text Color, Shadow, and Distortion tabs that are shown above the Text Settings dialog box and make changes in the displayed screen.
|
| | -
To correct the characters once typed, double-click on the characters to open Text Settings dialog box. In the Text Settings dialog box, you can correct characters you have already typed.
|
|
|
Drag the characters that are displayed on the label and move them to the position you want to print.
|
|
|
If you want to type more characters, repeat steps 1-3.
|
For Macintosh
|
|
Click  button on the Tool palette. The Text Settings dialog box opens. button on the Tool palette. The Text Settings dialog box opens.
|
|
|
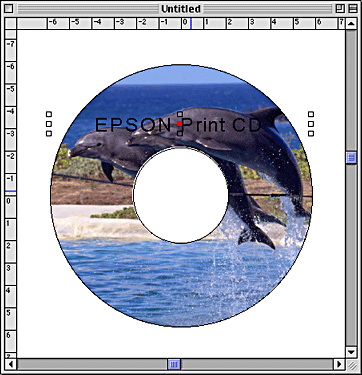
Click Text Settings tab and type characters in the textbox. The characters typed in the textbox are displayed on the label.
|
| |
Note:
|
| | -
You can change character font, size and style in the Text Settings dialog box.
|
| | -
To correct the characters once typed, click on the characters. In the Text Settings dialog box, you can correct characters you have already typed.
|
|
|
Drag the characters that are displayed on the label and move them to the position you want to print.
|
|
|
If you want to type more characters, repeat step 1-3.
|
[Top]
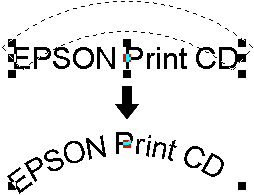
Printing curved characters
For Windows users
|
|
Click  button at the left end of edit toolbar. button at the left end of edit toolbar.
|
|
|
Click the characters that are typed and displayed on the label. Handles are displayed on the corner and the center of the character block.
|
|
|
Drag the red handle displayed in the center of the character block upward or downward. The character block curves to the dragged direction.
|
| |
Note:
|
| | -
When the characters are unevenly aligned either to the right or to the left, click
 button in the character toolbar, so that they are pasted evenly. button in the character toolbar, so that they are pasted evenly.
|
| | -
If you cannot see the handles clearly, remove the background image before proceeding to this step.
|
For Macintosh users
|
|
Click  button on the Tool palette. button on the Tool palette.
|
|
|
Click the characters that are typed and displayed on the label. Handles are displayed in the corner and the center of the character block.
|
|
|
Drag the red handle displayed in the center of the character block upward or downward. The character block curves to the dragged direction.
|
| |
Note:
|
| |
If you cannot see the handles clearly, remove the background image before proceeding to this step.
|
[Top]
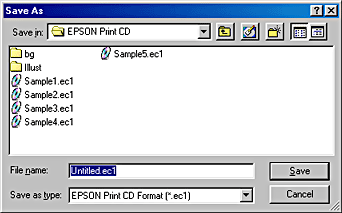
Saving the label data
For Windows users
|
|
Select Save from the File menu. The Save As dialog box opens.
|
|
|
To save the label data, locate a folder and specify a file name and click Save button.
|
For Macintosh users
|
|
Select Save from the File menu. The Save dialog box opens.
|
|
|
To save the label data, locate a folder and specify a file name and click Save button.
|

[Top]
Accessing EPSON Print CD help
For details on EPSON Print CD, you can also view the EPSON Print CD help. How to start EPSON Print CD help is described in this section.
For Windows users
Select Help Topics from the Help menu on the EPSON Print CD window.
For Macintosh users
Select EPSON Print CD Helps from the Apple menu.
[Top]
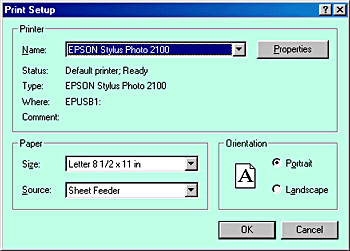
Printing on CD-R
EPSON Print CD lets you print images on CD-Rs. Follow the instruction for how to print on CD-Rs using the EPSON Print CD.
For Windows users
|
|
Select Printer Settings from the File menu. Print Setup dialog box opens.
|
|
|
Select EPSON Stylus Photo 2100 from the Name list box and click Properties.
|
|
|
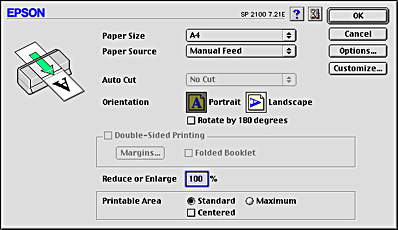
Click the Main tab, and select CD-R from the Media Type list box.
|

|
|
Click the Paper tab, then select Manual Feed Slot from the Paper source list box, A4 from the Paper size list box and Portrait in Orientation.
|

|
|
Click OK to return to Print Setup dialog box.
|
 |
Click OK.
|
 |
Select Print from File menu. Print dialog box opens.
|
 |
Select None in Print Confirmation Pattern and click OK.
|

 |
Caution:
|
| -
Do not change the adjust lever position while printing. Doing so may damage the printer hardware.
|
| -
After CD-R is printed, switch the adjust lever according to the thickness of paper loaded. For plain paper, which is less thick, switch to
 . .
|
|
Note:
|
| -
When ink smears in the print result, adjust the color saturation by referring to Color settings.
|
For Macintosh users
|
|
Select Page Setup from the File menu. Page Setup dialog box opens.
|
|
|
Select Manual Feed from the Paper source list box, A4 from the Paper size list box and Portrait in Orientation.
|
|
|
Click OK to close Page Setup dialog box.
|
|
|
Select Print from File menu. Print dialog box opens.
|
|
|
Select CD-R from the Media Type list box and None in Test Print Pattern and click Print.
|

|
Caution:
|
| -
Do not change the adjust lever position while printing. Doing so may damage the printer hardware.
|
| -
After CD-R is printed, switch the adjust lever according to the thickness of paper loaded. For plain paper, which is less thick, switch to .
|
|
Note:
|
| -
When ink smears in the print result, adjust color saturation by referring to Color settings.
|
[Top]
Print cancellation in Windows
Print cancellation in Windows is described in this section. Follow the instruction below to stop printing while the print job is being executed.
Click the Stop button in Progress Meter displayed at the right end of the toolbar while printing job is executed. Then the print job progress is printed out and the print job ceases.
|
Note:
|
| -
Progress Meter does not appear if EPSON Status Monitor 3 is not installed.
|
[Top]
Cancel print job while printing
In the step described above, your printer does not stop printing until all the print data processed to the computer is printed out. In case print data error occurs for some reason and you want to quit printing immediately, follow the step below.
For Windows Me,98,and 95 users
|
|
Turn off the printer, even while a printing job is being executed. Then the paper loaded for printing is ejected.
|
| |
Note:
|
| |
Data remaining in the print job queue is canceled by turning off the printer.
|
|
|
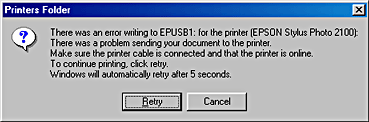
Click Cancel if the screen below appears. It takes time before the screen shows. You can cancel printing by following this step.
|
| |
Note:
|
| | -
When the following screen opens after OK is clicked, click the print data you want to cancel and click Cancel.
|
For Windows XP, 2000 and NT 4.0 users
|
|
Turn off the printer, even while a printing job is being executed. Then the paper loaded for printing is ejected.
|
| |
Note:
|
| |
Data remaining in the print job queue is canceled by turning off the printer.
|
|
|
For Windows 2000 and NT 4.0 users, click Start, point to Settings, then click Printers to open the Printer folder. For Windows XP users, click Start, then click Control Panel, then click Printers and Other Hardware, then click Printers and Faxes to open the Printers and Faxes folder.
|
|
|
Double-click the EPSON Stylus Photo 2100 icon.
|
|
|
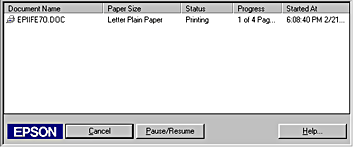
Select Purge Print Documents (for Windows NT4.0) or Cancel All Documents (for Windows 2000 and XP) from the Printer menu. When deleting specific print job data, select the document you want to delete, and then select Cancel Printing from Document menu.
|
| |
Note:
|
| | -
Your print document is not displayed on the Printer Manager (above figure) if the print job has already been sent to the printer. In that case, you can stop printing by turning off the printer.
|
[Top]
Print cancellation in Macintosh
Print cancellation in Macintosh is described in this section. Follow the instruction below to stop printing while a print job is being executed.
Turn off the printer first. Paper loaded for printing is ejected, then delete the print document as follows.
When using the background print
Use EPSON Monitor3 displayed on the screen to stop printing when Background Printing is On.
|
|
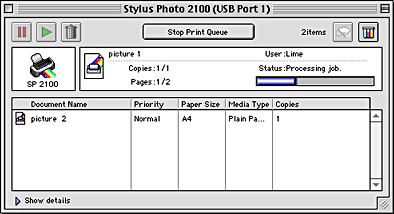
Select EPSON Monitor3 from the Application menu at the right end of the menu bar. The EPSON Monitor3 dialog box opens.
|
|
|
Click the icon of the document you want to delete, then click  . .
|
When the print cancellation dialog box appears, follow the instruction on the screen, then printing stops normally.
| |
Note:
|
When background print is not used
If you are not using the Background Printing, you can stop printing by using Macintosh function.
Press . period key while pressing  Command key.
When the print cancellation dialog box appears, follow the instruction on the screen, then printing stops normally.
|
Note:
|
[Top]

