How To / Printing on CD-R
Notice for CD-R Printing
 Available size of CD-R
Print position adjustment
Color settings
The EPSON STYLUS PHOTO 2100 supports CD-R printing. When printing on the CD-R, keep the following points in mind.
-
Do not print on the CD-R before writing your data to it. If you do, fingerprints, dirt, or scratches on the surface may cause errors while writing data.
-
It is recommended that you attempt to print using some extra CD-Rs.
-
The printed surface can easily be damaged immediately after printing.
-
Let the printed CD-R dry for more than 24 hours. Do not insert the printed CD-R into any CD-ROM drive before it dries completely.
-
Do not let the printed CD-R dry in direct sunlight.
-
Depending on the CD-R type, smearing may occur according to the level of color saturation.
-
If the printed surface is sticky even after it has dried, the color saturation level may be too high. It is recommended that you lower the level in the color saturation setting of EPSON Print CD.
-
Moisture on the printable surface may cause smearing.
-
If you print on a large amount of CD-Rs, it is recommended that you attempt to print using some extra CD-Rs. Then, check the condition of the printed surface after a full day.
-
If the printing is made on the CD-R tray or on the internal transparent compartment by error, wipe it off immediately.
-
The print quality may not be improved if you re-print on the printed label surface.
-
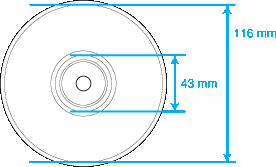
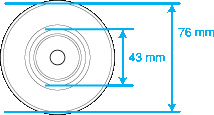
The following specifies the printable area of CD-R.
|
12 cm CD-R
|
8 cm CD-R
|
|
|
Available size of CD-R
EPSON STYLUS PHOTO 2100 allows for printing on two sizes of CD-R: 12 cm and 8 cm.
Use only a CD-R labelled as suitable for printing, for example "Printable on the label surface" or "Printable with ink jet printers".
 |
Note:
|
 | -
For more details on CD-R handling and guidelines for writing data, refer to your CD-R documentation.
|
| -
When CD-R printing, a lower level of color saturation is used compared with EPSON special paper to ensure the print quality.
|
| -
When printing on an 8 cm CD-R, use the attachment provided on the outside of the CD-R before inserting it into the CD-R tray.
|

[Top]
Print position adjustment
If the print position is misaligned after printing, adjust it as follows.
For Windows users
1. Print the print position check pattern
To check the print gap, print the position check pattern first.
 |
Place the CD-R Print Position Check Disk attached to the CD-R tray on the CD-R tray and insert it into the printer.
|
| |
Note:
|
| | -
If the print position check sheet is warped, flatten it before loading it.
|
 |
Double-click the EPSON Print CD icon on the desktop to access EPSON Print CD.
|
| |
Note:
|
| |
If the EPSON Print CD icon does not appear on the desktop, click Start button, point to Programs (for Windows Me, 2000, NT 4.0, 98 and 95) or All Programs (for Windows XP) and point to EPSON Print CD, then click EPSON Print CD.
|
 |
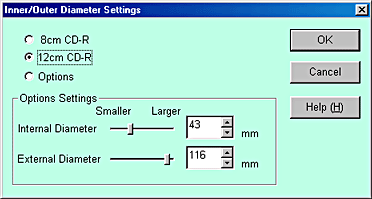
Click Inner/Outer Diameter Settings on the File menu. The Inner/Outer Diameter Settings dialog box opens.
|
 |
Select 12 cm CD-R and click OK.
|
 |
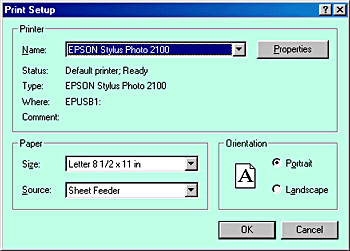
Click Printer Settings on the File menu. The Print Setup dialog box opens.
|
 |
Select EPSON STYLUS PHOTO 2100 from the Name list box and click Properties.
|
 |
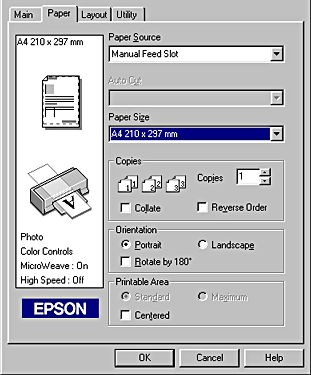
Click the Main tab, then select CD-R from the Media Type list box.
|

 |
Click the Paper tab, then select Manual Feed Slot from the Paper source list box, A4 from the Paper size list box and Portrait in Orientation.
|
 |
Click OK on the Print Setup dialog box.
|
 |
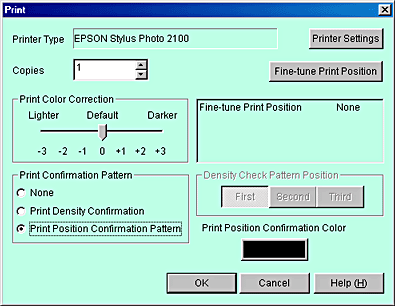
Select Print from the File menu. The Print dialog box opens.
|
 |
Select Print Position Confirmation Pattern in Print Confirmation Pattern and click OK.
|
|  |
Caution:
|
| | -
Do not switch the adjust lever position during printing. It may cause hardware damage.
|
| | -
After the CD-R is printed, switch the adjust lever according to the thickness of paper loaded. For plain paper which is less thick, switch to
 . .
|
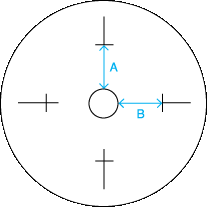
2. Measurement of print position gap
Measure the gap using the printed check sheet. Measure the area as shown in the illustration with a ruler.
|
|
A: HeightB: Width |
|
Note:
|
| -
Position the ruler to pass through the center of the circle when measuring.
|
| -
If you print the position check pattern on the CD-R instead of the check sheet, you may not measure the gap correctly. Make sure to include the internal transparent compartment of the CD-R in the measurement range. Measure the distance from the circumference of CD-R tray's center circle to the horizontal line of the check pattern.
|
3. Save the measured value to the EPSON Print CD
|
|
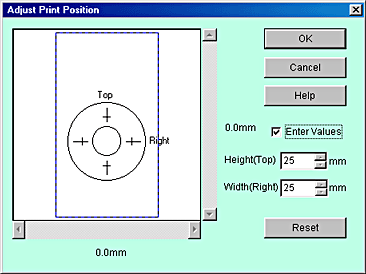
Select Adjust Print Position from the File menu. The Adjust Print Position dialog box opens.
|
|
|
Select the Enter Values check box, then input the measured value to Height (Top) and Width (Right) and click OK.
|
| |
Note:
|
| | -
If you re-install the EPSON Print CD, adjust the settings again.
|
| | -
If you readjust settings after the position gap is found, print the position check pattern after clicking the Reset button.
|
For Macintosh users
1. Print the print position check pattern
To check the print gap, print the position check pattern first.
|
|
Place the CD-R Print Position Check Disk attached to the CD-R tray on the CD-R tray and insert it into the printer.
|
| |
Note:
|
| | -
If the print position check sheet is warped, flatten it before loading it.
|
|
|
Double-click the Macintosh HD icon, then the EPSON Print CD folder then the EPSON Print CD icon.
|
|
|
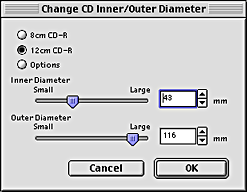
Click Change CD Inner/Outer Diameter on the File menu. The Change CD Inner/Outer Diameter dialog box opens.
|
|
|
Select 12 cm CD-R and click OK.
|
|
|
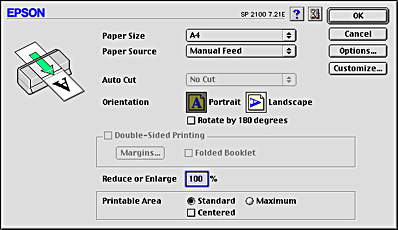
Click Page Setup on the File menu. The Page Setup dialog box opens.
|
|
|
Select Manual Feed from the Paper source list box, A4 from the Paper size list box and Portrait in Orientation.
|
|
|
Click OK to close Page Setup dialog box.
|
|
|
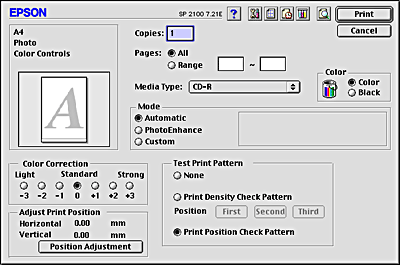
Select Print from File menu. Print dialog box opens.
|
|
|
Select CD-R from the Media Type list box and Print Position Check Pattern in Test Print Pattern and click Print.
|
|
|
Click OK.
|
| |
Caution:
|
| | -
Do not switch the adjust lever position during printing. It may cause hardware damage.
|
| | -
After the CD-R is printed, switch the adjust lever according to the thickness of paper loaded. For plain paper which is less thick, switch to .
|
2. Measurement of print position gap
Measure the gap using the printed check sheet. Measure the area as shown in the illustration with a ruler.
|
|
|
A: HeightB: Width |
|
Note:
|
| -
Position the ruler to pass through the center of the circle when measuring.
|
| -
If you print the position check pattern on the CD-R instead of the check sheet, you may not measure the gap correctly. Make sure to include the internal transparent compartment of the CD-R in the measurement range. Measure the distance from the circumference of CD-R tray's center circle to the horizontal line of the check pattern.
|
3. Save the measured value to the EPSON Print CD
|
|
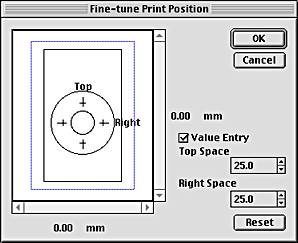
Select Fine-tune Print Position from the File menu. The Fine-tune Print Position dialog box opens.
|
|
|
Select the Value Entry check box, then input the measured value to Top Space and Right Space and click OK.
|
| |
Note:
|
| | -
If you re-install the EPSON Print CD, adjust the settings again.
|
| | -
If you readjust settings after the position gap is found, print the position check pattern after clicking the Reset button.
|
[Top]
Color settings
Adjust color saturation
If the ink smears when CD-R printing, follow the steps below.
Set the color saturation in the Print Color Correction (for Windows) or Color Correction (for Macintosh) in the Print dialog box, and click OK.

|
Note:
|
| -
Ink smearing may differ depending on the type of CD-R even if you print at the same color saturation level.
|
| -
If you want to lower the saturation level, adjust it by Brightness in EPSON Print CD or Contrast in the printer driver.
|
| -
If the color saturation of the printout is low, set the Print Color Correction to Darker (for Windows) or Color Correction to Strong (for Macintosh).
|
| -
To check the print results, let the printout dry for more than 24 hours after the printing.
|
Print the color saturation check pattern
You can print the color saturation check pattern with EPSON Print CD. This check pattern is printed in bands on the label surface of CD-R. You can check the appropriate ink saturation level for your CD-R.
Print the saturation check pattern using the following steps.
|
|
Set the CD-R to check the saturation.
|
|
|
Select Print from the File menu. The Print dialog box opens.
|
|
|
Select Print Density Confirmation in Print Confirmation Pattern (for Windows) or Print Density Check Pattern in Test Print Pattern (for Macintosh) and click Print.
|
[Top]

