 Online problem-solving
 Error indicators
 EPSON Status Monitor
 Running a printer operation check
Problem Solver
Online problem-solving
Error indicators
EPSON Status Monitor
Running a printer operation check
If you are connecting via the USB interface and are having difficulty printing, the problem may be related to your USB connection. Refer to Correcting USB Problems for details.
If your problem is not USB related, troubleshooting printer problems is best handled in two easy steps: first diagnose the problem, and then apply likely solutions until the problem is fixed.
The information that you need to diagnose and solve most common problems is provided by online problem-solving, the printer's control panel, the EPSON Status Monitor utility, or by running a printer operation check. Refer to the appropriate section below.
If you have a specific problem relating to print quality, a printout problem not related to print quality, or a paper feeding problem, or if the printer does not print at all, refer to the appropriate section in this chapter.
To solve a problem, you may need to cancel printing. For details, see Canceling Printing.
You can use online problem-solving to diagnose and solve most of the problems you may encounter. Refer to the appropriate section below.
The Technical Support Web Site provides you with tips to help solve any problems you may encounter when using your printer.
If you encounter a problem, access the Technical Support Web Site in one of the following ways:
Click Start, point to Programs (for users of Windows Me, 98, 95, 2000, and NT 4.0) or All Programs (for users of Windows XP) then to EPSON, and then click ESC82 Problem Solver.
Click Technical Support in the Status Monitor 3 dialog box.
Click Technical Support on the Main menu of the printer software.
If you cannot solve your problem using the Technical Support Web Site, contact your local EPSON office or dealer for assistance.
EPSON's Technical Support Web site provides help with problems that cannot be solved using the troubleshooting information in your printer documentation.
To access the Web site from the printer software CD-ROM, insert the CD in the CD-ROM drive, double-click the EPSON icon, then select Technical Support Web Site and click. 
You can identify many common printer problems using the lights on your printer's control panel. If your printer stops working and the lights are on or flashing, use the following table of panel light patterns to diagnose the problem, and then follow the recommended corrective measures. If the status of the power light is not shown, it is on or flashing.
|
Lights |
Problem and solution |
|
|

|
Paper out |
|
|
No paper is loaded in the printer. |
Load paper in the sheet feeder, and then press the |
|
|

|
Paper jam |
|
|
Paper has jammed in the printer. |
Press the |
|
|

|
Ink low |
|
|
The ink cartridge is nearly empty. |
Obtain a replacement black ink cartridge (T0321), cyan ink cartridge (T0422), magenta ink cartridge (T0423), or yellow ink cartridge (T0424). To determine which cartridge is nearly empty, check the ink level using EPSON Status Monitor 3 (Windows) or EPSON StatusMonitor (Macintosh). |
|
|

|
Ink out |
|
|
The ink cartridge is empty or not installed. |
Replace the black ink cartridge (T0321), cyan ink cartridge (T0422), magenta ink cartridge (T0423), or yellow ink cartridge (T0424) with a new one. If the ink end error occurs after the print head moves to its home position, the ink cartridge may not be installed properly. Reinstall the ink cartridge until it clicks into place. See Replacing an Empty Ink Cartridge for details. |
|
|
Wrong cartridge |
||
|
The currently installed ink cartridge is not compatible with the printer. |
Replace the incompatible cartridge using the appropriate black ink cartridge (T0321), cyan ink cartridge (T0422), magenta ink cartridge (T0423) or yellow ink cartridge (T0424). See Replacing an Empty Ink Cartridge for details. |
|
|

|
Incorrectly installed ink cartridge |
|
|
The ink cartridge is not installed correctly. |
If the print head is at the home position, press the If the print head is at the ink cartridge replacement position, remove and reinsert the ink cartridge. Then, continue with ink cartridge installation. |
|
|

|
Carriage error |
|
|
The print head carriage is obstructed by jammed paper or other foreign material and cannot return to the home position. |
Turn off the printer. Open the printer cover and remove any paper or other obstructions from the paper path by hand. Then, turn the printer back on. If the error does not clear, contact your dealer. |
|
|

|
Unknown printer error |
|
|
An unknown printer error has occurred. |
Turn off the printer and contact your dealer. |
|
The EPSON Status Monitor utility provides status messages and a graphic display showing the current status of the printer.
If a problem occurs while printing, an error message appears in the Progress Meter window.
When the ink is out, click How To in the EPSON Status Monitor or Progress Meter window, and EPSON Status Monitor will lead you step by step through the cartridge replacement procedure.
If you are unable to determine the source of the problem, performing a printer operation check can help you determine whether the problem comes from the printer or the computer.
To print a printer operation check page, follow these steps.
 | If you use the parallel interface, make sure both the printer and computer are turned off. If you use the USB interface, make sure the PC is on and the printer is turned off. |
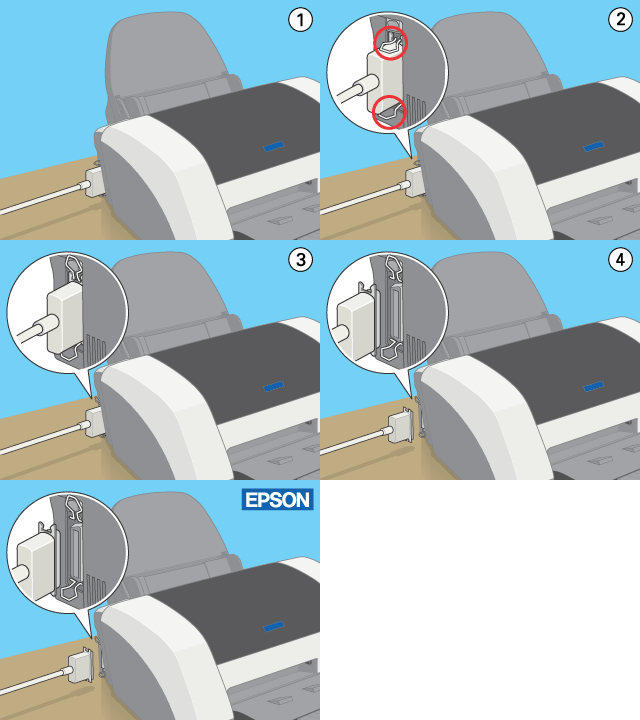
 | Disconnect the cable from the printer's interface connector. |
If you use the parallel interface, unlock the wire clips on both sides of the interface connector and remove the ground connector, if necessary. Then, disconnect the cable from the printer's interface connector.
If you use the USB interface, make sure your PC is on when connecting the cable; otherwise, the PC may not recognize the printer.

 | Make sure that A4 or Letter size paper is loaded in the sheet feeder. |
 |
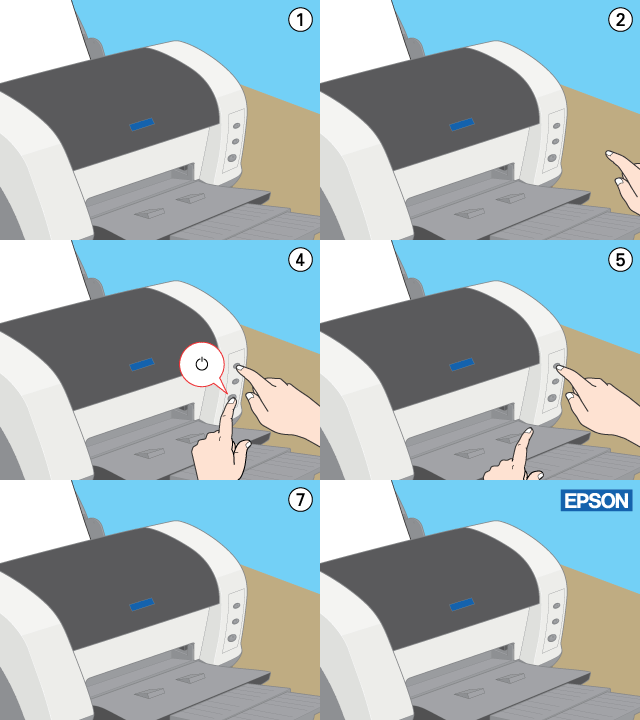
Hold down the  paper button and press the paper button and press the  power button to turn on the printer. Then, release only the power button to turn on the printer. Then, release only the  power button. When the printer starts the operation check, release also the power button. When the printer starts the operation check, release also the  paper button. paper button.
|

The printer prints an operation check page that includes the version of your printer's ROM, the ink counter code, and a nozzle check pattern.
Compare the quality of the printed test page with the sample shown below. If there are no print quality problems, the printer itself is fine and the problem probably lies with the printer software settings, the application settings, the interface cable (be sure to use a shielded cable), or the computer itself.

If the check page does not print satisfactorily, there is a problem with the printer. For example, if bands appear in the check pattern, as shown below, this could mean a clogged ink nozzle or a misaligned print head.

 Next |