 EPSON StatusMonitorNozzle CheckHead CleaningPrint Head AlignmentConfiguration
Printer Software Functions / For Users of Mac OS 8.1 or Later (Except Mac OS X)
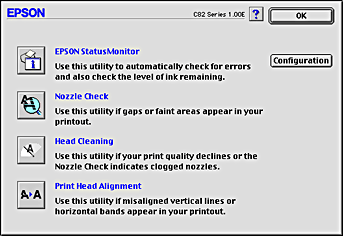
EPSON printer utilities allow you to check the current printer status and to perform printer maintenance from your computer.
To use the utilities, click the  Utility icon button in the Print or Page Setup dialog box, and then click the button for the utility that you want to use.
| Note: |
|
Refer to the appropriate section below.
The StatusMonitor utility monitors the printer status. If it detects a printer error, it will inform you with an error message.
You can also use this utility to check how much ink is remaining before printing.
To use the EPSON StatusMonitor, click the EPSON StatusMonitor button in the Utility dialog box. For details, see Using EPSON StatusMonitor.
The Nozzle Check utility checks the print head nozzles for clogging. Check the nozzles if you notice print quality has declined and after cleaning, to confirm that the print head nozzles have been cleared. If the nozzle check indicates that the print head needs cleaning, you can access the Head Cleaning utility directly from the Nozzle Check utility. For details, see Checking the Print Head Nozzles.
The Head Cleaning utility cleans the print head. You may need to clean the print head if you notice print quality has declined. Use the Nozzle Check utility first to confirm that the print head needs to be cleaned. For details, see Cleaning the Print Head.
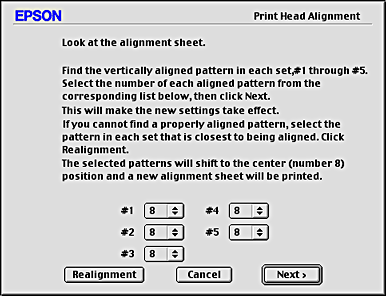
The Print Head Alignment utility can be used to improve the print quality of your documents. The print head alignment may need to be adjusted if vertical lines appear out of alignment or if white, black, dark, or light banding appears in your documents. Follow the on-screen instructions for using this utility.
| Note: |
|
When you use this utility, the printer prints the following four different types of test patterns, which are used to check the print head alignment:
- Black vertical alignment sheet
- Color vertical alignment sheet
- Black horizontal alignment sheet
- Color horizontal alignment sheet
Click Skip in the Print Head Alignment dialog box to skip the alignment that you do not need.
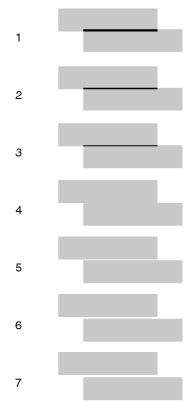
The following are examples of the black vertical alignment sheet that are printed by the printer first.

From each pattern on the printed test sheet, choose the vertical line that is aligned best. For each pattern, select the corresponding line number from the appropriate list in the Print Head Alignment dialog box, and then click Next. The new settings are put into effect.
| Note: |
|
Click Print in the Print Head Alignment dialog box. The color vertical alignment sheet is printed. In the same way as for the black vertical alignment, select, for each of the four patterns, the line number that corresponds to the best aligned vertical line in the color vertical alignment sheet. Then, click Next. The new settings are put into effect.
Click Print in the Print Head Alignment dialog box. The black horizontal alignment sheet is printed. The following are examples of the black horizontal alignment sheet.
Look for a pattern that does not contain any black or white banding. Next, select the corresponding pattern number from the appropriate list in the Print Head Alignment dialog box. Then click Next. The new settings are put into effect.
| Note: |
|
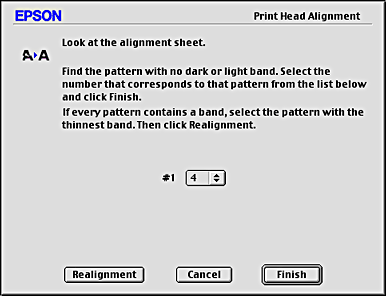
Click Print in the Print Head Align is printed. In the same way as for the black horizontal alignment sheet, select the pattern number that corresponds to the pattern in the color horizontal alignment sheet that does not contain any dark or light banding. Then, click Finish. The new settings are put into effect.
Click this button to open the Configuration dialog box, where you can change the method by which the EPSON StatusMonitor utility notifies you when the printer status changes. For details, see Using the Configuration Settings dialog box.
 Previous |
 Next |
 paper button to cancel printing while printing a test pattern with the Print Head Alignment utility.