Problem Solver
Print Quality Problems
 Horizontal banding
 Vertical misalignment or banding
 Incorrect or missing colors
 Blurry or smeared printout
 Print quality does not improve after head cleaning
If you are having print quality problems, first perform a . Then, compare your test printing with the illustrations below. Click the caption under the illustration that best resembles your printout.
Horizontal banding
Try one or more of these solutions:
-
Make sure that the printable side of the paper is face up in the sheet feeder.
-
Run the Head Cleaning utility to clear any clogged ink nozzles. Windows Me, 98, or 95 users can start the now.
-
Run the Print Head Alignment utility. Windows Me, 98, or 95 users can start the now.
-
Clear all customized settings by selecting Automatic as the Mode setting on your printer software's Main menu (Windows) or in the Print dialog box (Macintosh).
-
Make sure that Maximum is not selected as the Printable Area setting in your printer software. When this setting is selected, banding may occur in the expanded area.
-
Make sure that the Media Type selected in the printer software is appropriate for the type of media loaded in the printer.

[Top]
Vertical misalignment or banding
Try one or more of these solutions:
-
Make sure that the printable side of the paper is face up in the sheet feeder.
-
Run the Print Head Alignment utility. Windows Me, 98 or 95 users can start the now.
-
Run the Head Cleaning utility to clear any clogged ink nozzles. Windows Me, 98 or 95 users can start the now.
-
Make sure that the Media Type setting selected in the printer software is appropriate for the type of media loaded in the printer.

[Top]
Incorrect or missing colors
Try one or more of these solutions:
-
Run the Head Cleaning utility. Windows Me, 98 or 95 users can start the now. If colors are still incorrect or missing, replace the color ink cartridge. If the problem persists, replace the black ink cartridge. See Replacing an Empty Ink Cartridge.
-
Do not use ink cartridges beyond the expiration date printed on the cartridge package. Also, if the printer has not been used for a long time, replace the ink cartridges. See Replacing an Empty Ink Cartridge.

[Top]
Blurry or smeared printout
Try one or more of these solutions:
-
Make sure that you are using the appropriate printer driver for your printer.
-
Use only paper recommended by EPSON.
-
Make sure that the printer is on a flat, stable surface that extends beyond the printer base in all directions. The printer will not operate properly if it is tilted.
-
Make sure that your paper is not damaged, dirty, or too old. Also, make sure that the printable side of the paper is face up in the sheet feeder.
-
Make sure that your paper is dry and that the printable side is facing up. Also, make sure that you are using an acceptable paper type. See Paper for specifications.
-
Clear all customized settings by selecting Automatic as the Mode setting on your printer software's Main menu (Windows) or in the Print dialog box (Macintosh).
-
If the paper is curled toward the printable side, flatten it or curl it slightly toward the opposite side.
-
Set the adjust lever to the
 position, and make sure that the Media Type setting in your printer driver is correct.
-
Remove each sheet from the output tray as it is printed, especially if you are using transparencies.
-
If you are printing on glossy media or transparencies, place a support sheet (or a sheet of plain paper) beneath the stack. Or, load only one sheet at a time.
-
Do not touch or allow anything to come into contact with the printed side of transparencies or paper with shiny finishes. After printing, documents that are printed on transparencies or glossy media should not be handled for a few hours to allow the ink to set.
-
Run the Head Cleaning utility. Windows Me, 98 or 95 users can start the now.
-
Run the Print Head Alignment utility. Windows Me, 98 or 95 users can start the now.
-
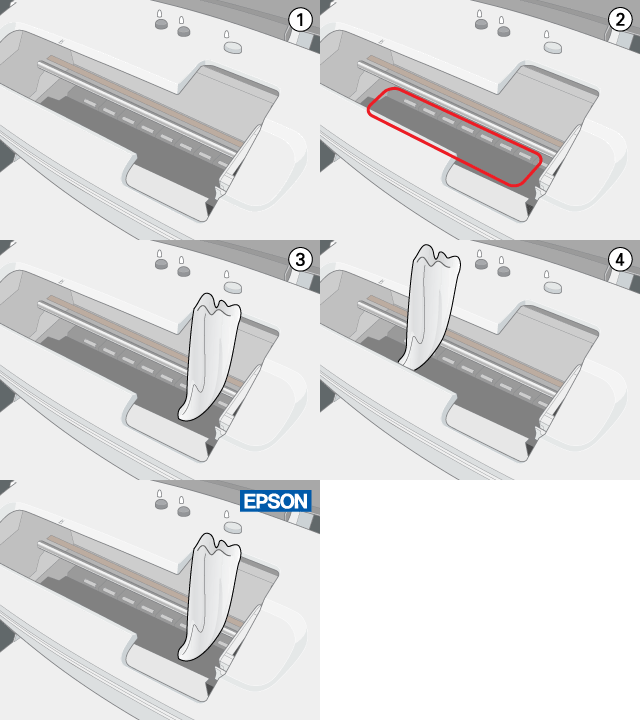
Load and eject dry paper several times. If the problem persists, ink may have leaked inside the printer, so wipe the inside of the printer with a soft, clean cloth.

 |  |
Warning:
|
 |  |
Be careful not to touch the gears inside the printer.
|

[Top]
Print quality does not improve after head cleaning
If the quality of your printouts remains poor even after repeatedly cleaning and aligning the print head, one or some of the ink cartridges may be old or damaged and should be replaced.
To replace an ink cartridge before the Status Monitor notifies you that the cartridge is empty, see Replacing an Ink Cartridge.

[Top]
 Horizontal banding
 Vertical misalignment or banding
 Incorrect or missing colors
 Blurry or smeared printout
 Print quality does not improve after head cleaning
Horizontal banding
Vertical misalignment or banding
Incorrect or missing colors
Blurry or smeared printout
Print quality does not improve after head cleaning


 ink out light. If the light is flashing, replace the appropriate ink cartridge. See Replacing an Empty Ink Cartridge for details.
 position, and make sure that the Media Type setting in your printer driver is correct.


