Replacing the Photo Cartridge
Replacing the Photo Cartridge
 Replacement instructions
Using the EPSON Status Monitor to view instructions
This printer uses photo cartridge equipped with an IC chip. The IC chip accurately monitors the amount of ink, so even if it is removed and later reinserted, all of its ink can be used. However, some ink is consumed each time the cartridge is inserted because the printer automatically checks reliability.
You can replace the photo cartridge using the EPSON Status Monitor utility. Refer to the appropriate section below for instructions.
 |
Warning:
|
 | -
Keep photo cartridges out of the reach of children. Do not allow children to drink from or otherwise handle the cartridges.
|
|
| -
Be careful when you handle used photo cartridges, as there may be some ink around the ink supply ports. If ink gets on your skin, wash the area thoroughly with soap and water. If ink gets into your eyes, flush them immediately with water. If discomfort or vision problems remain after a thorough flushing, see a doctor immediately.
|
|
 |
Caution:
|
| -
Epson recommends the use of genuine Epson photo cartridges. Epson warranties do not cover damage to your printer caused by the use of ink cartridges not manufactured by Epson.
|
|
| -
Leave the old cartridge installed in the printer until you have obtained a replacement; otherwise, ink remaining in the print head nozzles may dry out.
|
|
| -
Do not refill photo cartridges. The printer calculates the amount of ink remaining using an IC chip on the photo cartridge. Even if the cartridge is refilled, the amount of ink remaining will not be recalculated by the IC chip and the amount of ink available for use will not change.
|
|
 |
Note:
|
| |
In addition to the ink used during an image printing, ink is consumed during the print head cleaning operation, during the self-cleaning cycle which is performed when the printer is turned on, and during ink charging when the photo cartridge is installed in the printer.
|
|
For more information about photo cartridges, see the Safety Instructions.
Replacement instructions
 |
Make sure that PictureMate is on, but not printing.
|
| |
Note:
|
 |
Check that the message "Ink out." is displayed on the LCD panel. This message is not displayed if there is some ink left.
|
 |
Close the paper support and paper feeder.
|
 |
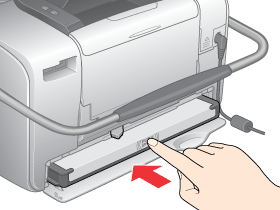
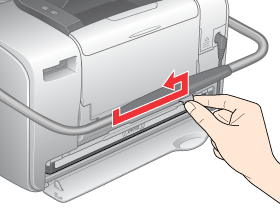
Move the handle to the cartridge replacement position.
|
 |
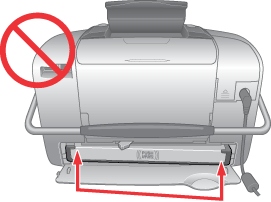
Open the cartridge compartment cover on the back of the printer.
|
 |
Set the cartridge lock lever in the Release position by sliding the lever to the right, then down and to the left. The photo cartridge will be ejected about halfway out of the holder. Pull the cartridge out of the printer and dispose of it properly.
|
| |
Note:
|
| | -
Do not take the used cartridge apart or try to refill it. Do not shake the used photo cartridge; otherwise, it may leak.
|
|
| | -
The photo cartridge must be replaced when any one of the colors is depleted. The rate that a specific color of ink is consumed depends on the images printed.
|
|
 |
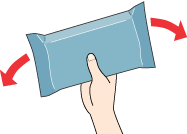
For best results, shake the new photo cartridge four or five times before opening the package.
|
 |
Remove the replacement photo cartridge from its package.
|
| |
Caution:
|
| | -
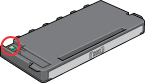
Do not touch the green IC chip on the bottom of the cartridge. This can damage the photo cartridge.
|
|
| | -
If you remove the photo cartridge for later use, be sure to protect the ink supply ports from dirt and dust; store it in the same environment as the printer. Note that there is a valve in the ink supply ports, making covers or plugs unnecessary, but care is needed to prevent the ink from staining items that the cartridge touches. Do not touch the ink supply ports or surrounding area.
|
|
| | -
Be sure to always install a photo cartridge into the printer immediately following the removal of the current photo cartridge. If a photo cartridge is not installed promptly, the print head may dry out, rendering it unable to print.
|
|
 |
Place the cartridge properly into the cartridge holder, then push it in until you feel resistance and hear the cartridge faintly click into place.
|
| |
Note:
|
| | |
After installing the cartridge, make sure the sides of the cartridge are even. If either side of the cartridge sticks out, push the side of the cartridge until it clicks.
|
|
| |
Warning:
|
| | |
If ink gets on your hands, wash them thoroughly with soap and water. If ink gets into your eyes, flush them immediately with water. If discomfort or vision problems continue after a thorough flushing, see a doctor immediately.
|
|
 |
Set the lever to the Lock position by sliding it in the direction shown.
|
 |
Close the cartridge compartment cover.
|
|
Note:
|
| |
If you cannot close the cartridge compartment cover, the photo cartridge is not installed correctly. Go back to the Step 5 and eject the photo cartridge. Then install the photo cartridge again.
|
|

[Top]
Using the EPSON Status Monitor to view instructions
You can monitor the remaining ink level from your computer and view on-screen instructions for replacing a low or empty photo cartridge using EPSON Status Monitor 3 (Windows) or EPSON StatusMonitor (Macintosh).
When a photo cartridge is low or empty, click How to in the EPSON Status Monitor window. Follow the on-screen instructions to replace the cartridge.
For more information on using EPSON Status Monitor, see the section below.
 See Using EPSON Status Monitor 3 for Windows
See Using EPSON StatusMonitor for Macintosh
[Top]
