Maintaining PictureMate
Aligning the Print Head
 Using the Print Head Alignment utility
Using the control panel buttons
If you have moved PictureMate and print quality is not as good as it was before — for example, you see misaligned vertical lines or light or dark horizontal banding — you may need to align the print head.
Using the Print Head Alignment utility
For Windows
Follow the steps below to align the print head using the Print Head Alignment utility.
 |
Check that no warnings or errors are displayed on the LCD panel.
|
 |
Make sure that paper is loaded in the paper feeder.
|
 |
Access the printer software.
|
 |
Click the Maintenance tab, then click the Print Head Alignment button.
|
 |
Follow the on-screen instructions to align the print head.
|
For Mac OS X
Follow the steps below to align the print head using the Print Head Alignment utility.
|
|
Check that no warnings or errors are displayed on the LCD panel.
|
|
|
Make sure that paper is loaded in the paper feeder.
|
|
|
Access the EPSON Printer Utility dialog box.
|
|
|
Click the Print Head Alignment button in the Utility dialog box.
|
|
|
Follow the on-screen instructions to align the print head.
|
For Mac OS 9
Follow the steps below to align the print head using the Print Head Alignment utility.
|
|
Check that no warnings or errors are displayed on the LCD panel.
|
|
|
Make sure that paper is loaded in the paper feeder.
|
|
|
Access the Print or Page Setup dialog box.
|
|
|
Click the  Utility icon button, then click the Print Head Alignment button. Utility icon button, then click the Print Head Alignment button.
|
|
|
Follow the on-screen instructions to align the print head.
|

[Top]
Using the control panel buttons
|
|
Make sure that the printer is turned on and no warnings or errors are displayed on the LCD panel.
|
|
|
Load a sheet of photo paper.
|
|
|
On the Main Menu, or after selecting photos, press Menu.
|
|
|
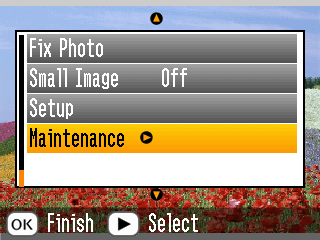
Press  or or  to highlight Maintenance, then press to highlight Maintenance, then press  . .
|
|
|
Press or to highlight Align Print Head, then press .
|
 |
Confirm the messages on the LCD panel, then press Print to start head alignment.
|
 |
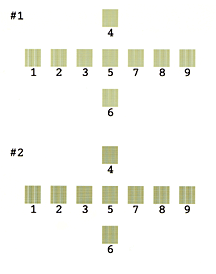
The following alignment sheet is printed.
|
 |
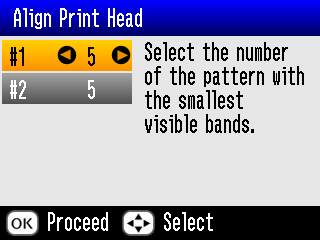
Look at the alignment pattern in each set and find the patch which is most evenly printed, with no noticeable streaks or lines.
|
 |
Press  or to highlight the number for the best pattern (1 to 9) in set #1, then press . or to highlight the number for the best pattern (1 to 9) in set #1, then press .
|
 |
Press or to highlight the number for the best pattern (1 to 9) in set #2, then press OK.
|
 |
Press OK to exit the alignment screen. The Maintenance Menu appears on the screen.
|
[Top]

