How To / Scan in a Network Environment
Network Scanning Procedure
 Starting EPSON Scan settings
EPSON Scan works with the optional EPSON Network Image Express Card (B80839 ) together to enable direct control of all of the features of your EPSON scanner in a network environment. If you need to set up the client computer, see Setting up the Client Computer.
 |
Note:
|
 | |
EPSON Network Image Express Card is not available in some areas.
|
|
To use your scanner in a network environment and send scanned images to a client computer, be sure to perform the following steps.
 |
Set up Network Image Express Card and your scanner. For details, refer to Network Image Express Card's User's Guide.
|
 |
Start EPSON Scan from the client computer.
|
 |
Change the basic settings to optimize images manually and then scan an image.
See Scanning an Image for details.
|
Starting EPSON Scan settings
Before starting it, be sure that the EPSON scanner and Network Image Express Card are turned on and working properly. Follow the steps below to change the EPSON Scan settings and enables network scanning.
|
Note:
|
| |
On Windows XP, 2000, and NT 4.0, only users with the Administrator's right can set the network address.
|
|
|
|
Obtain the IP address or host name of the Network Image Express from your network administrator.
|
 |
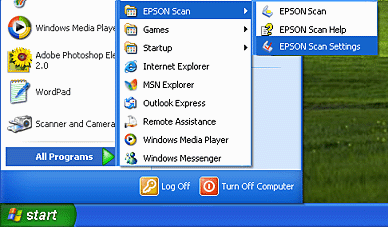
Start EPSON Scan Settings. Click Start, point to All Programs (for Windows XP users) or Programs (for Windows Me, 98, 2000, and NT 4.0 users) and EPSON Scan, and then select EPSON Scan Settings.
|
|
|
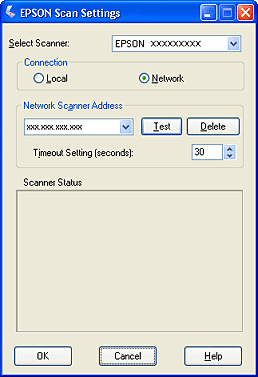
Select your scanner from the Select Scanner drop-down list.
|
|
|
Change the Connection setting to Network. Enter the Network Image Express's IP address or host name in the Network Scanner Address field.
|
 |
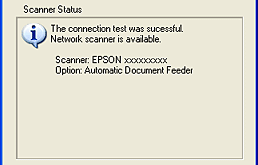
Click Test to check the connection. If everything is worked properly, successful message appears under Scanner Status in the dialog box.
|
 |
Click OK to save the settings and close the dialog box.
|

[Top]


