 Image Type list
 Image Type button
Scanner Software Functions / Manual Mode Window
Image Type list
Image Type button
Use the Image Type list to select from a variety of predefined and user-defined settings, or use the Image Type button to make detailed changes to settings and to save custom settings.

The Image Type list provides the predefined settings described below. There is a predefined setting to suit most image types, so EPSON recommends using the predefined settings first. Click the arrows on the right to view all of the available settings. If you later want to make fine adjustments to the Image Type setting, use the Image Type button. See Image Type button for details.
24-bit color, best quality
This setting is useful when scanning color photos.
24-bit color and best quality with de-screening to remove moiré patterns
This setting is useful when scanning magazines or catalogs in color. For information on moiré patterns, see Moiré (cross-hatch) patterns appear in the scanned image.
8-bit gray, best quality
This setting is useful when scanning black and white photos.
8-bit gray, best quality with de-screening to remove moiré patterns
This setting is useful when scanning magazines or catalogs in black and white. For information on moiré patterns, see Moiré (cross-hatch) patterns appear in the scanned image.
24-bit color, best quality with color smoothing
This setting is useful when scanning large areas of solid colors (for example, logos, illustrations, and charts).
Black and white, draft quality
This setting is useful when scanning characters-only documents or line drawings without coloring.
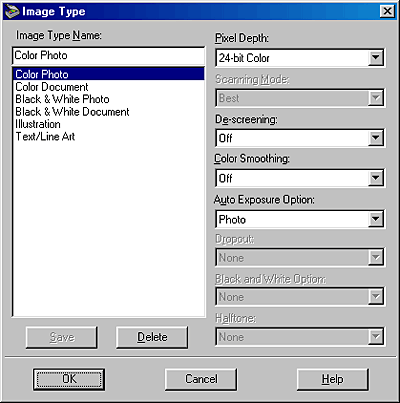
The Image Type button opens the Image Type dialog box, where you can customize the Image Type settings described in this section.
Click the Image Type button. The following dialog box appears.

To save the settings you made as a group of custom settings, type a new name in the Image Type Name box, then click Save. To delete an Image Type setting, select the setting name then click Delete.
To apply the settings you made, click OK. To cancel the settings, click Cancel.
| Note for Windows users: |
|
The names of predefined settings and any custom settings you have saved appear in the Image Type Name list.
Select scanning colors from:
24-bit Color
8-bit Gray
Black & White
| Note: |
|
Select either On or Off. When On is selected, moiré patterns are automatically removed from scanned images, but scanning takes longer. For information on moiré patterns, see Moiré (cross-hatch) patterns appear in the scanned image.
| Note: |
|
Select either On or Off. When On is selected, colors in an image are related to a limited number of index colors. This is useful when scanning large areas of solid colors (for example, logos, illustrations, and charts).
| Note: |
|
|
|
Allows you to specify the kinds of adjustments made by the Auto Exposure feature. When Photo is selected, Auto Exposure activates and optimizes image enhancement for photographic image source. When Document is selected, Auto Exposure optimizes image enhancement for printed matters, such as brochure, magazine or newspaper. When scanning photographs or documents which contain high quality images, select Photo. Select Document when scanning printed text.
You can see the effects of the Auto Exposure Option setting in the Preview window when you click the  Auto Exposure button.
| Note: |
|
Select a color to subtract from a black and white scan of a colored original. Proper use of dropout can improve the quality of your black and white scans. Available dropout options are:
None, Red, Green, and Blue.
| Note: |
|
|
 Previous |
 Next |