 |
|
|||
 |
||||
Configuring the Network Interface
This section explains how to configure the printer’s network interface with a computer using the bundled EpsonNet Config software.
Using EpsonNet Config
Starting EpsonNet Config
 Note:
Note:|
To install EpsonNet Config, see Accessing the Printer from Another Computer.
|
Windows
 |
Make sure that the printer is turned on.
|
 |
Click the Start button (or Start), Programs (or All Programs), EpsonNet, EpsonNet Config V3, and then EpsonNet Config.
|
For Windows Vista: Click Continue in the User Account Control dialog box.
Note:|
If the following screen appears, verify that the publisher is SEIKO EPSON, and click Unblock. If you click Keep blocking, register EpsonNet Config (Windows) in Windows Firewall. If commercially available firewall software is installed, the corresponding screen may appear. See the software User’s Guide, and allow the communication temporarily.
|
Mac OS X
|
Make sure that the printer is turned on.
|
|
Double-click the Macintosh HD icon then the Applications folder.
|
Note:|
If the Macintosh HD icon name has been changed, double-click the icon of the hard disk running Mac OS X.
|
 |
Double-click the EpsonNet folder and then the EpsonNet Config folder.
|
 |
Double-click the EpsonNet Config icon to start the software.
|
Setup Procedure
Below is an example of using EpsonNet Config for Windows. The same procedure will apply to EpsonNet Config for Mac OS X.
Note:|
For details on the setting screens and menu bar, see the EpsonNet Config Help.
|
|
Select the printer from the printer list.
|
Note:|
If the printer’s IP address remains the default, the printer name may not appear. In this case, distinguish the printer by the MAC address. Also, if there are multiple printers, distinguish by the MAC address. The MAC address can be checked on the printer’s control panel or network status sheet.
|
|
Click Configuration.
|
|
Items that can be viewed or edited are shown in the left hand pane of the Device Interface Properties window.
|
|
When the settings are complete, click Transmit.
|
 |
Enter the password.
|
Note:|
When setting for the first time, click OK to set the password. If the password is already set, type the password in the Password field and click OK.
|
 |
After a few moments the Transmission is complete screen will appear. Then press OK.
|
 |
After approximately three minutes, click Refresh to check the settings.
|
Note:|
It takes up to three minutes to activate the settings. Keep the printer turned on.
|

Using WCN (Windows Connect Now)
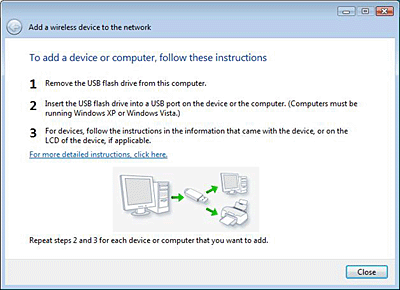
WCN (Windows Connect Now) allows you to set the wireless security automatically when using a USB flash drive in Windows XP with Service Pack 2 (SP2) or Windows Vista. Use the Wireless Network Setup Wizard to save the network settings to a USB flash drive, then use the printer’s control panel to load the settings from the USB flash drive to the printer.
Note:|
Wireless Connect Now cannot be used if the wireless security type is set to WPA-PSK (AES). USB flash drives with built-in USB hub functionality cannot be used.
|
Using the Windows Connect Now wizard in Windows Vista
|
Click the Start button, select Network then Add a wireless device.
|
|
Click I want to add a wireless device or computer that is not on the list, using a USB flash drive.
|
|
Click Add the device or computer using a USB flash drive.
|
Note:|
If Add a wireless device was previously used, the network selection screen appears. To use settings previously configured on the printer, select a network from the list, and click Next to go to Step 7. To configure new settings, select Create a New Wireless Network Profile, and then click Next.
|
|
Enter the printer’s access point SSID in Network name (SSID), and then click Next.
|
Note:|
If WPA-PSK (TKIP) is used as the encryption method (security), select the Use WPA encryption instead of WEP (WPA is stronger than WEP but not all devices are compatible with WPA) checkbox, and then click Next.
|
|
Click Show advanced network security options.
|
|
Select Security method.
|
Note:|
If WPA-PSK (TKIP) is used as the encryption method (security), select WPA-Personal. If another method is used, select WEP.
|
|
Enter your security key or passphrase in the Security key or passphrase field, and then click Next.
|
 |
Click Continue in the User Account Control dialog box.
|
 |
Follow the on-screen instructions. Connect the USB flash drive to an available USB port on the computer.
|
 |
Remove the USB flash drive from the computer when the instructions screen appears.
|
 |
Follow the instructions in the WCN setup on the printer section.
|
Using the Windows Connect Now wizard in Windows XP
|
Click Start then Control Panel.
|
|
Click Network and Internet Connections then Wireless Network Setup Wizard.
|
|
Click Next.
|
Note:|
If the Wireless Network Setup Wizard was previously used, the Select a task screen appears. To use settings previously configured on the printer, select Add new computers or devices to the xxxxxxx network and go to step 7. To configure new settings, select Set up a new wireless network.
|
|
Enter the printer’s access point SSID in Network name (SSID), select Manually assign a network key, and then click Next.
|
Note:|
If WPA-PSK (TKIP) is used as the encryption method (security), select the Use WPA encryption instead of WEP (WPA is stronger than WEP but not all devices are compatible with WPA) checkbox, and then click Next.
|
|
Enter the text set on the access point in Network key and Confirm network key, and click Next.
|
|
Select Use a USB flash drive, and then click Next.
|
|
Follow the on-screen instructions. Connect the USB flash drive to the computer.
|
|
Remove the USB flash drive from the computer if the an instruction screen asks you to do so.
|
|
Follow the instructions in WCN setup on the printer.
|
|
Connect the USB flash drive to the computer again and click Next.
|
|
Follow the on-screen instructions.
|
WCN setup on the printer
|
Enter the Setup mode.
|
|
Select Network Settings.
|
|
Select Wireless LAN Setup, and then select Yes.
|
|
Select Enable.
|
|
Select WCN Wireless LAN Setup and then press OK.
|
|
Follow the instructions on the control panel. If a message appears prompting you to connect the USB flash drive, connect it into the front USB port on the printer.
|
|
When Establishing the wireless connection with WCN appears on the control panel, disconnect the USB flash drive from the printer and press OK.
|
Ad Hoc mode
In the Ad Hoc mode, the printer and computer wirelessly communicate directly with each other, without using an access point.
To set the Ad Hoc mode, configure the printer settings first.
Ad Hoc setup on the printer with LCD panel
|
Enter the Setup mode.
|
|
Select Network Settings.
|
|
Select Wireless LAN Setup, and then select Yes.
|
|
Select Enable.
|
|
Select Manual Wireless LAN Setup, and then press OK.
|
|
Follow the instructions on the control panel.
|
|
Select Ad Hoc Mode.
|
|
Select Enter SSID, enter the printer SSID, and then press OK.
|
Note:|
You can choose the wireless network SSID freely.
|
|
Select the channel of the network, then press OK.
|
|
Follow the on-screen instructions to set the security settings.
|
|
Check the network settings, and then press OK.
|
Ad Hoc setup on the printer with EpsonNet Config
Use EpsonNet Config to set up Ad Hoc mode for printers without a LCD panel.
|
Start EpsonNet Config.
|
|
Select the printer from the printer list, and then click Configuration.
|
Note:|
If the printer’s IP address remains the default, the printer name may not appear. In this case, distinguish by the MAC address. Also, if there are multiple printers, distinguish by the MAC address. The MAC address can be checked on the printer’s control panel or network status sheet.
|
|
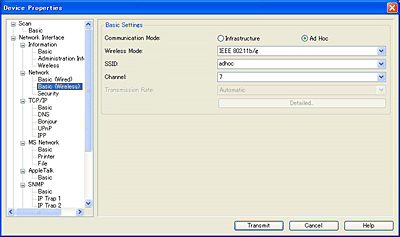
Select Network - Basic (Wireless) on the left of the Device Interface Properties screen.
|
|
Select Ad Hoc in Communication Mode.
|
|
When the confirmation message appears, then click OK.
|
|
Enter the SSID.
|
Note:|
You can choose the wireless network SSID freely.
|
|
When the settings are complete, click Transmit.
|
|
Enter the password.
|
Note:|
When setting for the first time, click OK to set the password. If the password is already set, type the password in the Password field and click OK.
|
|
When the Transmission is complete screen appears, press OK.
|
|
After about three minutes, click View then Refresh to check the settings.
|
Note:|
It takes up to three minutes to activate the settings. Keep the printer turned on.
|
Making settings on the computer
Ad Hoc setup on the computer varies depending on the computer’s operating system and version. See your operating system manuals for information on constructing an Ad Hoc mode network.