 |
 |
|
||
 |
||||
Setup for Windows
These instructions tell you how to set up your printer so other users on the network can share it.
First you will set up the printer as a shared printer on the computer directly connected to it. Then you will add the printer to each network computer that will access it.
 Note:
Note:|
These instructions are for small networks only. To share the printer on a large network, consult your network administrator.
To uninstall programs in Windows Vista, you need an administrator account and the password if you log on as a standard user.
You must log on to a Computer Administrator account to install software on Windows XP. After you install Windows XP, the user account is set as Computer Administrator.
You must log on to Windows 2000 as a user with administrative privileges (belonging to the Administrators group) to install software.
When you use your printer as a shared printer on a network with the following combinations of computers, the client operating systems are not able to communicate with the printer, so that some functions are not available for that particular client.
The illustrations in the following section are from Windows Vista.
|
Setting up the printer as a shared printer
Follow the steps below on the computer that is connected directly to the printer:
 |
Windows Vista:
Click the start button, select Control Panel, and then select Printer from the Hardware and Sound category. |
Windows XP:
Click Start and select Control Panel, and then select Printers and Faxes, from the Printers and Other Hardware category.
Click Start and select Control Panel, and then select Printers and Faxes, from the Printers and Other Hardware category.
Windows 2000:
Click Start, point to Settings, and click Printers.
Click Start, point to Settings, and click Printers.
 |
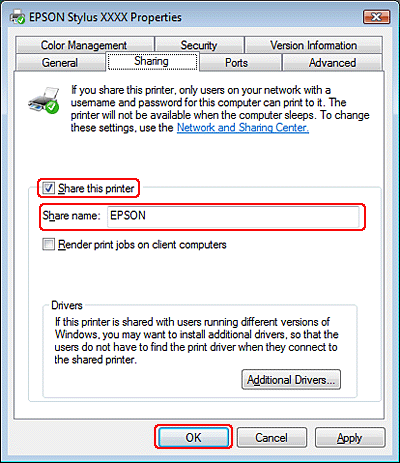
Right-click the icon for your printer, then click Sharing. For Windows Vista, click the Change sharing options button and then click Continue.
|
 |
Windows Vista and XP:
Select Share this printer, then type a Share name. |
Windows 2000:
Select Shared as, then type a name for the shared printer.
Select Shared as, then type a name for the shared printer.
 Note:
Note:|
Do not use spaces or hyphens in the share name.
|

If you want Windows Vista, XP, and 2000 to automatically download printer drivers for computers that are running different versions of Windows, click Additional Drivers and select the environment and the operating systems of the other computers. Click OK, then insert the printer software CD into the CD-ROM drive.
 |
Click OK or Close (if you installed additional drivers).
|
Adding the printer to the other network computers
Follow these steps to add the printer to each network computer that will access it.
 Note:
Note:|
Your printer must be set up as a shared printer on the computer to which it is connected before you can access it from another computer.
 See Setting up the printer as a shared printer See Setting up the printer as a shared printer
|
 |
Windows Vista:
Click the start button, select Control Panel, and then select Printer from the Hardware and Sound category. |
Windows XP:
Click Start and select Control Panel, and then select Printers and Faxes, from the Printers and Other Hardware category.
Click Start and select Control Panel, and then select Printers and Faxes, from the Printers and Other Hardware category.
Windows 2000:
Click Start, point to Settings, and click Printers.
Click Start, point to Settings, and click Printers.
 |
Windows Vista:
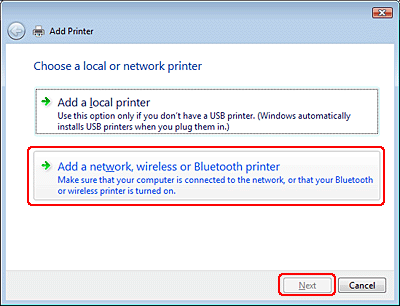
Click the Add a Printer button. |
Windows XP and 2000:
Double-click the Add Printer icon. The Add Printer Wizard appears. Click the Next button.
Double-click the Add Printer icon. The Add Printer Wizard appears. Click the Next button.
 |
Windows Vista:
Click Add a network, wireless or Bluetooth printer, and then click Next. |
Windows XP:
Select A network printer, or a printer attached to another computer, then click Next.
Select A network printer, or a printer attached to another computer, then click Next.
Windows 2000:
Select Network printer, then click Next.
Select Network printer, then click Next.

 |
Follow the on-screen instructions to select the printer you want to use.
|
 Note:
Note:|
Depending on the operating system and the configuration of the computer to which the printer is connected, the Add Printer Wizard may prompt you to install the printer driver from the printer software CD-ROM. Click the Have Disk button and follow the on-screen instructions.
|
