How to Print
Printing on CD/DVD
 Notice for CD/DVD printing
How to install, access, and uninstall EPSON Print CD
Preparing CD/DVD data
Cleaning the Printer before printing on CD/DVD
Positioning the CD/DVD
Printing on a CD/DVD
Print position adjustment
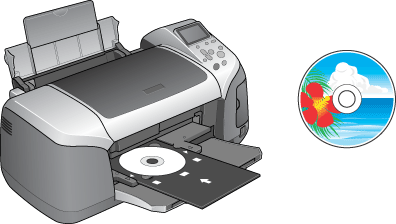
EPSON Print CD bundled with this printer allows you to create CD/DVD labels. After you create the CD/DVD label data, you can print on 12-cm CD/DVD and 8-cm CD/DVD with this printer. Follow the steps described below for CD/DVD printing.
When printing on CD/DVD, keep the following points in mind:
Notice for CD/DVD printing
-
Use only CD/DVD labelled as suitable for printing, for example "Printable on the label surface" or "Printable with ink jet printers".
-
For more details on handling CD/DVD and guidelines for writing data to a CD/DVD, refer to your CD/DVD documentation.
-
A lower level of color saturation is used to ensure print quality when printing on a CD/DVD, as opposed to Epson special paper.
-
Do not print on the CD/DVD before writing your data to it. If you do, fingerprints, dirt, or scratches on the surface may cause errors while writing data.
-
Try to test printing on a spare CD/DVD.
-
The printed surface is easily smeared immediately after printing.
-
Be sure to let CDs and DVDs dry completely before using them or touching the printed surface.
-
Do not let the printed CD/DVD dry in direct sunlight.
-
Depending on the CD/DVD type, smearing may occur depending on the level of color saturation.
-
If the printed surface is sticky even after it has dried, the color saturation level may be too high. In that case, lower the level of the color saturation in EPSON Print CD.
-
Moisture on the printable surface may cause smearing.
-
If you are going to print a large amount of CD/DVD, first print on a few spare CD/DVD and check the printed surface after one full day.
-
If the CD/DVD tray or the internal transparent compartment are accidentally printed on, immediately wipe off the ink.
-
Reprinting on the same CD/DVD may not improve the print quality.
-
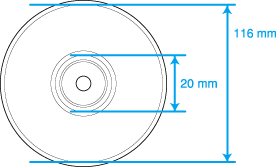
The printable area of a CD/DVD is illustrated as follows.
|
12-cm CD/DVD
|
8-cm CD/DVD
|
|
|

[Top]
How to install, access, and uninstall EPSON Print CD
Follow the steps below to install, access, and uninstall EPSON Print CD.
Installing EPSON Print CD
When installing the printer software, EPSON Print CD is also installed.
 |
Note:
|
 | |
You can select the software you want to install from a list of choices. If you do not want to install EPSON Print CD, click Custom when the installer opens and clear the EPSON Print CD check box, then click Install.
|
|
If you are upgrading from an older version of EPSON Print CD, the old version is automatically overwritten during installation. Follow the on-screen instructions for installation.
Accessing EPSON Print CD
|
Note:
|
| |
To learn how to use EPSON Print CD, select Help Topics from the Help menu in the EPSON Print CD (for Windows) or EPSON Print CD Help from the Help menu (for Macintosh).
|
|
For Windows
To access EPSON Print CD, double-click the EPSON Print CD icon on the desktop.
|
Note:
|
| |
If the EPSON Print CD icon does not appear on the desktop, click Start, point to Programs (Windows Me, 98, and 2000) or All Programs (Windows XP), point to EPSON Print CD, and then click EPSON Print CD.
|
|
For Mac OS 8.6 to 9.x
To access EPSON Print CD, double-click the Macintosh HD (default hard disk) icon, then the EPSON Print CD folder, then the EPSON Print CD icon.
For Mac OS X
To access EPSON Print CD, double-click the Macintosh HD (default hard disk) icon, double-click the Applications folder, then the EPSON Print CD folder, then the EPSON Print CD.
Uninstalling EPSON Print CD
For Windows
 |
For Windows Me, 98, and 2000, click the Start button, point to Settings, then select Control Panel. For Windows XP, click the Start button, then select Control Panel.
|
 |
Double-click the Add/Remove Programs icon and select EPSON Print CD from the list. Then click Add/Remove (Windows Me and 98) or Change/Remove (Windows XP and 2000).
|
 |
Follow the on-screen instructions.
|
For Macintosh
Drag the EPSON Print CD folder into the trash.
[Top]
Preparing CD/DVD data
Before you print, create the CD/DVD label data using EPSON Print CD.
Refer to the table below on how to write texts and create backgrounds using EPSON Print CD.
|
|
How to write texts
|
How to create background
|
|
For Windows
|
Click the Text button on tool bar on the left. Click the Text tab, type characters in the Text box, and then click OK. The characters typed are displayed on the label. Drag the text displayed on the label to move it where you want it.
|
Click the Background button on the tool bar on the left. Select the image that you want to use in the Select Background box, then click OK. The background image that you selected is displayed on the label.
|
|
For Macintosh (including OS X)
|
Click the Text button on the tool palette on the left. Click the Text Settings tab, type characters in the text box. The characters typed are displayed on the label. Drag the text displayed on the label to move it where you want it.
|
Click the Background button on the tool palette on the left. Click the Select Background button on the Adjust Background box. Select the background image you want to use, and then click Open. Click OK on the Adjust Background box. The background image you selected is displayed on the label.
|
|
Note:
|
| |
For details, refer to the EPSON Print CD Help. Select Help Topics from the Help menu in EPSON Print CD (for Windows) or EPSON Print CD Help from the Help menu (for Macintosh).
|
|
[Top]
Cleaning the Printer before printing on CD/DVD
Before printing on a CD/DVD, it is necessary to clean the roller inside of the printer by feeding and ejecting A4 size plain paper. This is to prevent any dirt on the roller from adhering to the printable surface of the CD/DVD.
Clean this roller only once before printing CD/DVD. You do not need to do this each time you print on a CD/DVD.
|
|
Make sure that the printer is on.
|
|
|
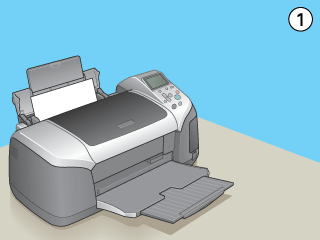
Open the paper support, then slide out the extension.
|
|
|
Lower the output tray and slide out the extension.
|
 |
Check that no warnings or errors are displayed on the LCD panel.
|
 |
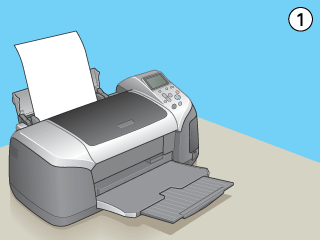
Load A4 size paper in the sheet feeder.
|
 |
Press the  Maintenance button in Advanced mode. Then press the Maintenance button in Advanced mode. Then press the  button to highlight Paper Feed/Paper Eject and press the OK button. The paper is fed. button to highlight Paper Feed/Paper Eject and press the OK button. The paper is fed.
|
 |
Press the OK button again. The paper is ejected.
|
 |
Repeat the above steps 5 to 7 several times.
|
[Top]
Positioning the CD/DVD
After you have finished cleaning the CD/DVD data, insert the CD/DVD into the printer as described below.
 |
Caution:
|
| -
Be sure to insert the CD/DVD following the steps described below. If you insert the CD/DVD in a different way, the data or printer may be damaged.
|
|
|
Note:
|
|
|
Make sure that the printer is on.
|
| |
Caution:
|
| | |
Be sure to insert the CD/DVD tray while the power is on. Otherwise, automatic print position adjustment may not take place after inserting the CD/DVD tray.
|
|
|
|
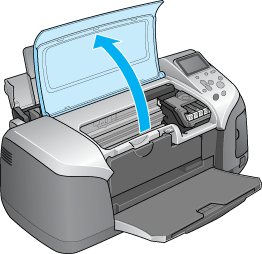
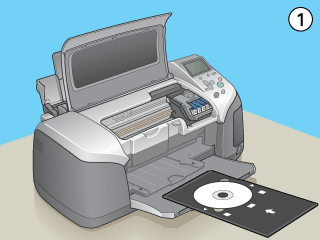
Open the printer cover then pull down the CD/DVD guide.
|
|
|
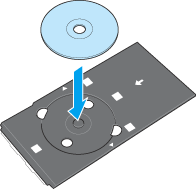
Place the CD/DVD on the CD/DVD tray with the label surface up.
|
| |
Note:
|
| | |
Use one CD/DVD at a time.
|
|
|
12-cm CD/DVD
|
8-cm CD/DVD
|
|
|
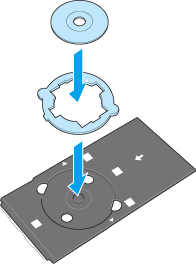
It is necessary to use the 8-cm adapter in conjunction with the CD/DVD tray when printing on 8-cm CD/DVD's. There are three tabs protruding from the perimeter of the 8-cm adapter; two round tabs diagonally opposite each other, and one small rectangular tab. The round tabs correspond to the semi-circular holes in the CD/DVD tray. Holding the 8-cm CD/DVD adapter so that the semi-circular tabs fit into the semi circular holes, insert the 8-cm adapter into the CD/DVD tray, as if it were a CD. The single rectangular tab should also fit neatly into the indentation at either the top or the bottom of the CD/DVD tray. To remove the adapter, gently push upwards on the round tabs.
| |
Caution:
|
| | -
Before positioning the CD/DVD, make sure that no foreign particles or substances are on the CD/DVD tray, as these may damage the CD/DVD's data side.
|
|
| | -
Be sure to use the CD/DVD tray provided with this printer. If you use another CD/DVD tray, there may be a gap in the print position and printing may not be performed properly.
|
|
|
|
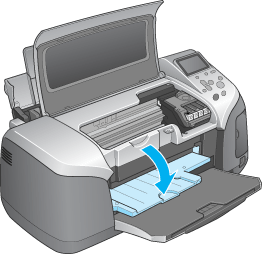
With the CD/DVD loaded printable side up, gently insert the CD/DVD tray along the base of the CD/DVD guide until the marks on the CD/DVD tray and the CD/DVD guide match each other.
|
| |
Note:
|
| | |
Insert the CD/DVD tray so that the CD/DVD tray passes under the small rollers on the both sides of the CD/DVD slot.
|
|
|
|
Close the printer cover.
|
[Top]
Printing on a CD/DVD
EPSON Print CD lets you print images on CD/DVD. The following instructions explain how to print on a CD/DVD using EPSON Print CD.
For Windows
|
|
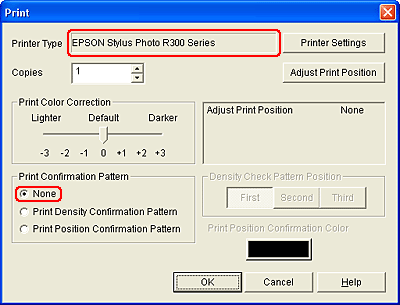
Click Print on the File menu. The Print dialog box appears.
|
|
|
Make sure that EPSON Stylus Photo R300 Series is selected as the printer type.
|
|
|
Select None as the Print Confirmation Pattern setting, and then click OK.
|
|
Note:
|
| -
If EPSON Stylus Photo R300 Series is not selected, press the Printer Settings button and select the appropriate printer name in the Printer Setting dialog box, then Press the OK button.
|
|
| -
If you select CD/DVD Premium Surface as the Media Type setting in the Printer Settings dialog box and use a high quality CD/DVD, you can create high quality CD/DVD labels.
|
|
| -
Be sure to let CDs and DVDs dry completely before using them or touching the printed surface. CDs and DVDs printed using CD/DVD Premium Surface as the Media Type setting take longer to dry than those printed using CD/DVD as the Media Type setting. Allow CDs and DVDs printed using the CD/DVD Premium Surface setting to dry for 24 hours.
|
|
| -
If an error message appears on the LCD panel or PC screen, follow the instructions on the LCD panel to clear the error.
|
|
| -
If the ink smears, adjust the color saturation. For details, refer to the Help of EPSON Print CD.
|
|
| -
After you finish printing on a CD/DVD, remove the CD/DVD tray and close the CD/DVD guide.
|
|
For Mac OS 8.6 to 9.x
|
|
Click Page Setup on the File menu. The Page Setup dialog box appears.
|
|
|
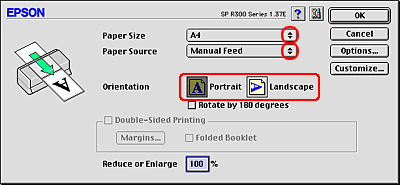
Select A4 as the Paper Size.
|
|
|
Select Manual Feed as the Paper Source.
|
|
|
Select Portrait as the Orientation.
|

|
|
Click OK to close the Page Setup dialog box.
|
|
|
Select Print from the File menu. The Print dialog box appears.
|
|
|
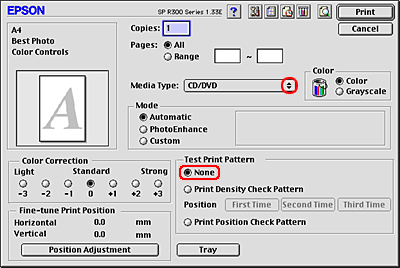
Select CD/DVD as the Media Type.
|
|
|
Select None as the Test Print Pattern setting.
|
 |
Click Print to start printing.
|
|
Note:
|
| -
If you select CD/DVD Premium Surface as the Media Type setting in the Print dialog box and use a high quality CD/DVD, you can create high quality CD/DVD labels.
|
|
| -
Be sure to let CDs and DVDs dry completely before using them or touching the printed surface. CDs and DVDs printed using CD/DVD Premium Surface as the Media Type setting take longer to dry than those printed using CD/DVD as the Media Type setting. Allow CDs and DVDs printed using the CD/DVD Premium Surface setting to dry for 24 hours.
|
|
| -
If an error message appears on the LCD panel or PC screen, follow the instructions on the LCD panel to clear the error.
|
|
| -
If the ink smears, adjust the color saturation. For details, refer to the Help of EPSON Print CD.
|
|
| -
After you finish printing on a CD/DVD, remove the CD/DVD tray and close the CD/DVD guide.
|
|
For Mac OS X
|
|
Click Page Setup on the File menu. The Page Setup dialog box appears.
|
|
|
Select Stylus Photo R300 as Format for setting.
|
|
|
Select A4 as the Paper Size.
|
|
|
Select Portrait as the Orientation.
|
|
|
Click OK to close the Page Setup dialog box.
|
|
|
Select Print from the File menu. The Print dialog box appears.
|
|
|
Select Stylus Photo R300 as Printer setting.
|
|
|
Select Print Settings from the pop-up menu.
|
|
|
Select CD/DVD as the Media Type.
|

| |
Note:
|
| | -
If you select CD/DVD Premium Surface as the Media Type setting in the Print dialog box and use a high quality CD/DVD, you can create high quality CD/DVD labels.
|
|
| | -
Be sure to let CDs and DVDs dry completely before using them or touching the printed surface. CDs and DVDs printed using CD/DVD Premium Surface as the Media Type setting take longer to dry than those printed using CD/DVD as the Media Type setting. Allow CDs and DVDs printed using the CD/DVD Premium Surface setting to dry for 24 hours.
|
|
 |
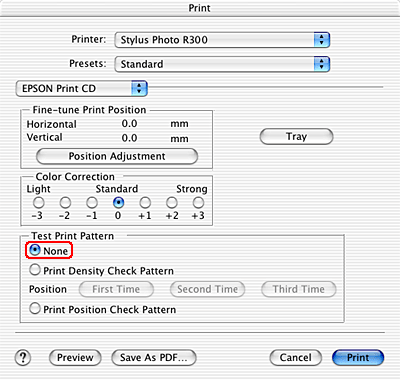
Select EPSON Print CD from the pop-up menu.
|
 |
Make sure None is selected as Test Print Pattern setting and click Print.
|
|
Note:
|
| -
If an error message appears on the LCD panel or PC screen, follow the instructions on the LCD panel to clear the error.
|
|
| -
If the ink smears, adjust the color saturation. For details, refer to the Help of EPSON Print CD.
|
|
| -
After you finish printing on a CD/DVD, remove the CD/DVD tray and close the CD/DVD guide.
|
|
[Top]
Print position adjustment
If you notice after printing that the print position is misaligned, adjust it as follows.
For Windows
Printing the print position check pattern
First print the print position check pattern for checking the print gap.
|
|
Place the CD-R Print Position Check sheet attached to the CD/DVD tray and then insert the CD/DVD tray in the printer.
 See Positioning the CD/DVD See Positioning the CD/DVD
|
| |
Note:
|
| | |
If the print position check sheet is warped, flatten it before loading it.
|
|
|
|
Double-click the EPSON Print CD icon on the desktop to access EPSON Print CD.
|
| |
Note:
|
| | |
If the EPSON Print CD icon does not appear on the desktop, click Start, point to Programs (Windows Me, 98, and 2000) or All Programs (Windows XP), point to EPSON Print CD, and then click EPSON Print CD.
|
|
|
|
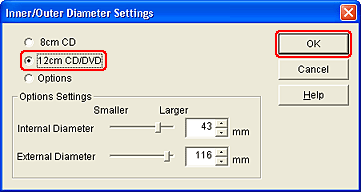
Click Inner/Outer Diameter Settings on the File menu. The Inner/Outer Diameter Settings dialog box appears.
|
|
|
Select 12-cm CD/DVD, and then click OK.
|
|
|
Select Print from the File menu. The Print dialog box appears.
|
|
|
Make sure that EPSON Stylus Photo R300 Series is selected as the printer type.
|
| |
Note:
|
| | |
If EPSON Stylus Photo R300 Series is not selected, press the Printer Settings button and select the appropriate printer name in the Printer Setting dialog box, then Press the OK button.
|
|
|
|
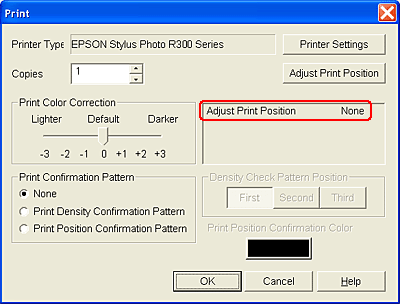
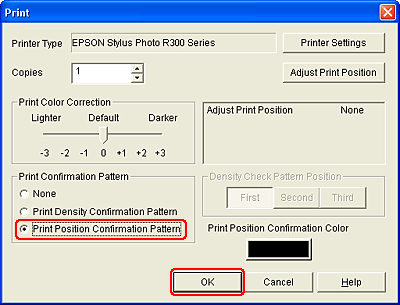
If the Adjust Print Position setting is not None, click Adjust Print Position. The Adjust Print Position dialog box appears. If the setting is None, proceed to step 9.
|
|
|
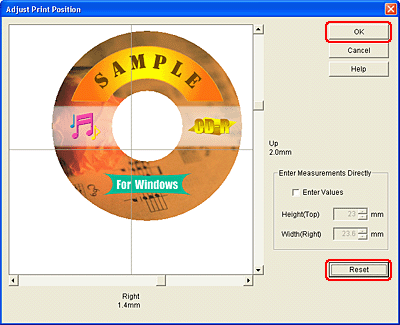
Click Reset, and then click OK to return to the Print dialog box.
|
|
|
Select Print Position Confirmation Pattern as the Print Confirmation Pattern setting, and then click OK.
|
Measuring the print position gap
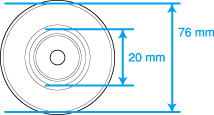
On the printed check sheet, take the measurements shown in the illustration using a ruler.
|
Note:
|
| -
Make sure that the ruler passes through the center of the circle when measuring.
|
|
| -
If you print the position check pattern on a CD/DVD instead of a check sheet, you may not measure the gap correctly. Be sure to include the inner transparent section of the CD/DVD in the measurement. Measure the distance from the circumference of CD/DVD tray's center circle to the crossline on the check pattern.
|
|
Entering the measurements in EPSON Print CD
|
|
Choose Adjust Print Position from the File menu. The Adjust Print Position dialog box appears.
|
|
|
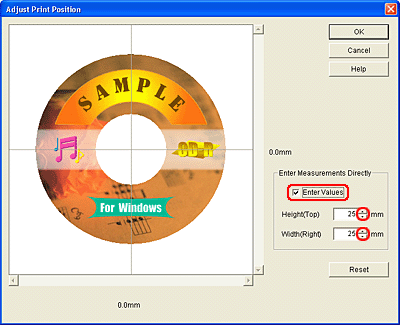
Select the Enter Values check box, and then specify the measured values for Height(Top) and Width(Right).
|
|
|
Click OK.
|
| |
Note:
|
| | -
If you reinstall EPSON Print CD, readjust the print position.
|
|
| | -
If you readjust the print position, click Reset, and then print a position check pattern.
|
|
| | -
You can adjust the print position manually without printing the check pattern. Open the Adjust Print Position dialog box. Make sure the Enter Values check box is not selected, then drag the sample label image or use the scroll bar to adjust the settings for Width(Right) and Height(Top), then click OK.
|
|
For Mac OS 8.6 to 9.x
Printing the print position check pattern
First print the print position check pattern for checking the print gap.
|
|
Place the CD-R Print Position Check sheet attached to the CD/DVD tray and then insert the CD/DVD tray in the printer.
See Positioning the CD/DVD
|
| |
Note:
|
| | |
If the print position check sheet is warped, flatten it before loading it.
|
|
|
|
Double-click the Macintosh HD (default hard disk) icon, then the EPSON Print CD folder, then the EPSON Print CD icon.
|
|
|
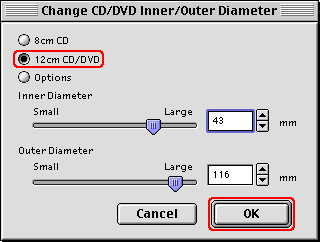
Click Change CD/DVD Inner/Outer Diameter on the File menu. The Change CD/DVD Inner/Outer Diameter dialog box appears.
|
|
|
Select 12-cm CD/DVD, and then click OK.
|
|
|
Click Page Setup on the File menu. The Page Setup dialog box appears.
|
|
|
Select A4 as the Paper Size.
|
|
|
Select Manual Feed as the Paper Source.
|
|
|
Select Portrait as the Orientation.
|
|
|
Click OK to close the Page Setup dialog box.
|
|
|
Choose Print from the File menu. The Print dialog box appears.
|
|
|
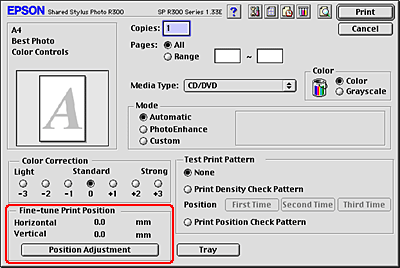
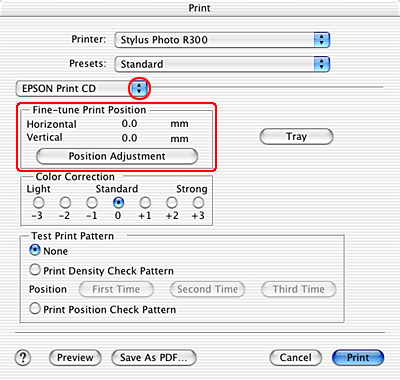
If the Horizontal and Vertical settings under Fine-tune Print Position are not 0.0mm, click Position Adjustment. The Fine-tune Print Position dialog box appears. If the setting is 0.0mm, proceed to the step 13.
|
 |
Click Reset, and then click OK to return to the Print dialog box.
|
 |
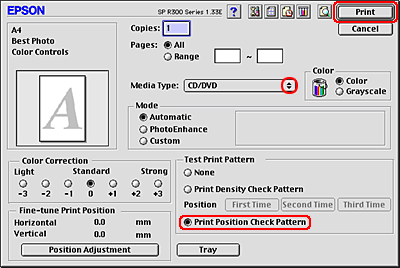
Select CD/DVD as the Media Type setting.
|
 |
Select Print Position Check Pattern as the Test Print Pattern setting, and then click Print.
|
Measuring the print position gap
On the printed check sheet, take the measurements shown in the illustration using a ruler.
|
Note:
|
| -
Make sure that the ruler passes through the center of the circle when measuring.
|
|
| -
If you print the position check pattern on a CD/DVD instead of a check sheet, you may not measure the gap correctly. Be sure to include the inner transparent section of the CD/DVD in the measurement. Measure the distance from the circumference of CD/DVD tray's center circle to the crossline on the check pattern.
|
|
Entering the measurements in EPSON Print CD
|
|
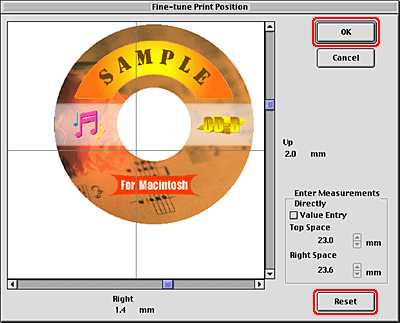
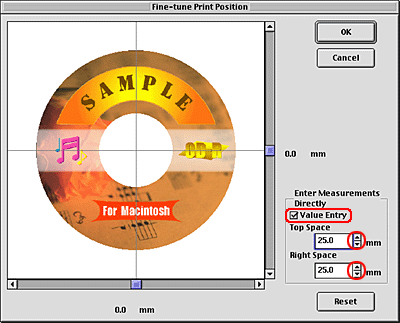
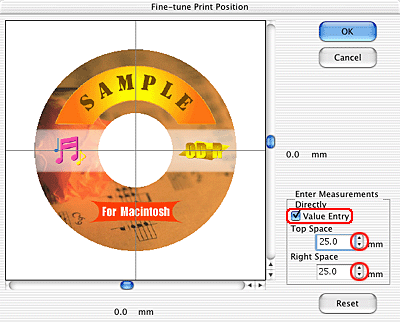
Choose Fine-tune Print Position from the File menu. The Fine-tune Print Position dialog box appears.
|
|
|
Select the Value Entry check box, and then specify the measured values for Top Space and Right Space.
|
|
|
Click OK.
|
| |
Note:
|
| | -
If you reinstall EPSON Print CD, readjust the print position.
|
|
| | -
If you readjust the print position, click Reset, and then print a position check pattern.
|
|
| | -
You can adjust the print position manually without printing the check pattern. Open the Fine - tune Print Position dialog box. Make sure the Value Entry check box is not selected, then drag the sample label image or use the scroll bar to adjust the settings for Top Space and Right Space, then click OK.
|
|
For Mac OS X
Printing the print position check pattern
First print the print position check pattern for checking the print gap.
|
|
Place the CD-R Print Position Check sheet attached to the CD/DVD tray on the CD/DVD tray, and then insert the CD/DVD tray in the printer.
See Positioning the CD/DVD
|
| |
Note:
|
| | |
If the print position check sheet is warped, flatten it before loading it.
|
|
|
|
Double-click the Macintosh HD (default hard disk) icon, then the Application folder, then the EPSON Print CD folder, then the EPSON Print CD icon.
|
|
|
Click Change CD/DVD Inner/Outer Diameter on the File menu. The Change CD/DVD Inner/Outer Diameter dialog box appears.
|
|
|
Select 12-cm CD/DVD, and then click OK.
|

|
|
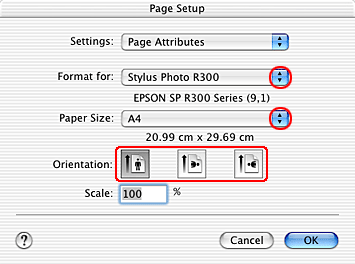
Click Page Setup on the File menu. The Page Setup dialog box appears.
|
|
|
Select Stylus Photo R300 as the Format for setting.
|
|
|
Select A4 as the Paper Size.
|
|
|
Select Portrait as the Orientation.
|

|
|
Click OK to close the Page Setup dialog box.
|
|
|
Choose Print from the File menu. The Print dialog box appears.
|
|
|
Select Stylus Photo R300 as the Printer setting. Select Print Settings from the pull-down menu. Select CD/DVD as the Media Type Setting.
|
|
|
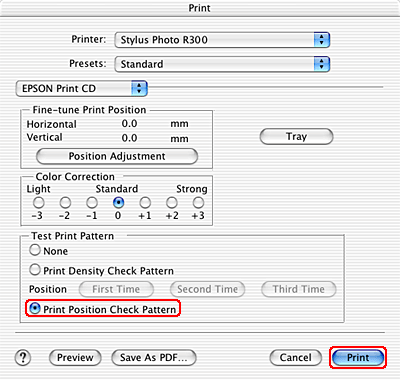
Select EPSON Print CD from the pull-down menu. If the Horizontal and Vertical settings under Fine-tune Print Position are not 0.0mm, click Position Adjustment. The Fine-tune Print Position dialog box appears. If the setting is 0.0mm, proceed to the step 14.
|
|
|
Click Reset, and then click OK to return to the Print dialog box.
|

|
|
Select Print Position Check Pattern as the Test Print Pattern setting, and then click Print.
|
Measuring the print position gap
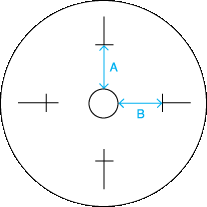
On the printed check sheet, take the measurements shown in the illustration using a ruler.
|
|
A: Height
B: Width
|
|
Note:
|
| -
Make sure that the ruler passes through the center of the circle when measuring.
|
|
| -
If you print the position check pattern on a CD/DVD instead of a check sheet, you may not measure the gap correctly. Be sure to include the inner transparent section of the CD/DVD in the measurement. Measure the distance from the circumference of CD/DVD tray's center circle to the crossline on the check pattern.
|
|
Entering the measurements in EPSON Print CD
|
|
Choose Fine-tune Print Position from the File menu. The Fine-tune Print Position dialog box appears.
|
|
|
Select the Value Entry check box, and then specify the measured values for Top Space and Right Space.
|
|
|
Click OK.
|
| |
Note:
|
| | -
If you reinstall EPSON Print CD, readjust the print position.
|
|
| | -
If you readjust the print position, click Reset, and then print a position check pattern.
|
|
| | -
You can adjust the print position manually without printing the check pattern. Open the Fine - tune Print Position dialog box. Make sure the Value Entry check box is not selected, then drag the sample label image or use the scroll bar to adjust the settings for Top Space and Right Space, then click OK.
|
|
[Top]