 |
 |
|
||
 |
||||
Poster Printing (For Windows Only)
Poster printing allows you to print poster-size images by enlarging one page to cover several sheets of paper.

 Note:
Note:|
This feature is not available with Mac OS X.
|
Printer settings
Follow the steps below to print odd- and even-numbered pages onto opposite sides of the sheet.
 |
Open the file you want to print.
|
 |
Access the printer settings.
|

 |
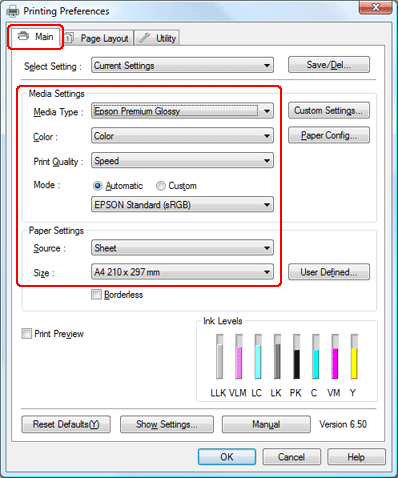
Click the Main tab, select the appropriate Media Type setting, and then select your preferred items for Color, Print Quality, and Mode settings.
|
 Note:
Note:|
Availability of setting items may vary depending on the setting you select.
|
 |
Select Sheet or Manual - Roll as the Source setting.
|
 |
Select the appropriate Size setting.
|
 |
Click the Page Layout tab, select Portrait (tall) or Landscape (wide) to change the orientation of your printout, and then select Multi-page, then select Poster.
|

 |
Click Settings to open the Poster Settings window. In the Poster Settings window, select the number of printed pages you want the poster to cover.
|

 |
Select Borderless Poster Print if you want to make posters without cutting the margins and overlapping the panels.
|
 |
If you do not select Borderless Poster Print, the following settings are available.
|
|
Print Cutting Guides
|
Prints guide lines for cutting.
|
|
Overlapping Alignment Marks
|
Slightly overlaps the panels and prints alignment markers so that the panels can be aligned more precisely.
|
|
Trim Lines
|
Prints border lines on the panels to guide you when trimming the pages.
|
 |
Click OK to close the Poster settings window.
|
After completing the steps above, print one test copy and examine the results before printing an entire job. Then follow the instructions.
 See How to make a poster from your printouts
 See How to make a poster from your printouts
How to make a poster from your printouts
Here is an example of how to make a poster with 2x2 selected under Poster Printing and Overlapping Alignment Marks selected as the Print Cutting Guides.

 |
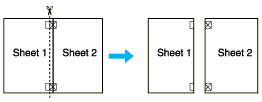
Cut off the margin of Sheet 1 along a vertical line through the center of the top and bottom cross marks:
|

 |
Place the edge of Sheet 1 on top of Sheet 2 and align the cross marks, then temporarily tape the two sheets together from the back:
|

 |
Cut the taped sheets in two along a vertical line through the alignment markers (this time, a line to the left of the cross marks):
|

 |
Align the edges of the paper using the alignment markers and tape them together from the back:
|

 |
Repeat the instructions from step 1 to step 4 to tape Sheets 3 and 4 together.
|
 |
Repeat the instructions from step 1 to step 4 to tape the top and bottom edges of the paper:
|

 |
Cut off the remaining margins.
|
