Printing with Windows
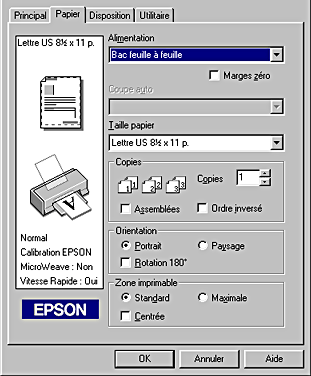
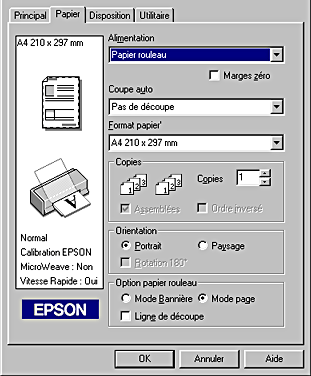
Use the settings on the Paper menu to change the paper size, set the number of copies and other copy parameters, specify the paper orientation, and adjust the printable area.
The settings which are available vary depending upon whether the sheet feeder, roll paper or manual feed slot is selected as the Paper Source setting.
When you select Sheet Feeder and Manual Feed Slot as the Paper Source setting, the printer software will appear as shown below.

When you select Roll Paper as the Paper Source setting, the printer software will appear as shown here.

You can make the following settings on the Paper menu:
|
Paper Source |
Select the paper source that you want to use from the selections below.
Sheet Feeder:
Roll Paper:
Manual Feed Slot: |
|
No Margins |
Check this box when you want to print with no margins.
Sheet Feeder:
Roll Paper: You can use the following media with this feature.
Photo Paper:
Matte Paper-Heavyweight:
Index Card:
Note When using this feature with Roll Paper, you need to use your image-editing software to make the image 4 mm wider than the roll paper. Printing with this feature selected takes longer than for normal printing. Because this feature enlarges the image to a size slightly larger than the paper size when Sheet Feeder is selected as the Paper Source setting, the portion of the image that extends beyond the edges of the paper will not be printed. Print quality may decline in the top and bottom areas of the printout, or the area may be smeared when printing on media other than listed above. We recommend printing a single sheet to check quality before printing large jobs. You cannot use this feature with the following media: Photo Quality Glossy Film, Ink Jet Transparencies, Iron-On Cool Peel Transfer Paper, 360 dpi Ink Jet Paper, CD-R. |
|
Auto Cut |
If the cutter is attached, you can select the types of cutting.
Not Cut:
Single Cut:
Double Cut:
Note: Auto Cut is selectable after the cutter is attached and Roll Paper is selected as the Paper Source setting. If Auto Cut is not available even when Roll Paper is selected as the Paper Source, the Auto Cutter Attached setting has not been made in the printer driver. Refer to the Printer driver settings with Automatic Roll Paper Cutter and make the setting. |
|
Paper Size |
Select the paper size that you want to use. You can also add a custom paper size. |
|
Copies |
Select the number of copies that you want to print. You can select Collate to print one set at a time or Reverse Order to print your documents in reverse order, starting with the last page. |
|
Orientation |
Select Portrait (tall) or Landscape (wide) to change the orientation of your printout. To print closer to the bottom of the page, select the Rotate by 180° check box. |
|
Printable Area |
Use this option in the Printable Area Box to adjust the total area available for printing when Sheet Feeder and Manual Feed Slot is selected as the Paper Source setting. Standard and Maximum are only available when Sheet Feeder is selected. This feature is not available when No Margins or Roll Paper is selected. To center the printout, select Centered. To increase the printable area at the bottom edge from 14 mm to 3 mm, select Maximum.
Note: |
|
Roll Paper Option |
The Roll Paper Option settings are only available when Roll Paper is selected as the Paper Source setting. These features are not available when Sheet Feeder or Manual Feed Slot is selected. The available settings are described below.
Banner Mode:
Cut Sheet Mode:
Save roll paper:
Print page frame: |
 Previous |
 Next |