How To / Setting Up Your Printer on a Network
For Users of Windows Me, 98, and 95
 Setting up your printer as a shared printer
 Accessing the printer through a network
This section tells you how to set up your printer so that other computers on a network can use it.
First, you need to set up the printer as a shared printer on the computer to which the printer is connected. Then, you must add the printer to each computer that will access it through the network.
 |
Note:
|
 | |
This section describes how to use your printer as a shared printer on a network. To connect your printer directly to a network without setting it up as a shared printer, consult your network administrator.
|
|
Setting up your printer as a shared printer
To share a printer with other computers on a network, follow the steps below for configuring the computer to which the printer is connected.
 |
Click Start, point to Settings, and then click Control Panel.
|
 |
Double-click the Network icon.
|
 |
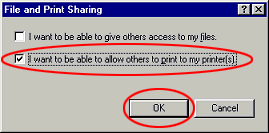
Click File and Print Sharing.
|
 |
Select the I want to be able to allow others to print to my printer(s) check box and click OK.
|

 |
In the Network dialog box, click OK.
|
 |
In the Control Panel, double-click the Printers icon.
|
 |  |
Note:
|
 |  | -
If a dialog box requesting the insertion of the Windows Me, 98, or 95 CD-ROM appears, insert the CD in the CD-ROM drive and follow the on-screen instructions.
|
|
 |  | -
If a dialog box requesting that you to restart your computer appears, do so. Then, open the Printers folder, and continue from step 7.
|
|
 |
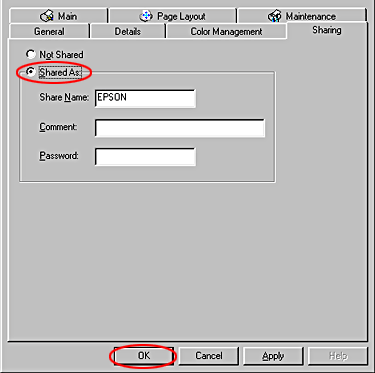
Select the icon for your printer in the Printers folder, and then click Sharing on the File menu.
|
 |
Select Shared As, type the printer information as required, and then click OK.
|


[Top]
Accessing the printer through a network
To use your printer from other computers on a network, you must first add the printer to each computer that will access it. Follow the steps below.
 |
Note:
|
 |
Click Start, point to Settings, and then click Printers.
|
 |
Double-click the Add Printer icon. The Add Printer Wizard opens.
|
 |
Click Next.
|
 |
Select Network printer, and then click Next.
|

 |
On the next screen, click Browse.
|
 |
Double-click the icon of the computer that is directly connected to the printer. Then, click the icon for the appropriate printer.
|

 |
Click OK and follow the on-screen instructions.
|
 |  |
Note:
|
 |  | |
To monitor the status of a shared printer, you must install EPSON Status Monitor 3 on each computer that will access the printer. See Installing EPSON Status Monitor 3 for instructions.
|
|
Installing EPSON Status Monitor 3
To monitor the status of a printer accessed through a network, you must install EPSON Status Monitor 3 on each computer that will access the printer. Follow the steps below.
 |
Insert the printer software CD in the CD-ROM drive. If the Installer dialog box does not appear, double-click SETUP.EXE on the CD-ROM.
|
 |
Select Install EPSON Status Monitor 3, and then click  . .
|
 |
Follow the on-screen instructions.
|

[Top]
 Setting up your printer as a shared printer
 Accessing the printer through a network
Setting up your printer as a shared printer
Accessing the printer through a network


 .
.


