 |
|
|||
 |
||||
2-Sided Printing
Performing automatic 2-sided printing requires the Auto Duplexer.
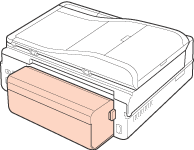
The Auto Duplexer is attached to the back of the printer.
To setup the Auto Duplexer, see Setting Up the Auto Duplexer.
For Windows:
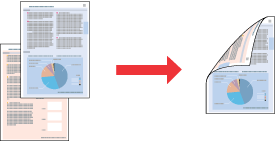
Four types of 2-sided printing are available: automatic standard, automatic folded booklet, manual standard and manual folded booklet.
Four types of 2-sided printing are available: automatic standard, automatic folded booklet, manual standard and manual folded booklet.
For Mac OS X:
Mac OS X supports automatic standard 2-sided printing only.
Mac OS X supports automatic standard 2-sided printing only.
2-sided printing is only available for the following papers and sizes.
|
Paper
|
Size
|
|
Plain paper
|
Legal*, Letter, A4, B5, A5*
|
|
Epson Bright White Ink Jet Paper
|
A4
|
* Manual standard and manual folded booklet only.
 Note:
Note:|
This feature is not available with borderless printing.
Manual 2-sided printing may not be available when the printer is accessed over a network or is used as a shared printer.
The loading capacity differs during 2-sided printing.
 See Selecting which tray to use and its loading capacities See Selecting which tray to use and its loading capacities
Only use papers that are suitable for 2-sided printing. Otherwise, the printout quality may deteriorate.
Depending on the paper and the amount of ink used to print text and images, ink may bleed through to the other side of the paper.
The surface of the paper may be smeared during 2-sided printing.
|
Note for Windows:|
When automatic 2-sided printing is performed, printing may be slow depending on the combination of options selected for Select Document Type in the Print Density Adjustment window and for Paper & Quality Options in the Advanced window.
|
Note for Mac OS X:|
When automatic 2-sided printing is performed, printing may be slow depending on the combination of options selected for Select Document Type in the 2-sided Printing Settings and for Print Quality in the Print Settings.
|
Automatic standard 2-sided printing
Automatic standard 2-sided printing allows you to print both sides of a sheet automatically with the Auto Duplexer.
 Note:
Note:|
If the ink runs low during automatic 2-sided printing, the printer stops printing and the ink needs to be replaced. When ink replacement is complete, the printer starts printing again, but there may be some missing parts in your print out. If this happens, print the missing parts again.
|
Printer settings for Windows
 |
Access the printer settings.
|
 |
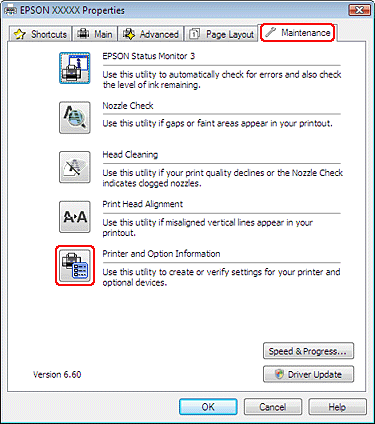
Click the Maintenance tab, and then select Printer and Option Information.
|
 |
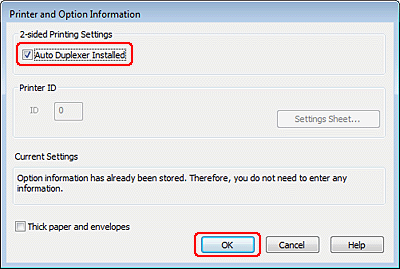
Make sure the Auto Duplexer Installed check box is selected, and click OK.
|
 |
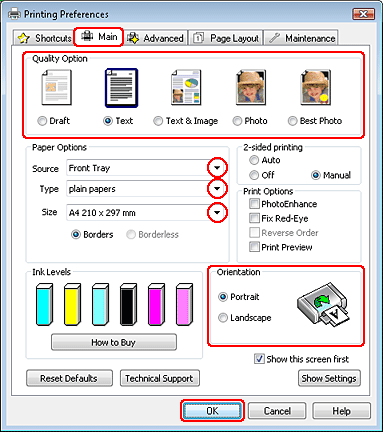
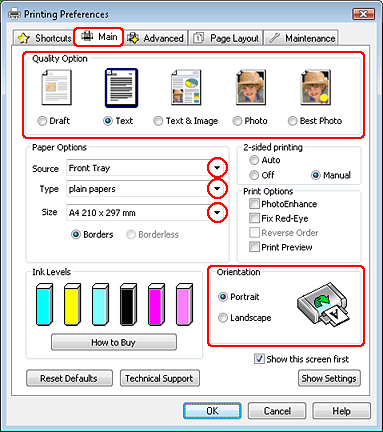
Click the Main tab, and then select one of the following Quality Option settings:
|
Draft for rough drafts with reduced print quality
Text for text-only pages
Text & Image for higher quality pages with text and image
Photo for good quality and speed
Best Photo for the best print quality
 |
Select Front Tray as the Source setting.
|
 |
Select plain papers as the Type setting.
|
 |
Select A4 210 x 297 mm, Letter 8 1/2 x 11 in, or B5 182 x 257 mm as the Size setting.
|
 |
Select Portrait (tall) or Landscape (wide) to change the orientation of your print out.
|
 |
Click the Page Layout tab, and then select Auto from 2-sided printing.
|

 |
Click Settings to open the Settings window.
|
 |
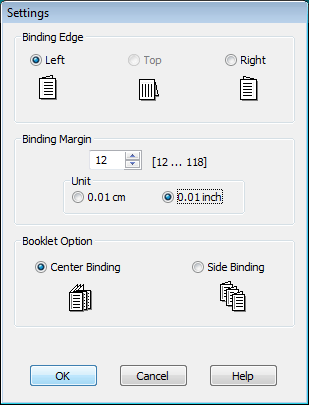
Specify the edge of the paper where the binding will be placed. You can choose Left, Top, or Right.
|
 |
Choose cm or inch as the Unit setting. Then specify the width of the binding margin. You can enter any width from 0.3 cm to 3.0 cm, or from 0.12 inches to 1.18 inches.
|
Note:|
The actual binding margin may be different from the specified settings depending on your application. Experiment with a few sheets to examine actual results before printing the entire job.
|
 |
Click OK to return to the Page Layout window.
|
 |
Click the Adjust Print Density button to open the Print Density Adjustment window.
|

 |
Select one of the Select Document Type settings. This automatically adjusts Print Density and Increased Ink Drying Time.
|
Note:|
If you are printing high-density data, such as photos or graphs, we recommend making the settings in the Print Density Adjustment window.
|
 |
Click OK to return to the Page Layout window.
|
 |
Make sure all of the settings are correct, and then click OK.
|
 |
Load paper into the paper cassette, then send the print job from your application.
|
Printer settings for Mac OS X 10.5 or 10.6
|
Access the Epson Printer Utility 4 dialog box.
|
|
Click the Printer and Option Information button.
|

|
Make sure that Duplexer Installed is displayed in the Two-sided Printing Information section, and then click OK.
|

|
Close the Epson Printer Utility 4 dialog box.
|
|
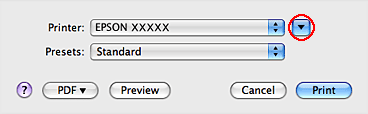
Access the Print dialog box.
|
|
Click the
 button to extend this dialog box. button to extend this dialog box. |
|
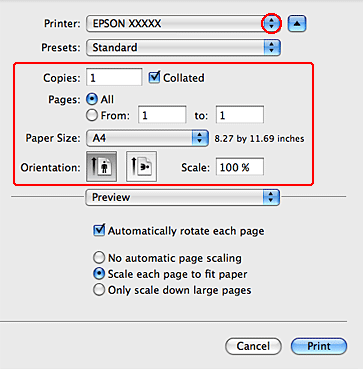
Select the printer you are using as the Printer setting, and then make suitable settings.
|
 Note:
Note:|
Depending on your application, you may not be able to select some of the items in this dialog box. If so, click Page Setup on the File menu of your application, and then make suitable settings.
|
|
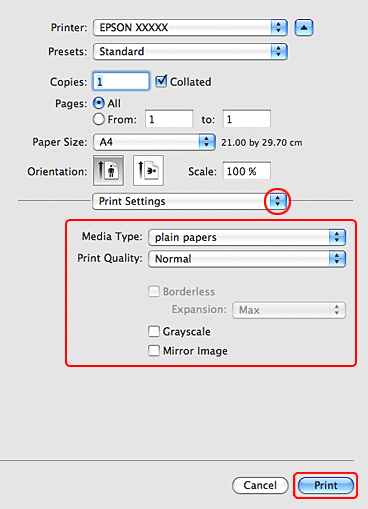
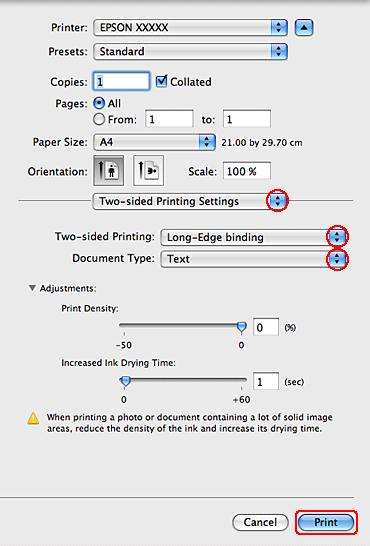
Select Print Settings from the pop-up menu.
|
|
Select plain papers as the Media Type setting, then make the settings that you want to use to print. See online help for details on Print Settings.
|
|
Select Two-sided Printing Settings from the pop-up menu.
|
|
Select Long-Edge binding or Short-Edge binding from the Two-sided Printing pop-up menu.
|
|
Select one of the Document Type settings. This automatically adjusts Print Density and Increased Ink Drying Time.
|
|
Select one of the Select Document Type settings. This automatically adjusts Print Density and Increased Ink Drying Time under the Adjustments setting.
|
Note:|
If you are printing high-density data, such as photos or graphs, we recommend adjusting settings manually.
|
|
Load paper into the paper cassette, and click Print.
|
Printer settings for Mac OS X 10.4
|
Access the Epson Printer Utility 4 dialog box.
|
|
Click the Printer and Option Information button.
|
|
Make sure that Duplexer Installed is displayed in the Two-sided Printing Information section, and then click OK.
|
|
Close the Epson Printer Utility 4 dialog box.
|
|
Access the Page Setup dialog box.
|

|
Select the printer you are using as the Format for setting.
|
|
Select A4, Letter, or B5 as the Paper Size setting.
|
|
Select the appropriate Orientation setting, and click OK to close the Page Setup dialog box.
|
|
Access the Print dialog box.
|
|
Select the printer you are using as the Printer setting, then make the Copies & Pages settings.
|
|
Select Print Settings from the pop-up menu.
|

|
Select plain papers as the Media Type setting, then make the settings that you want to use to print. See online help for details on Print Settings.
|
|
Select Two-sided Printing Settings from the pop-up menu.
|

|
Select Long-Edge binding or Short-Edge binding from the Two-sided Printing pop-up menu.
|
Note:|
If you are printing high-density data, such as photos or graphs, we recommend adjusting settings manually.
|
|
Load paper into the paper cassette, and click Print.
|

Automatic folded booklet 2-sided printing (for Windows only)
Automatic folded booklet 2-sided printing allows you to make single-fold booklets automatically with the Auto Duplexer.
 |
 |
|
Side Binding
|
Center Binding
|
 : Binding edgeNote:
|
This feature is not available for Mac OS X.
If the ink runs low during automatic 2-sided printing, the printer stops printing and the ink needs to be replaced. When ink replacement is complete, the printer starts printing again, but there may be some missing parts in your print out. If this happens, print the missing parts again.
|
Printer settings
|
Access the printer settings.
|
|
Click the Maintenance tab, and then select Printer and Option Information.
|
|
Make sure the Auto Duplexer Installed check box is selected, and click OK.
|
|
Click the Main tab, and then select one of the following Quality Option settings:
|
Draft for rough drafts with reduced print quality
Text for text-only pages
Text & Image for higher quality pages with text and image
Photo for good quality and speed
Best Photo for the best print quality
|
Select Front Tray as the Source setting.
|
|
Select plain papers as the Type setting.
|
|
Select A4 210 x 297 mm, Letter 8 1/2 x 11 in, or B5 182 x 257 mm as the Size setting.
|
|
Select Portrait (tall) or Landscape (wide) to change the orientation of your print out.
|
|
Click the Page Layout tab, and then select Auto from 2-sided printing. Then select the Folded Booklet check box.
|

|
Click Settings to open the Settings window.
|
|
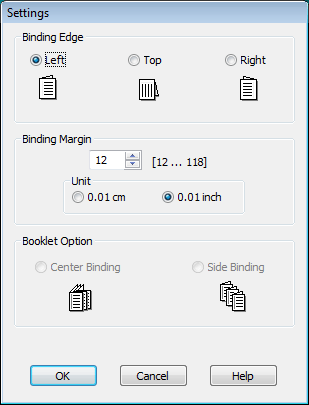
Specify the edge of the paper where the binding will be placed. You can choose Left, Top, or Right.
|
Note:|
When you select Portrait as the Orientation setting, the Left or Right binding positions are available. The Top binding position is available when you select Landscape as the Orientation setting.
|
|
Choose cm or inch as the Unit setting. Specify the width of the binding margin.
|
 |
|
|
Portrait
|
Landscape
|
* : Folding edge
** : Margin
You can enter any width from 0.3 cm to 3.0 cm, or from 0.12 inches to 1.18 inches. The specified margin width will be used on both sides of the fold. For example, if you specify a 1 cm margin, you will get a 2 cm margin (a margin of 1 cm will be placed on each side of the fold).
|
Choose Center Binding or Side Binding as the Booklet Option.
|
|
Click OK to return to the Page Layout window.
|
|
Click the Adjust Print Density button to open the Print Density Adjustment window.
|
|
Select one of the Select Document Type settings. This automatically adjusts Print Density and Increased Ink Drying Time.
|
Note:|
If you are printing high-density data, such as photos or graphs, we recommend making the settings in the Print Density Adjustment window.
|
|
Click OK to return to the Page Layout window.
|
|
Make sure all of the settings are correct, and then click OK.
|
 |
Load paper into the paper cassette, then send the print job from your application.
|
Manual standard 2-sided printing (for Windows only)
Manual standard 2-sided printing allows you to print the even-numbered pages first. Once these pages are printed, you can reload them to print the odd-numbered pages onto the opposite side of the paper.
Note:|
This feature is not available for Mac OS X.
|
Printer settings
Follow the steps below to print odd- and even-numbered pages onto opposite sides of the sheet.
|
Access the printer settings.
|
|
Click the Main tab, then select one of the following Quality Option settings:
|
Draft for rough drafts with reduced print quality
Text for text-only pages
Text & Image for higher quality pages with text and images
Photo for good quality and speed
Best Photo for the best print quality
|
Select Front Tray as the Source setting.
|
|
Select the appropriate Type setting.
|
|
Select the appropriate Size setting.
|
|
Select Portrait (tall) or Landscape (wide) to change the orientation of your printout.
|
|
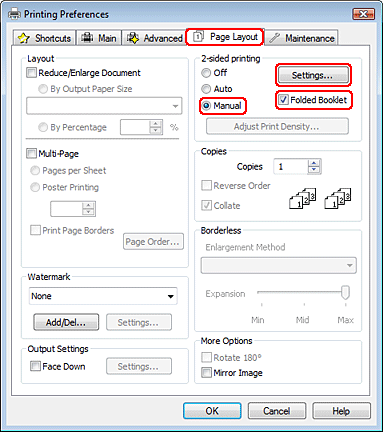
Click the Page Layout tab, then select Manual from 2-sided printing.
|

|
Click Settings to open the Settings window.
|
|
Specify the edge of the paper where the binding will be placed. You can choose Left, Top, or Right.
|
|
Choose cm or inch as the Unit setting. Then specify the width of the binding margin. You can enter any width from 0.3 cm to 3.0 cm, or from 0.12 inches to 1.18 inches.
|
Note:|
The actual binding margin may be different from the specified settings depending on your application. Experiment with a few sheets to examine actual results before printing the entire job.
|
|
Click OK to return to the Page Layout window. Then click OK to save your settings.
|
|
Load paper into the paper cassette, then send the print job from your application. Instructions for generating the odd-numbered pages will be displayed while the even-numbered pages are printed.
|
|
Follow the on-screen instructions to reload the paper.
|
Note:|
The paper may curl during printing due to the amount of ink used. Should this occur, slightly curl the sheets in the opposite direction before reloading them.
Align the sheet stack by tapping its edges against a hard, flat surface before reloading the stack.
Follow the instructions provided when reloading the printouts. Otherwise, paper may jam or the binding margins may be incorrect.
|
|
Once the paper is reloaded, click Resume to print the odd-numbered pages.
|
Manual folded booklet 2-sided printing (for Windows only)
Manual folded booklet 2-sided printing allows you to make single-fold booklets. The pages that will appear on the inside (after the page is folded) are printed first. The pages that will appear outside the booklet can then be printed after you reload the paper into the printer as shown in the illustration below.
|
|
|
Single-fold booklet
|
* : Binding edge
You can create a booklet by printing pages 2 and 3 on the first sheet of paper, pages 6 and 7 on the second sheet, and pages 10 and 11 on the third sheet.
After you reload these sheets into the paper cassette, you can then print pages 1 and 4 on the back of the first sheet of paper, pages 5 and 8 on the back of the second sheet, and pages 9 and 12 on the back of the third sheet.
The resulting pages can then be folded and bound together into a booklet.
Note:|
This feature is not available for Mac OS X.
|
Printer settings
Use the following steps to create a folded booklet.
|
Access the printer settings.
|
|
Click the Main tab, then select one of the following Quality Option settings:
|
Draft for rough drafts with reduced print quality
Text for text-only pages
Text & Image for higher quality pages with text and images
Photo for good quality and speed
Best Photo for the best print quality
|
Select Front Tray as the Source setting.
|
|
Select the appropriate Type setting.
|
|
Select the appropriate Size setting.
|
|
Select Portrait (tall) or Landscape (wide) to change the orientation of your printout.
|
|
Click the Page Layout tab and select Manual from 2-sided printing. Then select the Folded Booklet check box.
|
|
Click Settings to open the Settings window.
|
|
Specify the edge of the paper where the binding will be placed. You can choose Left, Top, or Right.
|
Note:|
When you select Portrait as the Orientation setting, the Left or Right binding positions are available. The Top binding position is available when you select Landscape as the Orientation setting.
|
|
Choose cm or inch as the Unit setting. Specify the width of the binding margin.
|
|
|
|
|
Portrait
|
Landscape
|
* : Folding edge
** : Margin
You can enter any width from 0.3 cm to 3.0 cm, or from 0.12 inches to 1.18 inches. The specified margin width will be used on both sides of the fold. For example, if you specify a 1 cm margin, you will get a 2 cm margin (a margin of 1 cm will be placed on each side of the fold).
|
Click OK to return to the Page Layout window. Then click OK to save your settings.
|
|
Load paper into the paper cassette, then send the print job from your application. Instructions for printing the inside pages will be displayed while the outside pages are printed.
|
|
Follow the on-screen instructions to reload the paper.
|
Note:|
The paper may curl during printing due to the amount of ink used. Should this occur, slightly curl the sheets in the opposite direction before reloading them.
Align the sheet stack by tapping its edges against a hard, flat surface before reloading it in the printer.
Follow the instructions provided when reloading the printouts. Otherwise, paper may jam or the binding margins may be incorrect.
|
|
Once the paper is reloaded, click Resume to print the inside pages.
|
|
Once printing is complete, fold the sheets and bind them together using a stapler or other binding method.
|