 |
|
|||
 |
||||
The Paper Jams
 Warning:
|
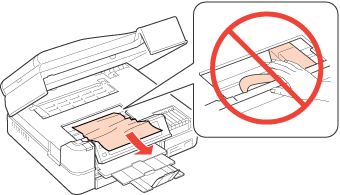
Never touch the buttons on the control panel while your hand is inside the printer.
|
 Note:
Note:|
The illustrations in this section show the PX820FWD/TX820FWD/Artisan 835.
|
Removing jammed paper from inside the printer
 |
Cancel the print job if necessary.
|
 |
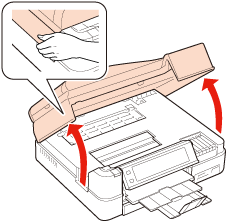
Raise the scanner unit.
|
 |
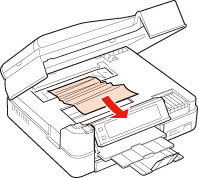
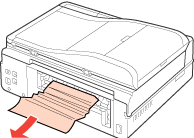
Remove all of the paper inside, including any torn pieces.
|

 |
Squeeze the hooks on the cover at the back and remove the cover.
|

 |
Remove all of the paper inside, including any torn pieces.
|
 |
Reattach the cover.
|

 |
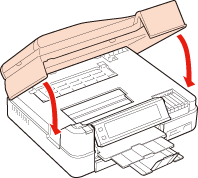
Close the scanner unit. If the jammed paper remains near the output tray, carefully remove the paper.
|
 |
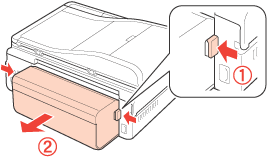
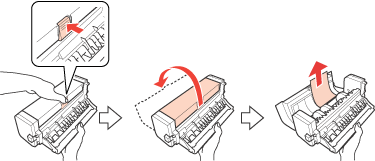
Remove the Auto Duplexer by pressing the buttons on the sides.
|
 |
Carefully remove the jammed paper.
|
 |
Insert the both sides of the connector of the Auto Duplexer along the slits of the printer.
|

 |
Holding the buttons on the sides, horizontally insert the Auto Duplexer into place.
|
 |
If the printer’s LCD screen tells you to turn off the printer, press the
 On button to turn off the printer, and then press the On button again to turn the printer back on. On button to turn off the printer, and then press the On button again to turn the printer back on. |

Removing jammed paper from the paper cassette
|
Close the output tray.
|
|
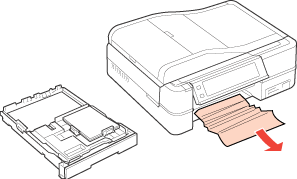
Pull out the paper cassette.
|

|
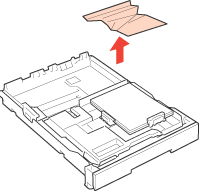
Remove the jammed paper from the cassette.
|
|
Align the edges of the paper.
|

|
Carefully remove any paper jammed inside the printer.
|
|
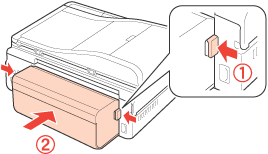
Remove the Auto Duplexer by pressing the buttons on the sides.
|
|
Carefully remove the jammed paper.
|
|
Insert the both sides of the connector of the Auto Duplexer along the slits of the printer.
|
|
Holding the buttons on the sides, horizontally insert the Auto Duplexer into place.
|
|
Keep the cassette flat as you insert it back into the printer.
|

|
Press the
 Start button. If the error message still does not clear, try the following steps. Start button. If the error message still does not clear, try the following steps. |
|
Turn off the printer and unplug the power cord from the printer and the electrical outlet. Unplug all other cables from the printer.
|
 |
Close the output tray if it is extended.
|
 |
Remove the paper cassette, and carefully stand the printer on its left side.
|

 |
Carefully remove the jammed paper.
|

 |
Replace the printer and the paper cassette.
|
 |
Plug the power cord into the printer and the electrical outlet. Plug all other cables into the printer.
|
Removing jammed paper from the automatic document feeder (ADF)
This section applies only to the PX820FWD/TX820FWD/Artisan 835.
|
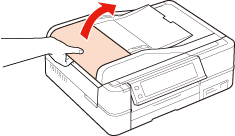
Remove the stack of paper from the ADF paper support.
|
|
Open the ADF cover.
|
 Caution:
|
Make sure you open the ADF cover before removing jammed paper. If you do not open the cover, the printer may be damaged.
|
|
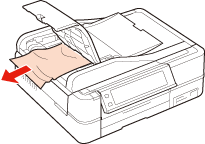
Carefully remove the jammed paper.
|
|
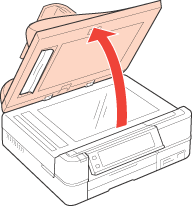
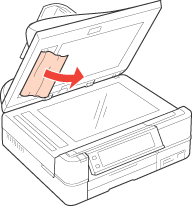
Open the document cover.
|
|
Carefully remove the jammed paper.
|
|
Close the ADF cover.
|

Removing jammed paper from the Auto Duplexer
|
Make sure the printer is turned on.
|
|
Remove the Auto Duplexer.
|
Note:|
Do not turn off the printer when removing jammed paper from the Auto Duplexer.
|
|
If you can see the paper jammed in the printer, pull it out slowly.
|
|
If you can see the paper jammed in the Auto Duplexer, open the unit and pull the jammed paper out slowly.
|
|
Reattach the Auto Duplexer.
|
Preventing paper jams
If your paper jams frequently, check the following.
The paper is smooth, not curled or wrinkled.
You are using high quality paper.
The printable side of the paper is face down in the paper cassette.
The paper stack was fanned before loading.
The paper is not loaded above the edge guides inside the paper cassette.
The number of sheets in the paper stack does not exceed the limit specified for that paper.
 See Selecting which tray to use and its loading capacities.
See Selecting which tray to use and its loading capacities.The edge guide is snug against the left edge of the paper.
The printer is on a flat, stable surface that extends beyond the base in all directions. The printer will not operate properly if it is tilted
Reprinting after a paper jam (For Windows Only)
After you cancel the print job because of a paper jam, you can reprint it without reprinting pages that have already been printed.
|
Solve the paper jam.
The Paper Jams |
|
Access the printer settings.
Accessing the printer driver for Windows |
|
Select the Print Preview check box in the Main or Advanced window of your printer driver.
|
|
Make the settings that you want to use to print.
|
|
Click OK to close the printer settings window, and then print your file. Print Preview window opens.
|
|
Select a page that has already been printed in the Front box in the upper left corner, and then select Remove Page from the Print Options menu. Repeat this step for all the pages that have already been printed.
|
|
Click Print on the Print Preview window.
|