 Printer Parts
 Control panel
Other Information
Printer Parts
Control panel

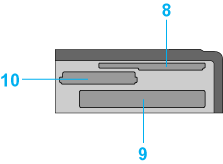
Memory card slot (enlarged figure)

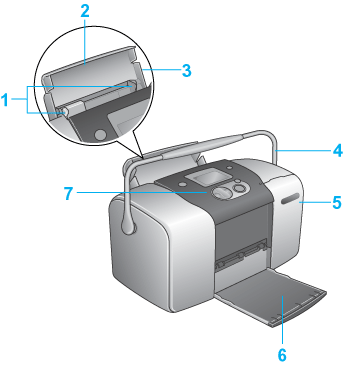
1. Edge guides: Help load the paper straight. Adjust the left edge guide to fit the width of your paper.
2. Paper support: Supports the paper loaded in the paper feeder.
3. Paper feeder: Holds blank paper and automatically feeds the paper during printing.
4. Carrying handle:
5. Memory card slot cover: Open the cover to insert or eject the memory card.
6. Output tray: Receives the ejected paper.
7. Control panel: Controls various printer functions. See the next section for details.
8. SmartMedia/xD-Picture Card memory card slot: Use to load the SmartMedia and xD-Picture Card.
9. CompactFlash Type II memory card slot: Use to load the CompactFlash or Microdrive.
10. Memory Stick/Memory Stick PRO/SD/MultiMediaCard memory card slot: Use to load the Memory Stick, Memory Stick PRO, Memory Stick Duo, MagicGate Memory Stick, SD, miniSD Card and MultiMediaCard.

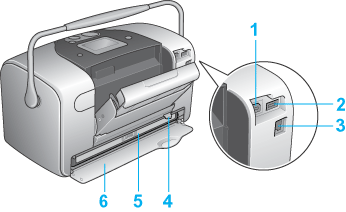
1. Computer USB connector: Used to connect the computer and printer together using the USB cable.
2. External Device USB connector: Used to connect the optional Bluetooth Photo Print Adapter or external storage devices and digital cameras that have USB DIRECT-PRINT functionality, to the printer.
3. AC inlet
4. Photo cartridge lever
5. Photo cartridge
6. Cartridge compartment cover

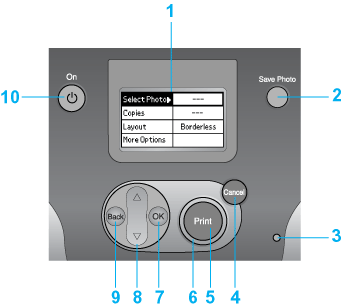
1. LCD panel: Displays the printer status messages, and the items and settings which can be changed with the buttons on the control panel.
2. Save Photo button: Store the contents of memory card in an external storage device.
3. Memory card light: On when a memory card is inserted into the memory card slot. Flashes when the printer is accessing the memory card.
4. Cancel button: Cancels print operations, or the settings on the LCD panel. Resets all printer settings when you press and hold this button for three seconds or more.
5. Print button: Starts printing with the settings on the LCD panel selected via the buttons on the control panel.
6. Power light: On when the printer is turned on and ready. Flashes during printing.
7. OK button: Opens the setting menu and selects the item to be set on the LCD panel.
8. Up  /Down
/Down  arrow buttons: Move the cursor on the LCD panel. Increase and decrease numbers being entered.
9.Back button: Returns to the main menu on the LCD panel.
10. On button: Turns the printer on and off. To turn off the printer power, press and hold the Power button for two seconds.
| Note: |
|
 Previous |
 Next |