 |
|
|||
 |
||||
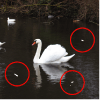
Removing Dust and Scratch Marks from Originals Using DIGITAL ICE Technology
Your scanner and its Epson Scan software are equipped with the DIGITAL ICE Technology feature that removes stubborn dust or scratch marks from your originals.
|
Original image
|
DIGITAL ICE Technology applied
|
 |
 |
DIGITAL ICE Technology can remove dust marks that the Dust Removal feature cannot. However, it takes longer to scan using DIGITAL ICE Technology and also uses more of your system resources. It is best to try removing dust marks using Dust Removal before using DIGITAL ICE Technology. See Removing Dust Marks with the Dust Removal Feature for details.
 Note:
Note:|
You cannot use Dust Removal and DIGITAL ICE Technology at the same time.
Do not use DIGITAL ICE Technology to scan originals that do not contain dust or scratch marks; otherwise your scanned image(s) may be distorted or blurred.
Images scanned with DIGITAL ICE Technology may appear softer than your original images.
|
Before using DIGITAL ICE Technology, make sure your system meets the requirements in DIGITAL ICE Technology Specifications.
DIGITAL ICE Technology Specifications
To use DIGITAL ICE Technology, your system memory and hard disk space must meet the requirements in the table below. DIGITAL ICE Technology needs additional resources to process and store your scanned images at the sizes and resolutions specified here.
|
Original type
|
Resolution *
|
Hard disk space
|
System memory
|
|
35 mm film or slide
|
150 dpi
|
1 MB
|
8 MB
|
|
300 dpi
|
1 MB
|
15 MB
|
|
|
600 dpi
|
4 MB
|
30 MB
|
|
|
1200 dpi
|
16 MB
|
59 MB
|
|
|
2400 dpi
|
63 MB
|
117 MB
|
|
|
3600 dpi
|
142 MB
|
175 MB
|
|
|
12800 dpi
|
251 MB
|
233 MB
|
|
|
Medium format film (6 × 20 cm)
|
150 dpi
|
4 MB
|
34 MB
|
|
300 dpi
|
8 MB
|
70 MB
|
|
|
600 dpi
|
29 MB
|
139 MB
|
|
|
1200 dpi
|
116 MB
|
277 MB
|
|
|
2400 dpi
|
464 MB
|
553 MB
|
|
|
3600 dpi
|
1042 MB
|
830 MB
|
|
|
12800 dpi
|
1853 MB
|
1106 MB
|
* This is the actual scan resolution used by DIGITAL ICE Technology, which is higher than the scan resolution you specify in Epson Scan. Make sure your system resources meet these increased requirements.
You can use DIGITAL ICE Technology on the following types of originals.
|
Original type
|
DIGITAL ICE Technology
|
|
Color negative film
|
Yes
|
|
Color positive film or slides
|
Yes *
|
|
Monochrome negative film
|
No **
|
|
Monochrome positive film
|
No
|
* Kodachrome film is not supported.
** Only chromogenic monochrome negative film is supported.
Note:|
It may take much longer to scan and for your software to respond to clicking Cancel if you have insufficient system resources.
|
See one of these sections for instructions on using DIGITAL ICE Technology.
Full Auto Mode: This feature is not available in Full Auto Mode. Change the scan mode to Home Mode or Professional Mode. See Changing the Scan Mode for instructions.
Office Mode: This feature is not available in Office Mode. Change the scan mode to Home Mode or Professional Mode. See Changing the Scan Mode for instructions.
Home Mode: Using DIGITAL ICE Technology in Home Mode
Professional Mode: Using DIGITAL ICE Technology in Professional Mode

Using DIGITAL ICE Technology in Home Mode
 |
Place your original(s) on the document table. See Placing Film or Slides for instructions.
|
 |
Start Epson Scan. See Starting Epson Scan for instructions.
|
 |
In the Home Mode window, select the Document Type, Image Type, and Destination settings. For details, see Scanning in Home Mode.
|
 |
Click Preview to preview your image(s), then select your scan area. See Previewing and Adjusting the Scan Area for details.
|
 |
Click the DIGITAL ICE Technology check box.
|
 Note:
Note:|
The results of DIGITAL ICE Technology do not appear in the images in the Preview window, but apply to all of them. You must scan the images to see the effects.
|
 |
Make any other necessary image adjustments. See Adjusting the Color and Other Image Settings for instructions.
|
 |
Size your image(s) as necessary. See Selecting the Scan Size for instructions.
|
 |
Click Scan to scan and remove dust and scratch marks in your image(s).
|
What happens next depends on how you started Epson Scan. See Finishing the Scan for details.
Using DIGITAL ICE Technology in Professional Mode
|
Place your original(s) on the document table. See Placing Film or Slides for instructions.
|
|
Start Epson Scan. See Starting Epson Scan for instructions.
|
|
In the Professional Mode window, select the Film Type, Image Type, Resolution, and Document Size settings. For details, see Scanning in Professional Mode.
|
|
Click Preview to preview your image(s), then select your scan area. See Previewing and Adjusting the Scan Area for details.
|
|
Scroll down to the Adjustments area and click the DIGITAL ICE Technology check box.
|
Note:|
The results of DIGITAL ICE Technology do not appear in the images in the Preview window, but apply to all of them. You must scan the images to see the effects.
|
|
Make any other necessary image adjustments. See Adjusting the Color and Other Image Settings for instructions.
|
|
Size your image(s) as necessary. See Selecting the Scan Size for instructions.
|
|
Click Scan to scan and remove dust and scratch marks in your image(s).
|
What happens next depends on how you started Epson Scan. See Finishing the Scan for details.