 |
|
|||
 |
||||
Selecting Epson Scan Settings
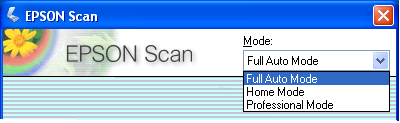
Overview of the Epson Scan Modes
Epson Scan lets you control all aspects of scanning and includes three modes.
Full Auto Mode lets you scan quickly and easily, without selecting any settings or previewing your image. This is the default mode in Epson Scan.
Full Auto Mode is best when you need to scan your images at 100% size and you do not need to preview the images before scanning. You can restore faded colors or remove dust marks by clicking the Customize button.
See Using Full Auto Mode for instructions on scanning in this mode.
Full Auto Mode is best when you need to scan your images at 100% size and you do not need to preview the images before scanning. You can restore faded colors or remove dust marks by clicking the Customize button.
See Using Full Auto Mode for instructions on scanning in this mode.
 Note:
Note:|
In Full Auto Mode, you can scan only 35 mm color film strips or color positive slides. To scan other types of film, use Home or Professional Mode.
|
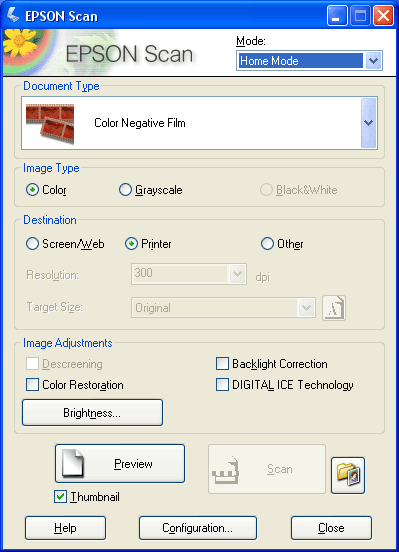
Home Mode lets you customize some scanning settings and check their effects with a preview image.
Home Mode is best when you want to preview images of photos, film, or slides before scanning them. You can size the image as you scan, adjust the scan area, and adjust many image settings, including color restoration, Digital ICE Technology (for color film and slides only), and backlight correction.
See Changing the Scan Mode for instructions on switching to Home Mode.
See Selecting Basic Settings for scanning steps.
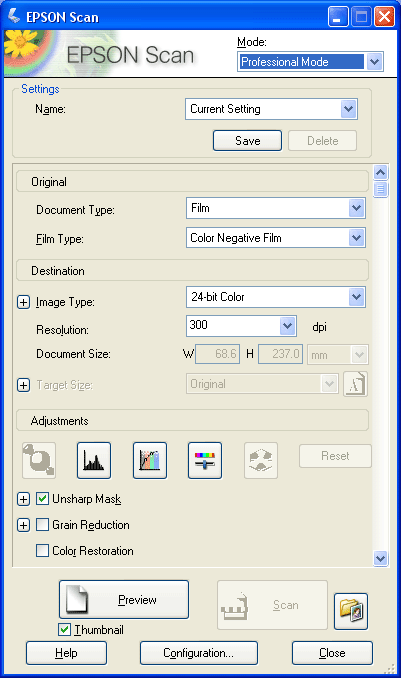
Professional Mode gives you total control of your scanning settings and lets you check their effects with a preview image.
Professional Mode is best when you want to preview your image and make extensive, detailed corrections to it before scanning. You can sharpen, color correct, and enhance your image with a full array of tools, including color restoration, dust removal, Digital ICE Technology and Digital ICE Lite Technology (for color film and slides only), and backlight correction.
See Changing the Scan Mode for instructions on switching to Professional Mode.
See Selecting Basic Settings for scanning steps.

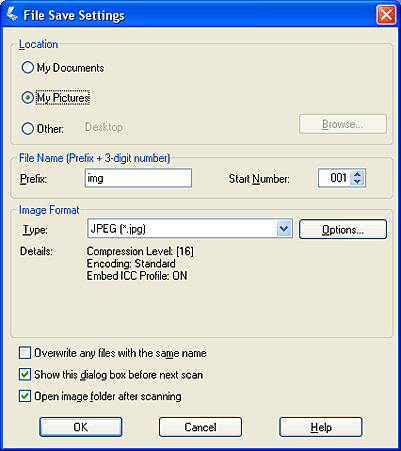
Selecting File Save Settings
When you see the File Save Settings window, you need to select the location, name, and format of the scanned image file you want to save.
 |
Do one of the following to open the File Save Settings window.
|
Full Auto Mode
In the Standby window, click the Customize button, then click the File Save Settings button (If you started Epson Scan from a program like Adobe Photoshop Elements, this button doesn’t appear.)
In the Standby window, click the Customize button, then click the File Save Settings button (If you started Epson Scan from a program like Adobe Photoshop Elements, this button doesn’t appear.)
Home or Professional Mode
Click the File Save Settings button to the right of the Scan button. (If you started Epson Scan from a program like Adobe Photoshop Elements, this button doesn’t appear.)
Click the
File Save Settings button to the right of the Scan button. (If you started Epson Scan from a program like Adobe Photoshop Elements, this button doesn’t appear.) |
In the File Save Settings window, specify the file folder in which you want to save your scanned image. Click the Documents or Pictures radio button, or the My Documents or My Pictures radio button.
|
If you want to select another folder, click Other, then click Browse (Windows) or Choose (Mac OS X) and select the folder. If you want to save your image on the desktop, simply click Other.
 |
Specify a file name prefix with an alphanumeric character string. A 3-digit number is automatically added to the file name, but you can change the Start Number if you like. If you are scanning multiple images at once, each image will receive a different 3-digit number.
|
Note:|
With Windows, the following characters cannot be used in the prefix.
\, /, :, ., *, ?, ", <, >, │ With Mac OS X, you cannot use a colon (:) in the prefix.
|
 |
Select a file format as described in the following table. Depending on the format, the Options button may be available for making detailed settings.
|
|
Format (File Extension)
|
Explanation
|
|
BITMAP (*.BMP) (Windows only)
|
A standard image file format for Windows. Most Windows programs, including word processing programs, can read and prepare images in this format.
|
|
JPEG (*.JPG)
|
A compressed file format in which the compression level can be selected. The JPEG format lets you highly compress image data. However, the higher the compression, the lower the image quality. Any lost image quality data cannot be restored and the quality deteriorates each time the data is saved. The TIFF format is recommended when modification and retouching are required.
|
|
Multi-TIFF (*.TIF)
|
A TIFF format where multiple pages are saved to the same file. You can also edit the scanned images before saving them. See Epson Scan Help for details. To open Multi-TIFF files, you need a program that supports it.
|
|
PDF (*.PDF)
|
A document format that can be read on both Windows and Macintosh systems (platform independent). To use PDF documents, you need Adobe Reader or Acrobat. Multi-page documents can be saved as one PDF file. When you save color or grayscale images in PDF, you can select a compression level. You can also edit the scanned images before they are saved. See Scanning Directly to a PDF File for details.
|
|
PICT (*.PCT) (Macintosh only)
|
A standard image file format for Macintosh. Most Macintosh programs, including word processing programs, can read and prepare images in this format.
|
|
PRINT Image Matching II JPEG (*JPG) or TIFF (*.TIF)
|
A file format that includes PRINT Image Matching II data for enhanced quality and a wider color range. Print Image Matching II compatible printers can then print this data for brilliant, true-to-life results. (PRINT Image Matching data does not affect the way the image displays on the screen.) Available in JPEG or TIFF format.
|
|
TIFF (*.TIF)
|
A file format created for exchanging data between many programs, such as graphic and DTP software. When scanning black & white images, you can specify the compression type.
|
 |
The checkboxes at the bottom of the window give you these options.
|
Overwrite any files with the same name
Select this option if you want to reuse the selected file name and location and overwrite previous files with the same names.
Select this option if you want to reuse the selected file name and location and overwrite previous files with the same names.
Show this dialog box before next scan
Select this option if you want the File Save Settings window to appear automatically before you scan (Home or Professional Mode only). If you deselect it, you must click the File Save Settings button to open the window in Home or Professional Mode.
Select this option if you want the File Save Settings window to appear automatically before you scan (Home or Professional Mode only). If you deselect it, you must click the
File Save Settings button to open the window in Home or Professional Mode.
Open image folder after scanning
Select this option if you want Epson File Manager, Windows Explorer, or the Macintosh Finder to automatically open the folder where your scanned image is saved when Epson Scan finishes scanning.
Select this option if you want Epson File Manager, Windows Explorer, or the Macintosh Finder to automatically open the folder where your scanned image is saved when Epson Scan finishes scanning.
 |
Click OK.
|
 |
In Full Auto Mode, click OK again, then click Scan. In Home or Professional Mode, click Preview, then click Scan.
|
The scanned image is automatically saved in the file and location you chose.
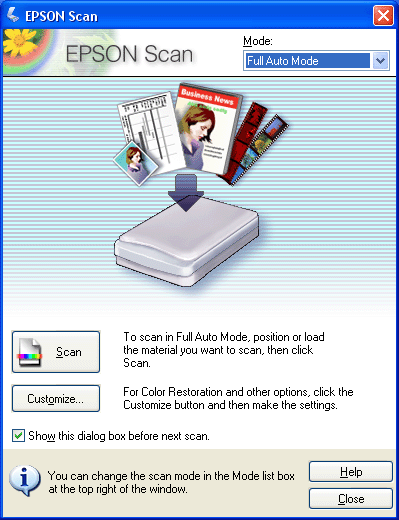
Using Full Auto Mode
When you start Epson Scan for the first time, it runs in Full Auto Mode and displays the Epson Scan standby window.
 Note:
Note:|
In Full Auto Mode, you can scan only 35 mm color film strips or color positive slides. To scan other types of film, use Home or Professional Mode.
|
|
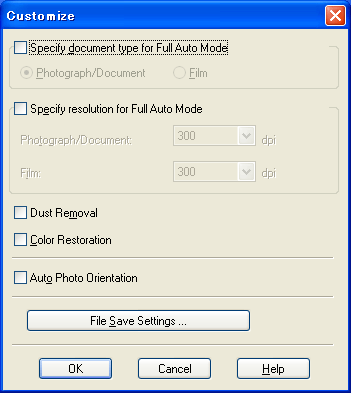
If you want to select a custom resolution, restore faded colors, or remove dust marks, click the Customize button. You see the Customize window.
|
 Note:
Note:|
If you started scanning from a program like Adobe Photoshop Elements, the File Save Settings button is not available in the Customize window.
|
Select your settings and click OK. (For details on selecting settings, click the Help button.)
|
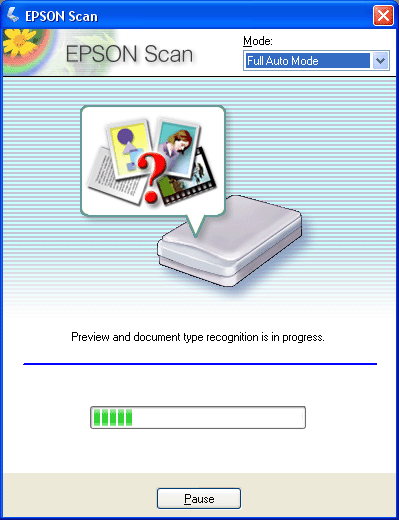
Click the Scan button. Epson Scan starts scanning in Full Auto Mode.
|
Epson Scan previews each image in your film strip or each slide, detects whether it is color positive or color negative, and selects the scan settings automatically. After a moment, you see a small preview of each image in the Epson Scan window. (It takes a few minutes to scan a full film strip.)
 Note:
Note:|
If you need to change any settings, click the Pause button. You will return to the Epson Scan standby window.
If you need to cancel scanning, click the Cancel button when it appears.
|
|
Depending on how you started Epson Scan, the program saves the files to the location you specified or opens the scanned image in your scanning program. See Finishing the Scan for details.
|
Note:|
If you have a problem scanning your film or slides in Full Auto Mode, try scanning them in Home or Professional Mode instead.
If you want to change the scan mode, see Changing the Scan Mode.
If your image is not rotated correctly, see Images are Rotated Incorrectly.
|
Changing the Scan Mode
To change the scan mode, click the arrow in the Mode box in the upper right corner of the Epson Scan window. Then select the mode you want to use from the list that appears.
 Note:
Note:|
The mode you select remains in effect when you start Epson Scan the next time.
|
For instructions on scanning using these modes, see:
Full Auto Mode: Using Full Auto Mode.
Home or Professional Mode: Selecting Basic Settings.
Selecting Basic Settings
When you start Epson Scan in Home or Professional Mode, you see the main Epson Scan window.
Home Mode
Professional Mode
Before you scan your film or slides, you need to select these basic settings.
Original settings. These tell Epson Scan the type of film or slides you are scanning.
Destination settings. These tell Epson Scan how you plan to use your scanned images so it can select the correct default resolution (scan quality) for you.
Follow these steps to select the basic settings for film or slides in Epson Scan.
|
Do one of the following to select your document type.
|
Home mode:
Click the arrow to open the Document Type list and select the type of film or slide(s) you are scanning. Select Color Negative Film, B&W Negative Film, or Positive Film for a film strip, or Positive Film for slides. Then click the Color, Grayscale, or Black&White button to select the colors in the original, if necessary.
Click the arrow to open the Document Type list and select the type of film or slide(s) you are scanning. Select Color Negative Film, B&W Negative Film, or Positive Film for a film strip, or Positive Film for slides. Then click the Color, Grayscale, or Black&White button to select the colors in the original, if necessary.
Professional mode:
Click the arrow to open the Document Type list and select Film (for scanning film or slides). Then click the arrow in the Film Type list and select Color Negative Film, B&W Negative Film, or Positive Film.
Click the arrow to open the Document Type list and select Film (for scanning film or slides). Then click the arrow in the Film Type list and select Color Negative Film, B&W Negative Film, or Positive Film.
|
Do one of the following to select your destination setting(s).
|
Home mode:
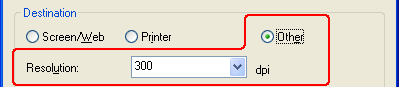
Click the button for the way you plan to use the scanned images in the Destination box.
Click the button for the way you plan to use the scanned images in the Destination box.
Screen/Web for images you will view only on a computer screen or post on the web.
Printer for images you will be printing.
Other if you want to select a specific resolution for other purposes.
Professional mode:
Click the arrow to open the Image Type list and select the detailed image type you are scanning.
Click the arrow to open the Image Type list and select the detailed image type you are scanning.
|
Image Type setting
|
Type of image you are scanning
|
|
48-bit Color
|
Color photo that you may want to modify in a 48-bit image-editing program
|
|
24-bit Color
|
Color photo
|
|
Color Smoothing
|
Color graphics, such as a chart or graph
|
|
16-bit Grayscale
|
Black-and-white photo with many shades of gray
|
|
8-bit Grayscale
|
Black-and-white photo with just a few shades of gray
|
|
Black & White
|
Black-and-white positive film or slides
|
|
In Home Mode, Epson Scan selects a default resolution setting based on the Destination setting you select. See Selecting the Scan Resolution to continue scanning.
|
Selecting the Scan Resolution
In Home Mode, you can change the resolution only if you select Other as the Destination setting.
In Professional Mode, you can select the resolution you want at any time.
Before you select the scan resolution, you should consider whether you will enlarge your images before or after you scan them. Follow these guidelines.
You will not be enlarging the images.
If you will scan the images at 100% size or smaller and will not enlarge them later, you can accept the Resolution setting selected by Epson Scan based on your Destination setting (Home Mode only).
If you will scan the images at 100% size or smaller and will not enlarge them later, you can accept the Resolution setting selected by Epson Scan based on your Destination setting (Home Mode only).
You will enlarge the images as you scan them (increase the Target Size setting).
If you will enlarge the images in Epson Scan so you can use them at a larger size, you can accept the Resolution setting selected by Epson Scan based on your Destination setting (Home Mode only).
If you will enlarge the images in Epson Scan so you can use them at a larger size, you can accept the Resolution setting selected by Epson Scan based on your Destination setting (Home Mode only).
You will scan the images at their original size, but then enlarge them later in an image-editing program.
If you plan to enlarge your images later in an image-editing program, you need to increase the Resolution setting to retain a high image quality after enlargement. Increase the resolution by the same amount you will increase the image size. For example, if the resolution is 300 dpi (dots per inch), but you will increase the image size to 200% in an image-editing program, change the Resolution setting to 600 dpi in Epson Scan.
If you plan to enlarge your images later in an image-editing program, you need to increase the Resolution setting to retain a high image quality after enlargement. Increase the resolution by the same amount you will increase the image size. For example, if the resolution is 300 dpi (dots per inch), but you will increase the image size to 200% in an image-editing program, change the Resolution setting to 600 dpi in Epson Scan.
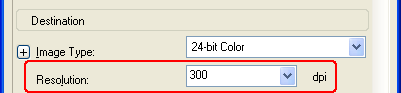
Click the arrow next to the Resolution list and select the number of dots per inch at which you want to scan. See the table below for some guidelines.
|
What you will do with the scanned image
|
Suggested scan resolution
|
|
Send via e-mail, upload to web, view only on the screen
|
96 to 150 dpi
|
|
Print
|
300 dpi
|
|
Fax
|
200 dpi
|
|
Enlarge after scanning at 100%
|
Increase Resolution setting by same amount you will increase image size after scanning
|
After selecting the Resolution, you can preview your images and make any necessary adjustments. See Previewing and Adjusting the Scan Area to continue scanning.
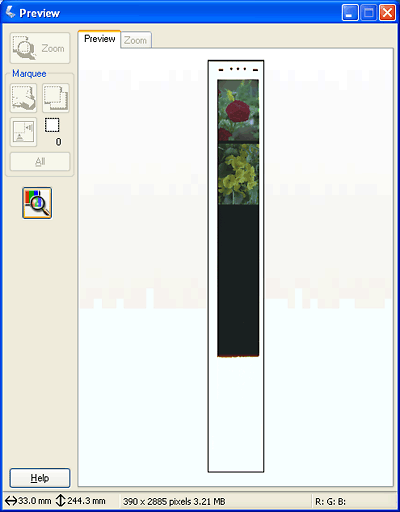
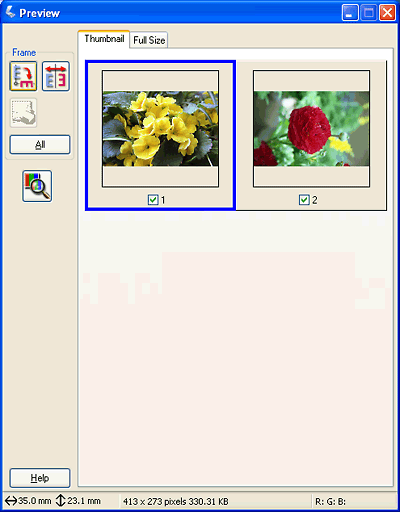
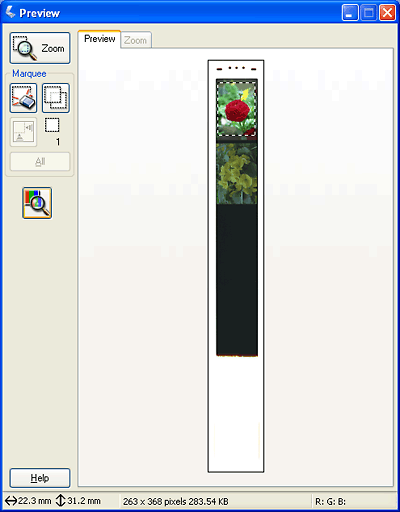
Previewing and Adjusting the Scan Area
Once you have selected your basic settings and resolution in Home or Professional Mode, you can preview your images and select or adjust the area of the images you want to scan. Epson Scan displays the preview images in a separate Preview window on your screen.
There are two types of preview.
Normal preview displays your previewed images in their entirety. You must select the scan area and make any image quality adjustments manually.
Thumbnail preview displays your previewed images as thumbnails. Epson Scan automatically locates the edges of your scan area and applies automatic exposure settings to the images. This is the default preview type when scanning film or slides.
Follow these steps to preview your images in Home or Professional Mode.
|
Click the Preview button toward the bottom of the Epson Scan window. If you want to change the preview type, click the Thumbnail checkbox under the Preview button, if it is available.
|
Epson Scan prescans your images and displays them in one of the following Preview windows.
Normal preview
Thumbnail preview
|
If you are viewing the thumbnail preview, you can do the following to adjust the image(s).
|
To zoom in on an image, double-click its thumbnail, or click the thumbnail and then click the Full Size tab near the top of the Preview window. (This feature is only available when you are scanning multiple images at the same time.)
To rotate an image or flip it horizontally (like a mirror image), click its thumbnail and then click the  rotation icon or
  mirroring icon.
rotation icon or mirroring icon.To adjust the scan area to crop your image, you can create and move a marquee that marks the edges of your scan. See Adjusting the Scan Area (Marquee) for instructions.
To adjust the image quality, click the image(s) you want to modify and make the adjustments as described in Adjusting the Color and Other Image Settings. If you want to apply the adjustments you have made to all your images, click the All button.
Note:|
If your image is not rotated correctly, see Images are Rotated Incorrectly.
|
|
If you are viewing the normal preview, you can do the following to adjust the image(s).
|
To select your scan area, draw a marquee that marks the edges of the scan area on each image. You can move and resize the marquees to change the scan areas as necessary. See Adjusting the Scan Area (Marquee) for instructions.
Note:|
If you are going to scan at a different size than your original, you must first select your Target Size and automatically create a marquee that is proportioned to that size. See Selecting the Scan Size for instructions. You can then copy the marquee and place it on each image you will scan at that size.
|
To zoom in on an image, click inside the scan area and click the Zoom button. Epson Scan prescans again and displays a larger preview on the Zoom tab. (Your other images are still previewed at the original size on the Preview tab.)
To adjust the image quality, click the image(s) you want to modify and make the adjustments as described in Adjusting the Color and Other Image Settings.
|
When you have finished adjusting the scan areas, and modifying the color and image settings, you can select the size of your scanned image, if you have not already selected it. See Selecting the Scan Size for instructions.
|
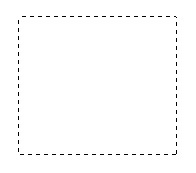
Adjusting the Scan Area (Marquee)
A marquee is a moving dotted line that appears on the edges of your preview image to indicate the scan area.
You can move the marquee, adjust its size, and create multiple marquees on one image (normal preview only) to scan different image areas in separate scan files. Follow these steps.
Note for Home Mode users:|
When you use the Thumbnail preview with film or slides, Epson Scan automatically creates marquees around your image(s) for you. If you need to adjust a marquee, click inside it and click the
 delete marquee icon before completing the steps in this section. If you do not need to adjust any marquees, skip to Adjusting the Color and Other Image Settings. delete marquee icon before completing the steps in this section. If you do not need to adjust any marquees, skip to Adjusting the Color and Other Image Settings. |
|
To draw a marquee, move your cursor over a preview image. The pointer becomes a set of cross-hairs.
|
|
Position the pointer in the area where you want to place the corner of your marquee and click. Hold down the mouse button and drag the cross-hairs over the image to the opposite corner of the desired scan area. Then release the mouse button. You see the moving dotted line of the marquee.
|
|
Do one of the following to adjust the marquee.
|
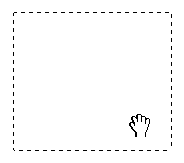
To move the marquee, position your cursor inside the marquee. The pointer becomes a hand. Click and drag the marquee to the desired location.
To resize the marquee, position your cursor over the edge or corner of the marquee. The pointer becomes a straight or angled double-arrow. Click and drag the edge or corner to the desired size.
 Note:
Note:|
To restrict movement of the marquee to vertical or horizontal only, hold down the Shift key as you move the marquee. To restrict sizing of the marquee to the current proportions, hold down the Shift key as you resize the marquee.
|
|
To draw multiple marquees (up to 50; normal preview only), you can just draw them as described in steps 1 through 3, or click the
 copy marquee icon to create additional marquees of the same size. You can move and resize all the marquees as described in step 3. To delete a marquee, click inside it and click the delete marquee icon. copy marquee icon to create additional marquees of the same size. You can move and resize all the marquees as described in step 3. To delete a marquee, click inside it and click the delete marquee icon. |
Note:|
If you draw multiple marquees, make sure you click the All button in the Preview window before you scan. Otherwise, only the area inside of the last marquee you drew will be scanned.
|
Adjusting the Color and Other Image Settings
Once you have previewed your images and adjusted the scan area, you can modify the image quality, if necessary. Epson Scan offers a variety of settings for improving color, sharpness, contrast, and other aspects affecting image quality.
Before you make adjustments, be sure to click the image or marquee for the area you want to adjust. In Professional Mode, you may need to scroll down to the Adjustments area of the main Epson Scan window.
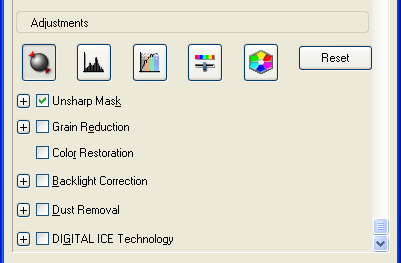
The table below describes the settings available in Home and/or Professional Mode. For details on adjusting these settings, click Help in the Epson Scan window.
When you are finished making adjustments, you can size your scanned images (see Selecting the Scan Size) or go ahead and scan (see Finishing the Scan).
|
Setting
|
Available mode(s) and description
|
|
Color Restoration
|
Home and Professional:
Restores the colors in faded photos automatically. |
|
Dust Removal
|
Professional only:
Removes dust marks from your originals automatically. The results of Dust Removal do not appear in the preview, only in your scanned image. The level of Dust Removal is adjustable. |
|
Backlight Correction
|
Home and Professional:
Removes shadows from photos that have too much background light. The level of Backlight Correction is adjustable. |
|
Grain Reduction
|
Professional only:
Reduces the effect of surface roughness from film and slide images. The level of grain reduction is adjustable. |
|
Digital ICE Technology and Digital ICE Lite Technology
|
Home and Professional:
Removes stubborn dust or scratch marks from color film or slide images. Digital ICE Lite Technology is available in Professional Mode only. |
|
Brightness
|
Home and Professional:
Adjusts the overall image lightness and darkness. In Home Mode, click the Brightness button to access the Brightness setting.
In Professional Mode, click the
 Image Adjustment button to access the Brightness setting. Image Adjustment button to access the Brightness setting. |
|
Contrast
|
Home and Professional:
Adjusts the difference between the light and dark areas of the overall image. In Home Mode, click the Brightness button to access the Contrast setting.
In Professional Mode, click the
Image Adjustment button to access the Contrast setting. |
|
Saturation
|
Professional only:
Adjusts the density of colors in the overall image. Click the
Image Adjustment button to access the Saturation setting. |
|
Color Balance
|
Professional only:
Adjusts the balance of red, green, and blue colors in the overall image. Click the
Image Adjustment button to access the Color Balance setting. |
|
Auto Exposure
|
Home: Automatically applied.
Professional: Click the
 Auto Exposure button. To turn it on continuously, click the Configuration button, click the Color tab and select Continuous auto exposure. You can adjust the level of exposure adjustment using the slider. Auto Exposure button. To turn it on continuously, click the Configuration button, click the Color tab and select Continuous auto exposure. You can adjust the level of exposure adjustment using the slider. |
|
Unsharp Mask
|
Home: Automatically applied.
Professional: Turn on to make the edges of image areas clearer for an overall sharper image. The level of sharpness is adjustable. Turn off to leave softer edges.
|
|
Histogram
|
Professional only:
Provides a graphical interface for adjusting highlight, shadow, and gamma levels individually. For advanced users only. Click the
 Histogram Adjustment button to access the Histogram setting. Histogram Adjustment button to access the Histogram setting. |
|
Tone Correction
|
Professional only:
Provides a graphical interface for adjusting tone levels individually. For advanced users only. Click the
 Tone Correction button to access the Tone Correction setting. Tone Correction button to access the Tone Correction setting. |
|
Color Palette
|
Professional only:
Provides a graphical interface for adjusting mid-tone levels, such as skin tones, without affecting the highlight and shadow areas of the image. For advanced users only. Click the
 Color Palette button to use the Color Palette settings. Color Palette button to use the Color Palette settings. |
|
Threshold
|
Home and Professional:
Adjusts the level at which the black areas in text and line art are delineated, improving text recognition in OCR programs. (Available only when you select Positive Film as the Document Type or Film Type setting and Black & White as the Image Type setting.) In Home Mode, click the Brightness button to access the Threshold setting.
|
Note:|
To view the red, green, and blue levels at particular points in your preview image as you make adjustments, click the
 densitometer icon in the preview window and click an image area. See Epson Scan help for details. densitometer icon in the preview window and click an image area. See Epson Scan help for details.Certain settings may not be available, or may be automatically selected, depending on the type of image you are previewing and other settings you have selected.
You can customize how certain Epson Scan settings behave by clicking the Configuration button and changing settings in the window that appears. See Epson Scan Help for details.
To undo any image quality adjustments you make to the preview image, click the Reset button (if available), turn off the setting, or preview your image again.
|
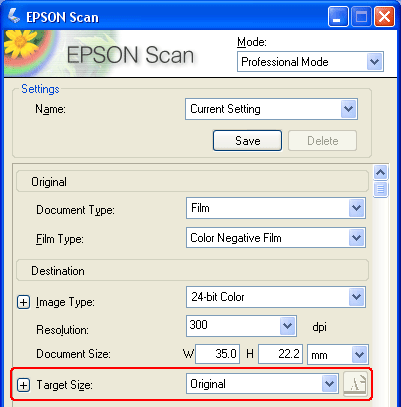
Selecting the Scan Size
You can scan your images at their original size, or you can reduce or enlarge their size as you scan them. You do this using the Target Size setting in Home or Professional Mode.
Home Mode
Professional Mode
If you are going to scan your image to a particular size, you should select the Target Size setting after previewing it, but before adjusting your scan area (indicated by the marquee). This sets the scan area to the correct proportions so your image will not be cropped unexpectedly.
For instructions on previewing your images, see Previewing and Adjusting the Scan Area. Then follow these steps to select the Target Size setting.
Note for Home Mode users:|
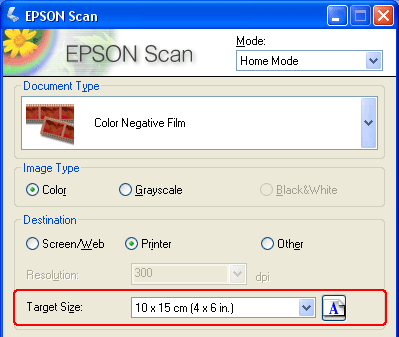
When you use the Thumbnail preview with film or slides, Epson Scan automatically selects a target size of 10 × 15 cm (4 × 6 in.) for you. If you need to select a different target size, complete the steps in this section. If you do not need to adjust any target sizes, go to step 5.
|
|
You can choose a predefined scan size from the Target Size list. Click the arrow in the list and select the size you want. A marquee (dotted line) proportioned for that size appears on your preview image.
|
|
If you need to create a scan size that is not in the Target Size list, you can create a custom size. Click the arrow in the list and select Customize. You see the Target Size window.
|

Type a name for your custom size, enter the size, click the Save button, then click OK. Your new size appears in the Target Size list.
|
In Professional Mode, you can fine-tune the size using additional tools. Click the + (Windows) or
 (Mac OS X) next to Target Size to display these tools. (Mac OS X) next to Target Size to display these tools. |
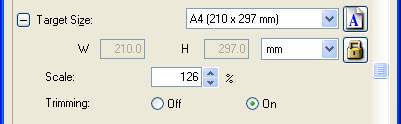
To size your image by a certain percentage, adjust the Scale value.
To change the way your image is cropped, turn Trimming on or off. (See Epson Scan Help for details.)
To unlock the proportions of your scan size, click the  lock icon. Then adjust the marquee or enter new width/height measurements.
lock icon. Then adjust the marquee or enter new width/height measurements. |
Once you have selected your scan size, you can click and drag the marquee to the area in the image you want to scan. For details, see Adjusting the Scan Area (Marquee). The marquee proportions are retained as you adjust it.
|
If you need to rotate the marquee for a landscape or portrait image without changing its aspect ratio, click the  orientation icon. (Not available if you are scanning at the Original Target Size.)
orientation icon. (Not available if you are scanning at the Original Target Size.)Note:|
For more information about using the Target Size tools, click Help in the Epson Scan window.
|
|
Now you are ready to scan your images. Click the Scan button, and see Finishing the Scan for instructions.
|
Finishing the Scan
What happens after you scan depends on how you started your scan.
If you started your scan by running Epson Scan as a standalone program in Full Auto Mode, your scanned image is saved in the file format and location you chose. If you did not choose any file save settings, it is saved as a JPEG file in the Pictures or My Pictures folder.
If you started your scan by running Epson Scan as a standalone program in Home or Professional Mode, you see the File Save Settings window. This lets you select the name and location of your saved scan files. See Selecting File Save Settings for details.
If you started your scan from a scanning program such as Adobe Photoshop Elements, your scanned images open in the program window. If Epson Scan does not automatically close after scanning, click Close to close the Epson Scan window and view your images in the program.
If you started your scan from Epson File Manager or by pressing the  Start button and used Full Auto Mode, you see thumbnails of your scanned images in the Epson File Manager window.
Start button and used Full Auto Mode, you see thumbnails of your scanned images in the Epson File Manager window.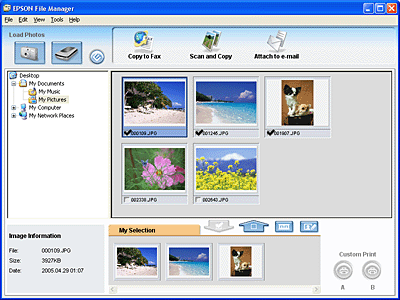 Note:
Note:|
If you do not see your scanned images, select the folder in which you saved them on the left side of the Epson File Manager window.
|
If you started your scan from Epson File Manager or by pressing the Start button and used Home or Professional Mode, you see the File Save Settings window. This lets you select the name and location of your saved scan files. See Selecting File Save Settings for details. Once scanning is finished, you see thumbnails of your scanned images in the Epson File Manager window.
Start button and used Home or Professional Mode, you see the File Save Settings window. This lets you select the name and location of your saved scan files. See Selecting File Save Settings for details. Once scanning is finished, you see thumbnails of your scanned images in the Epson File Manager window.If you want to use your scanned images in one of the Epson Creativity Suite project programs, click the checkbox beneath each image thumbnail. The images are displayed in the My Selection box on the bottom of the Epson File Manager window.
Then select one of these project icons at the top of the window.
|
Project icon
|
For instructions, see these sources
|
|
Scan and Copy
| |
|
Copy to Fax
|
See the Epson File Manager or Copy Utility Help for instructions.
|
|
Attach to e-mail
|
Note:|
Once you have saved a scanned image, you can start Epson File Manager by dragging the image file or an image folder to the EPSON File Manager icon on your desktop.
|