Basic Scanning / Using the Film Adapter
For Perfection 1650 Photo Users
 Unpacking
Removing and attaching the reflective document mat
Loading a film or slides
Scanning normal (reflective) documents
Your scanner's "integrated TPU" functions both as the document cover and the Film Adapter. You can scan negative film strips and slides simply by removing the reflective document mat.
Unpacking
When you first open the package, make sure that all the following items are included. If any items are missing or damaged, contact your EPSON dealer immediately.
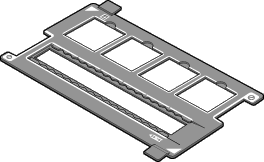
Film holder
|
|
35-mm film strip and slides
|

[Top]
Removing and attaching the reflective document mat
The reflective document mat is attached to the integrated TPU. Follow the steps below to remove and attach the reflective document mat.
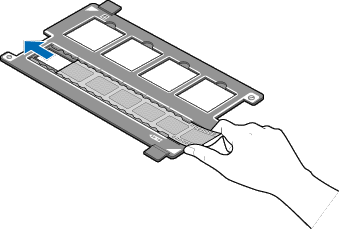
Removing the reflective document mat
 |
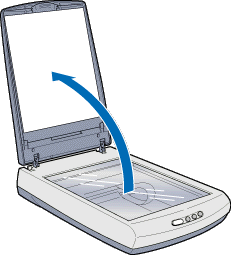
Open the integrated TPU.
|
 |
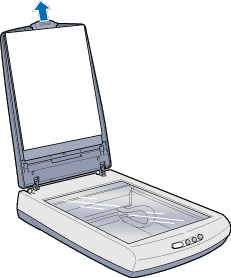
Hold the top of the reflective document mat and then slide it up gently.
|
 |
Note:
|
 |
You need to remove the reflective document mat when you scan transparent materials.
|
Attaching the reflective document mat
|
|
Open the integrated TPU.
|
|
|
Hold the top of the reflective document mat and slide it down gently along the integrated TPU.
|
 |
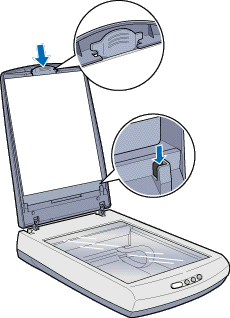
Adjust both bottom corners of the reflective document mat to the holes (position fittings) of the integrated TPU. Make sure the top of the reflective document mat is inserted in the hook of the integrated TPU.
|
|
Note:
|
|
You need to attach the reflective document mat when you scan reflective documents.
|
[Top]
Loading a film or slides
You can scan transparent materials such as positive or negative film, by passing light through the material. The following sections explain how to scan transparent materials.
You can scan a 35-mm film strip or slides.
|
Note:
|
| -
If you plan to scan transparent materials from the EPSON Smart Panel application, refer to the EPSON Smart Panel documentation for details.
|
| -
If you plan to scan transparent materials from EPSON Photo Print utility, refer to the EPSON Photo Print documentation for details.
|
| -
Wipe the inside of the integrated TPU and the scanner's document table before scanning transparencies.
|
Follow the steps below to load a film or slides.
 |
Caution:
|
|
Hold the film at the edges, or else use gloves. Touching the film surface with bare hands can leave fingerprints or other traces on the film.
|
|
|
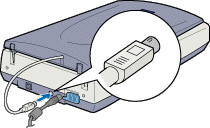
Make sure the scanner is unplugged and turned off.
|
|
|
Connect the integrated TPU connector to the scanner's option connector.
|
|
|
Plug in the scanner.
|
 |
Open the integrated TPU.
|

 |
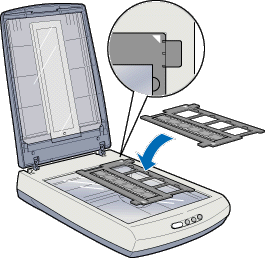
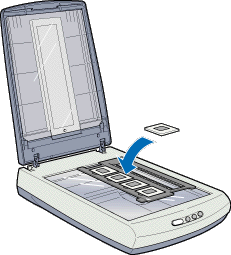
Load your transparencies into the film holder and position it on the scanner's document table. Go to the section listed below that matches the type of transparency you want to scan.
|
35-mm film strip
35-mm slides
| |
Note:
|
| | -
The base side of the film is the side which the film maker's name and film ID numbers are shown.
|
| | -
Align the up-down direction of the film with the illustration (the mirror writing of the alphabet "F") printed on the film folder.
|
35-mm film strip
Insert a strip of film in the film strip holder, base side facing down.
Place the film holder on the document table in alignment with the upper right-hand corner of the document table.
35-mm slides
Place the film holder on the document table in alignment with the upper right-hand corner of the document table.

Place slides in the 35-mm slide holder, as shown below.
 |
Close the integrated TPU.
|
For instructions on scanning transparent materials in the Full Auto mode, see Scanning from the Full Auto Mode. For instructions on scanning transparent materials in the Manual mode, see Thumbnail Preview.
|
Note:
|
| -
Make sure the integrated TPU is completely closed; otherwise you cannot obtain proper colored images.
|
| -
You need to select TPU: Color Neg. Film, TPU: Monochrome Neg. Film, or TPU: Pos. Film in the Document Source settings in the Manual mode window depending on the type of film (negative or positive) you are scanning. The scanner software automatically controls the operation of the integrated TPU.
|
| -
To remove a film holder from the document table, slide it left or right then take it out of the table.
|
[Top]
Scanning normal (reflective) documents
When you return to scanning normal reflective documents, you can simply attach the reflective document mat. See Attaching the reflective document mat.
|
Note:
|
|
When you return to scanning reflective documents in the Manual mode, you need to set the Document Source to Flatbed in the Manual mode window.
|
[Top]


