 Unpacking the Automatic Document Feeder
 Installing the Automatic Document Feeder
 Loading documents into the Automatic Document Feeder
 Loading documents manually
 Scanning from the Automatic Document Feeder
 Document specifications
Options
Unpacking the Automatic Document Feeder
Installing the Automatic Document Feeder
Loading documents into the Automatic Document Feeder
Loading documents manually
Scanning from the Automatic Document Feeder
Document specifications
The Automatic Document Feeder (B81316 ) allows you to automatically load multiple-page documents into your scanner. This document feeder is particularly useful for OCR (optical character recognition) scanning, or for creating an image database.
When you unpack your Automatic Document Feeder, make sure you have all the parts shown below and that none are damaged. If you find any missing or damaged items, contact your EPSON dealer immediately.

Follow the steps below to install the Automatic Document Feeder on your EPSON scanner.
 | Make sure your scanner is turned off, and unplug the scanner's power cord. |
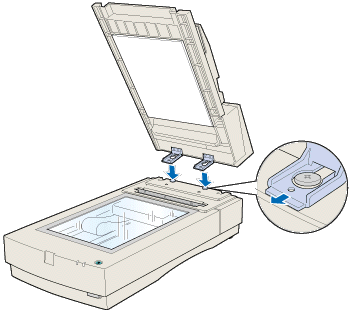
 | Remove your scanner's document cover by holding the cover behind the hinge and lifting the back of the cover straight up. |
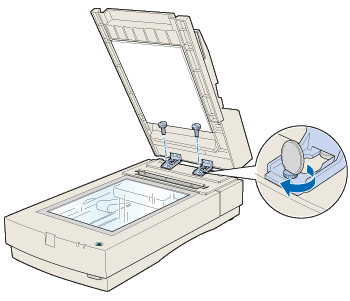
 | The scanner comes with two installation screws attached; slide the mounting slots on the Automatic Document Feeder forward, underneath these two screws. Do not remove the protective materials from the Automatic Document Feeder's mounting hardware yet. |

 | Insert the installation screws included with your Automatic Document Feeder into the holes in the scanner, then use a coin to tighten them. |

 | Remove the protective materials from the Automatic Document Feeder's mounting hardware. |
 | Close the Automatic Document Feeder. |
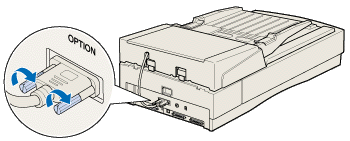
 | Attach the Automatic Document Feeder's connector to the scanner's option interface. |

Your Automatic Document Feeder can automatically load up to 30 sheets of the following paper sizes (based on a paper weight of 17 lbs and a stack thickness of 6.0 mm or less):
|
Checks |
76 x 127 mm (3 x 5 inches) |
|
B5 |
182 x 257 mm (7.17 x 10.1 inches) |
|
A4 |
210 x 297 mm (8.27 x 11.69 inches) |
|
Letter |
215.9 x 279.4 mm (8.5 x 11 inches) |
|
Legal |
215.9 x 355.6 mm (8.5 x 14 inches) |
Follow the steps below to load documents into the Automatic Document Feeder.
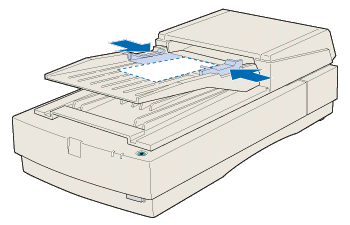
 | Slide the left edge guide all the way to the left and place your document in the feeder tray. Then move the right edge guide so it is flush with the right edge of your document. |

 | Note: |
| For checks, move the left edge guide to the center until it stops, then place your checks in the tray and move the right edge flush against them. |

 | Insert the document stack into the Automatic Document Feeder until it meets resistance. Make sure that the side you want to scan is facing up. |

 | Note: |
| To avoid paper jams, be sure to remove all documents from the Document Table before scanning. |
Documents are fed into the lower tray after scanning is finished.
You can load documents manually even when the Automatic Document Feeder is installed.
To load manually, lift the Automatic Document Feeder and place the document on the scanning table. Then lower the Automatic Document Feeder and scan the document.
 | Note: |
|
|
The scanning instructions are divided into two sections; read Scanning the full document area to scan an entire document or image, or read Scanning only part of the document area to scan only a certain part of an image or document.
You do not need to use the preview feature when scanning a full document or image. The scanner automatically find and scans the whole image. Follow the steps below to scan an image or document.
 | Note: |
| The steps below describe the scanning procedure when using Presto! PageManager for EPSON. The procedure may vary slightly when using another application. |
 | Load the document in the Automatic Document Feeder as described in Loading documents into the Automatic Document Feeder. |
 | Start Presto! PageManager for EPSON. |
 | Select EPSON TWAIN Pro from the File menu's Select Source option if necessary. |
 | Select Acquire from the File menu. The EPSON TWAIN Pro main dialog box appears. |
 | Select Auto Document Feeder from the Document Source list, then make appropriate settings for the type of document you are scanning. |
 | Click Scan. The Auto Document Feeder feeds the first sheet and scanning begins. |
After the entire document is scanned, a window with thumbnail images will appear in PageManager. In this window you can select and change the orientation of the scanned images.
To scan just a part of an image, follow the steps below.
 | Note: |
| The steps below describe the scanning procedure when using Presto! PageManager for EPSON. The procedure may vary slightly when using another application. |
 | Load only the first page of the document in the Automatic Document Feeder as described in Loading documents into the Automatic Document Feeder. |
 | Note: |
| Only set one page of the document at this time. If you set multiple pages at this time, the second page will be fed right after the first page is scanned and may become stuck in the middle of the document path as if the paper is jammed. In this case, you have to remove the second page from the document path and load it again. |
 | Start Presto! PageManager for EPSON and select Acquire from the File menu. EPSON TWAIN Pro's main dialog box appears. |
 | Click the Preview button. The first sheet of the document is fed into the scanner, then ejected after being previewed. |
 | Draw a marquee around the part of the image you want to scan by dragging the mouse pointer over that area. |
 | Load the ejected first page and all remaining pages of the document in the Automatic Document Feeder. |
 | Make EPSON TWAIN Pro settings as needed for your document type and click the Scan button. The Auto Document Feeder feeds the first sheet and scanning begins. |
After scanning the entire stack of documents, a window with thumbnail images appears in PageManager. In this window you can select and change the orientation of the scanned images.
|
Size: |
Width: 3 to 8.5 inches (76 to 215.9 mm) |
|
Thickness: |
0.07 to 0.16 mm |
|
Weight: |
52.3 to 127.9 g/m2 |
|
Paper quality: |
High-quality bond or thermal paper |
|
Document type: |
Documents printed with impact printers, laser printers, or facsimile machines |
Make sure of the following before feeding a document:
Do not feed photographic sheets or particularly valuable original artwork into this Automatic Document Feeder; misfeeding a document may result in accidental wrinkling or damage.
When you are scanning high-quality color or halftone documents, it is recommended you open the Automatic Document Feeder and scan documents individually.