Options
Using the Transparency Unit
 Unpacking the Transparency Unit
Removing the shipping screw
Installing the Transparency Unit
Preparing transparencies for scanning
Scanning normal reflective documents
The optional Transparency Unit (B81318 ) makes it possible to scan transparencies and slides. Once you install the Transparency Unit, you can leave it in place even when you scan other types of documents.
Unpacking the Transparency Unit
Make sure that all the items shown below are included and have not been damaged during shipping. Contact your EPSON dealer if any item is missing or damaged.
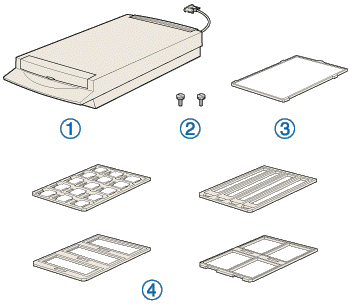
1. Transparency Unit
2. installation screws (2)
3. reflective document mat
4. film holders

[Top]
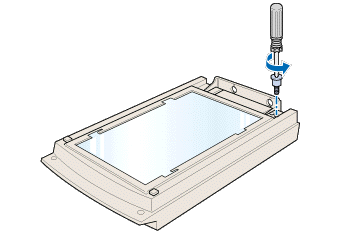
Removing the shipping screw
A shipping screw is installed on the Transparency Unit to prevent damage during shipping. Be sure to use the following procedure to remove this screw before attempting to use the unit.
 |
Turn over the Transparency Unit so its glass side is facing up.
|
 |
Remove the shipping screw as shown below.
|
 |
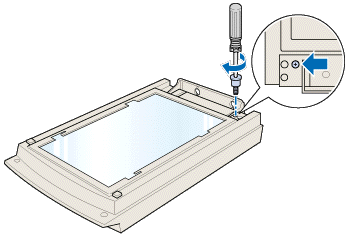
Screw the shipping screw into the storage hole as shown.
|
 |
Note:
|
[Top]
Installing the Transparency Unit
Follow the steps below to install the Transparency Unit on the scanner.
|
|
Make sure the scanner is turned off, and unplug the power cord.
|
|
|
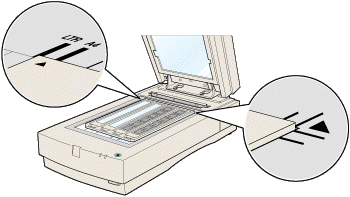
Remove the document cover from the scanner by lifting straight up on its back edge.
|
|
|
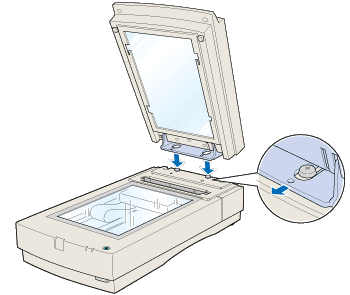
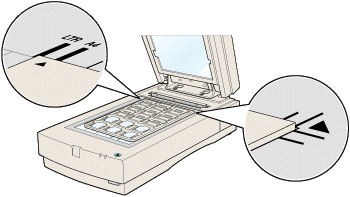
Slide the mounting slots on the Transparency Unit under the two installation screws attached to the scanner.
|
 |
Insert the two installation screws provided with the Transparency Unit into the holes as shown below, and then tighten the screws with a coin.
|

 |
Close the Transparency Unit.
|
 |
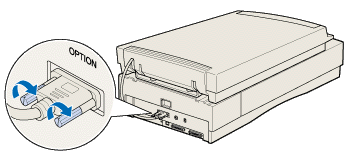
Connect the Transparency Unit's connector to the option connector on the scanner.
|
[Top]
Preparing transparencies for scanning
Four film holders for scanning various types of transparencies are included with this unit.

For instructions on loading your transparencies into the film holders and positioning them on the scanner, go to the section listed below that matches the type of transparency you want to load.
|
Note:
|
 |
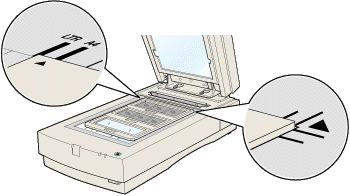
Be sure to wipe the Transparency Unit glass, the scanner's document table, and the narrow window near the mounting bracket with a soft cloth before scanning transparencies.
|
For instructions on scanning normal paper documents, see Scanning normal reflective documents.
35-mm film strips
Mounted slides
120/220 film
4 x 5 inch film
Non-standard film sizes
35-mm film strips
|
|
Place the 35-mm film strip holder on a flat surface, and remove a strip cover.
|
|
|
Insert a strip of film in the film strip holder, making sure the glossy (smooth) side of the film is facing down.
|
|
|
Replace the strip cover that you removed in step 1. Repeat steps 1 through 3 for all the film strips you scan.
|

|
|
Open the Transparency Unit, then place the film strip holder on the document table and align it as shown below.
|
|
|
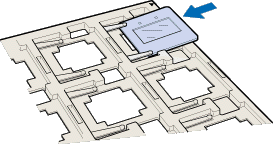
If the reflective document mat is installed on the Transparency Unit, remove it, then close the Transparency Unit.
|
| |
Note:
|
| | -
Make sure the Transparency Unit is completely closed. Otherwise an option error will occur and scanning will be cancelled.
|
| | -
When scanning transparencies, store the reflective document mat in the Transparency Unit pocket.
|

|  |
Caution:
|
| |
Do not put anything but the reflective document mat into the Transparency Unit pocket.
|
You are now ready to scan the film strips using your scanner software.
|
Note:
|
| -
Make sure to select TPU for Neg. film or TPU for Pos. film as the Document Source setting in EPSON TWAIN Pro.
|
| -
When TPU for Neg. film or TPU for Pos. film is selected as the Document Source setting, the focus position is automatically set to 2.5 to accommodate the use of the film holders.
|
Mounted slides
|
|
Load slides in the 35-mm slide holder face down, as shown below. Repeat this step for all the slides you scan.
|
|
|
Open the Transparency Unit, then place the slide holder on the document table. Align the slide holder as shown below.
|
|
|
If the reflective document mat is installed on the Transparency Unit, remove it, then close the Transparency Unit.
|
| |
Note:
|
| | -
Make sure the Transparency Unit is completely closed. Otherwise an option error will occur and scanning will be cancelled.
|
| | -
When scanning transparencies, store the reflective document mat in the Transparency Unit pocket.
|
| |
Caution:
|
| |
Do not put anything but the reflective document mat into the Transparency Unit pocket.
|
You are now ready to scan the slides using your scanner software.
|
Note:
|
| -
Make sure to select TPU for Neg. film or TPU for Pos. film as the Document Source setting in EPSON TWAIN Pro.
|
| -
When TPU for Neg. film or TPU for Pos. film is selected as the Document Source setting, the focus position is automatically set to 2.5 to accommodate the use of the film holders.
|
120/220 film
|
|
Place the 120/220 film holder on a flat surface, and open a strip cover.
|
|
|
Insert the film in the film holder, making sure the glossy (smooth) side of the film is facing down.
|
|
|
Close the cover. Repeat steps 1 through 3 for all the film you scan.
|

|
|
Open the Transparency Unit, then place the film holder on the document table and align it as shown below.
|
|
|
If the reflective document mat is installed on the Transparency Unit, remove it, then close the Transparency Unit.
|
| |
Note:
|
| | -
Make sure the Transparency Unit is completely closed. Otherwise an option error will occur and scanning will be cancelled.
|
| | -
When scanning transparencies, store the reflective document mat in the Transparency Unit pocket.
|
| |
Caution:
|
| |
Do not put anything but the reflective document mat into the Transparency Unit pocket.
|
You are now ready to scan the film using your scanner software.
|
Note:
|
| -
Make sure to select TPU for Neg. film or TPU for Pos. film as the Document Source setting in EPSON TWAIN Pro.
|
| -
When TPU for Neg. film or TPU for Pos. film is selected as the Document Source setting, the focus position is automatically set to 2.5 to accommodate the use of the film holders.
|
4 x 5 inch film
|
|
Place the 4 x 5 inch film holder on a flat surface, and open a cover.
|

|
|
Insert the film in the film holder, making sure the glossy (smooth) side of the film is facing down.
|
|
|
Close the cover. Repeat steps 1 through 3 for all the film you scan.
|
|
|
Open the Transparency Unit, then place the film holder on the document table and align it as shown below.
|
|
|
If the reflective document mat is installed on the Transparency Unit, remove it, then close the Transparency Unit.
|
| |
Note:
|
| | -
Make sure the Transparency Unit is completely closed. Otherwise an option error will occur and scanning will be cancelled.
|
| | -
When scanning transparencies, store the reflective document mat in the Transparency Unit pocket.
|
| |
Caution:
|
| |
Do not put anything but the reflective document mat into the Transparency Unit pocket.
|
You are now ready to scan the film using your scanner software.
|
Note:
|
| -
Make sure to select TPU for Neg. film or TPU for Pos. film as the Document Source setting in EPSON TWAIN Pro.
|
| -
When TPU for Neg. film or TPU for Pos. film is selected as the Document Source setting, the focus position is automatically set to 2.5 to accommodate the use of the film holders.
|
Non-standard film sizes
|
|
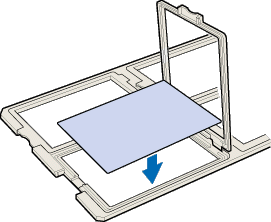
Open the Transparency Unit, then place the film directly onto the scanner's glass document table, making sure the glossy (smooth) side of the film is facing down.
|

| |
Note:
|
| |
An area approximately 1.6 mm from the horizontal and 1 mm from the vertical edges of the document table glass will not be scanned.
|
|
|
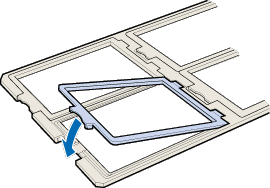
If the reflective document mat is installed on the Transparency Unit, remove it, then close the Transparency Unit.
|
| |
Note:
|
| | -
Make sure the Transparency Unit is completely closed. Otherwise an option error will occur and scanning will be cancelled.
|
| | -
When scanning transparencies, store the reflective document mat in the Transparency Unit pocket.
|
| |
Caution:
|
| |
Do not put anything but the reflective document mat into the Transparency Unit pocket.
|
You are now ready to scan the film using your scanner software.
|
Note:
|
|
When placing film directly on the document table, make sure to select TPU for Neg. film or TPU for Pos. film as the Document Source setting, and 0.0 as the focus position in EPSON TWAIN Pro.
|
[Top]
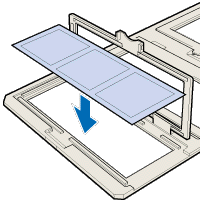
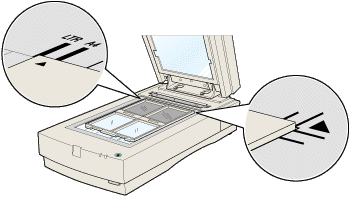
Scanning normal reflective documents
When scanning normal reflective documents, you should always use the reflective document mat included with the Transparency Unit. Also, make sure you remove the transparency guide from the scanner's document table.
Install the reflective document mat as described below.
|
|
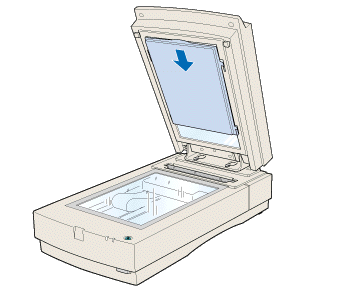
Open the Transparency Unit.
|
|
|
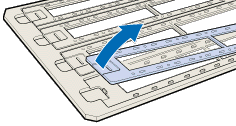
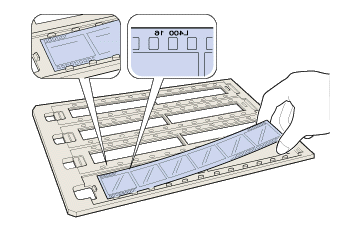
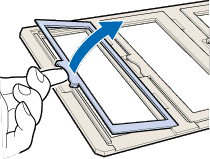
Insert the tabs on the reflective paper document mat into the slots on the Transparency Unit and slide the mat into place.
|
|
|
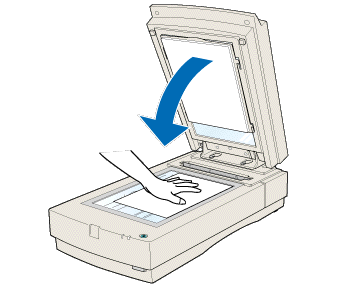
Position the reflective document and close the unit.
|
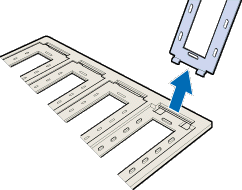
To remove the reflective document mat, slide it up and out of the slots on the Transparency Unit. Be sure to store the reflective document mat in the Transparency Unit pocket when not in use.
|
Caution:
|
|
Do not put anything but the reflective document mat into the Transparency Unit pocket.
|
[Top]