Error messagesEPSON Status MonitorRunning a printer operation check
Troubleshooting
If you are connecting via the USB interface and are having difficulty printing, the problem may be related to your USB connection. Refer to Correcting USB Problems for details.
If your problem is not USB related, troubleshooting problems is best handled in two easy steps: first diagnose the problem, then apply likely solutions until the problem is fixed.
The information that you need to diagnose and solve most common problems is provided by online problem solving, the Control Panel, the EPSON Status Monitor utility, or by running a printer operation check. Refer to the appropriate section below.
If you have a specific problem relating to print quality, a printout problem not related to print quality, or a paper feeding problem, or if this product does not print at all, refer to the appropriate section in this chapter.
To solve a problem, you may need to cancel printing. For details, see Cancelling Printing.
You can identify many common problems using the Error light and error messages on your Control Panel. If this product stops working and the Error light is on, use the following table of error messages to diagnose the problem, and then try the recommended solution.
|
Error Messages |
Problem |
Solution |
|
Quality&Paper setting is not acceptable for B&W copy. Press the Stop button. |
B&W copy button is pressed with the Photo quality setting. |
Press the Stop button and then change Quality&Paper settings. |
|
No XXX ink cartridge ---> Press the Color copy button to install new ink cartridge. |
The ink cartridge indicated in the message is not installed. |
Press the |
|
XXX ink out ---> Press the Color copy button to begin replacing the ink cartridge. |
The ink cartridge indicated in the message is empty. |
Press the |
|
Ink cartridge error ---> Press the Color copy button to begin replacing the ink cartridge. |
Error occurs at the ink cartridge. |
Press the |
|
Paper out or miss feed ---> Load paper in Paper tray and press the Color copy button. |
No paper is loaded in the sheet feeder. |
Load paper in the sheet feeder, and then press the |
|
Scanner unit open ---> Close the scanner unit. |
Scanner unit is open. |
Close the scanner unit securely. |
|
Paper jam ---> Press the Color copy button and clear the paper jam by hand if necessary. |
Paper jams occur. |
Press the |
|
Scanner error ---> See your documentation and call service if necessary. |
Scanner fails. |
Turn off this product and then make sure the transportation lock is released. If the error message still appears, contact your dealer. |
|
Printer error ---> See your documentation and call service if necessary. |
Printer fails. |
Turn this product off, and then back on. If the error message still appears, contact your dealer. |
The EPSON Status Monitor utility provides status messages and a graphic display showing the current status of this product. For details, see Checking the Printer Status.
If a problem occurs while printing, an error message appears in the Progress Meter window.
When the ink runs low or out, click the How to button in the EPSON Status Monitor or Progress Meter window and EPSON Status Monitor will lead you step-by-step through the cartridge replacement procedure.
If an error message indicating that parts inside this product are near the end of their service life appears, contact your dealer for replacement.
If you are unable to determine the source of the problem, performing a printer operation check can help you determine whether the problem comes from this product or the computer.
To print a printer operation check page, follow these steps.
 | Make sure that the computer is on and this product is turned off. |
 | Disconnect the cable from the interface connector. Make sure that your computer is on when connecting the cable; otherwise, the computer may not recognize this product. |
 | Make sure that A4 or Letter size paper is loaded in the sheet feeder. |
 | Make sure that this product is on and the Error lightis off. |
 |
Press one of the Menu buttons repeatedly until Nozzle Check appears on the LCD panel, and press the  Color Copy button. Color Copy button.
|
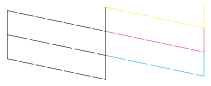
This product prints an operation check page that includes this product's ROM version information and a nozzle check pattern.
Compare the quality of the printed test page with the sample shown below. If there are no print quality problems, this product is fine and the problem probably lies with the printer software settings, the application settings, the interface cable (be sure to use a shielded cable), or the computer itself.
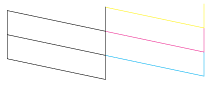
If the test page does not print satisfactorily, there is a problem with this product. For example, if bands appear in the check pattern as shown below, this could mean a clogged ink nozzle or a misaligned print head. See Cleaning the Print Head for details on cleaning the print head.