 Stylus CX Parts
 Control Panel Functions
Product Information
Stylus CX Parts
Control Panel Functions

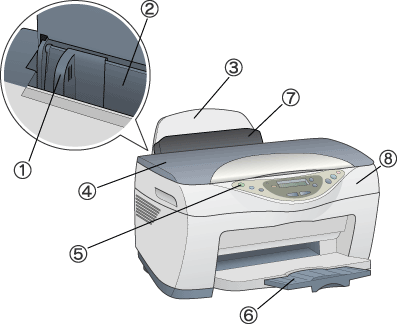
1. Edge guide: Helps load the paper straight. Adjust the left edge guide to fit the width of your paper.
2. Sheet feeder: Feeds a stack of paper automatically.
3. Paper support: Supports the paper loaded in the paper feeder.
4. Document cover: Holds the original document you want to scan or copy in place.
5.  On button: Turns this product on and off.
6. Output tray: Receives ejected paper.
7. Feeder guard: Prevents the objects which you place on the document cover from falling inside this product when opening the document cover.
8. Scanner unit: Raise and lower when you replace an ink cartridge.

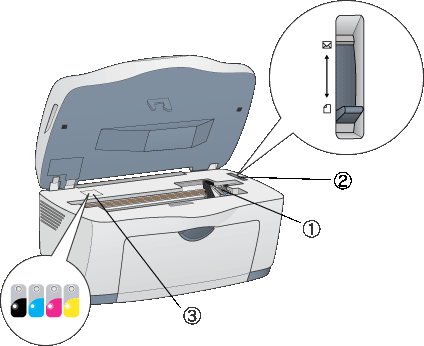
1. Ink cartridge clamps: Open and close when you replace ink cartridges. The left clamp is for black and the right is for color.
2. Adjust lever: Adjusts the distance between the print head and the paper to prevent smearing. Adjust the  position of the lever should ink appear to smear across your document when printing on thick paper or envelopes.
3. Ink Status lights: Flashes when the ink is low and turns on when ink is empty.

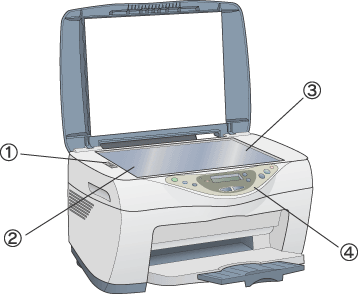
1. Transportation lock lever: Unlock the transportation lock lever to release the transportation lock.
2. Carriage: The optical sensor and light source for scanning. Before scanning the carriage is in the home position.
3. Document table: Place originals face-down on the glass.
4. Control Panel: Panel operation is explained below.
You can control most copy functions from the Control Panel.

When you press the  On button to turn on this product, the LCD panel shows the current copy mode, as well as the copy settings on quality, reduce/enlarge, paper size, and number of copies. Also, you can see the ink drop icon to check the amount of ink left. This state of the LCD panel is called the "normal display".
|
Buttons |
Function |
|
|
Turns this product on and off. |
|
|
Starts EPSON Smart Panel by default. Before using this feature, make sure you have installed EPSON TWAIN and EPSON Smart Panel from the software CD and connect this product to your computer. |
|
Recall |
Recalls the copy settings stored in the memory. When you press and hold the Recall button for 3 seconds, all of the settings are stored in the memory. |
|
Reset |
Resets the number of copies to one when the LCD panel is in normal display. Resets the values to their defaults when a menu item appears on the LCD panel. When you press and hold the Reset button for 3 seconds, all of the settings except language return to their defaults. |
|
Menu |
Display the menu items on the LCD panel. |
|
Copies/Value |
Increase or decrease the number of copies when the LCD panel is in normal display. Select an item or increases or decreases the setting's value when a menu item appears on the LCD panel. |
|
|
Copies in grayscale. |
|
|
Copies in color. Performs the function indicated in "Press the Color copy button to xxx (indicating a function)". |
|
|
Stops copying and cancels printing. The sheet being copied and printed is ejected. Returns to the normal display when a menu item appears on the LCD panel. |
|
Light |
Pattern |
Status |
|
On |
On |
This product is on. |
|
Flashing |
While Initializing, data processing, copying, printing, scanning, charging ink and cleaning, and replacing an ink cartridge. |
|
|
Error |
On |
An error occurs. |
|
Messages |
Status |
|
Turning on |
This product is turned on. |
|
Warming up |
This product is warming up. |
|
Turning off |
This product is turned off. |
|
Resetting |
The setting's values are reset to their defaults. |
|
Stored |
All of the settings are stored in the memory. |
|
Recalled |
The settings stored in the memory are recalled. |
|
Moving the ink cartridge... |
The ink cartridge (print head) is moving. |
|
Printing... |
This product is printing. |
|
Scanning... |
This product is scanning. |
|
Color Copying... |
This product is copying in color. |
|
B&W Copying... |
This product is copying in grayscale. |
When you press one of the Menu buttons, the following menu items appears on the LCD panel.
|
Menu item |
Description |
|
Quality&Paper |
Selects the copy quality using the Copies/Value buttons. |
|
Paper size |
Selects the paper size by pressing the Copies/Value buttons. |
|
Lighter/Darker |
Sets the copy printout density from the five levels by pressing the Copies/Value buttons. |
|
Reduce/Enlarge |
Selects the zoom by pressing the Copies/Value buttons. |
|
Zoom In/Out |
Selects the zoom from 25 to 400% by pressing the Copies/Value buttons. |
|
Copy mode |
Selects the copy mode by pressing the Copies/Value buttons. |
|
Language |
Sets the language used on the LCD panel. Press the Copies/Values buttons to select the display language. |
|
Head Alignment 1 |
When "Press the Color copy button to print head alignment pattern." appears on the LCD panel, press the |
|
Nozzle Check |
When "Press the Color copy button to print nozzle check pattern." appears on the LCD panel, press the |
|
Head Cleaning |
When "Press the Color copy button to clean the print head." appears on the LCD panel, press the |
|
Change Cartridge |
When "Press the Color copy button to replace the ink cartridge." appears on the LCD panel, press the |
|
Ink Levels |
The amount of ink left appears as a percentage between 0% and 100%, in 10% increments. |
|
Load/Eject |
When "Press the Color copy button to load/eject paper." appears on the LCD panel, press the |
 Next |