 |
 |
|
||
 |
||||
Scanning in Professional Mode
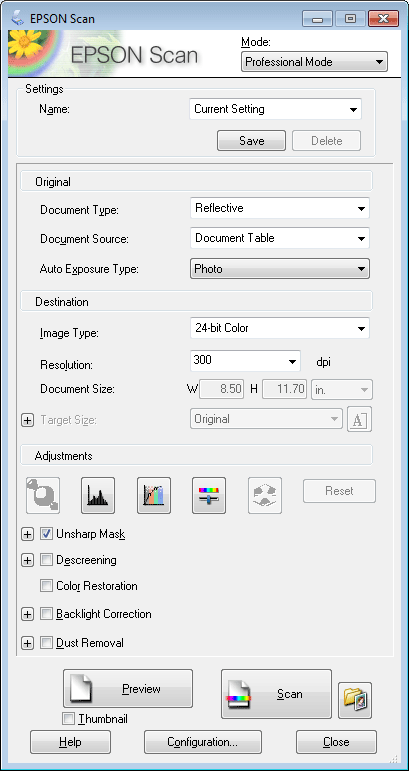
Professional Mode gives you total control of your scanning settings and lets you check the changes you have made in a preview image. This mode is recommended for advanced users.
 Note:
Note:|
See the Help for more details on Epson Scan.
|
 |
Place your original(s).
|
 |
Start Epson Scan.
|
 |
Select Professional Mode from the Mode list.
|

 |
Select the type of original(s) you are scanning as the Document Type setting.
|
 |
Select the Document Source setting.
|
 |
If you select Reflective as the Document Type setting, select Photo or Document as the Auto Exposure Type setting.
|
 |
Select the Image Type setting.
|
 |
Select an appropriate resolution for your original(s) as the Resolution setting.
|
 |
Click Preview to preview your image(s). The Preview window opens and displays your image(s).
|
 Note for the Automatic Document Feeder (ADF):
|
The ADF loads your first document page, and then Epson Scan prescans it and displays it in the Preview window. The ADF then ejects your first page.
Place your first document page on top of the rest of the pages, and then load the entire document into the ADF. Do not load paper above the
 arrow mark on the ADF. arrow mark on the ADF. |
 |
Select the size of the scanned image(s) as the Target Size setting if necessary. You can scan your images at their original size, or you can reduce or enlarge their size by selecting Target Size.
|
 |
Adjust the image quality if necessary.
|
 Note:
Note:|
You can save the settings you make as a group of custom settings with a Name, and later apply these custom settings when scanning. Your custom settings are also available in Epson Event Manager.
See the Help for more details on Epson Event Manager.
|
 |
Click Scan.
|
 |
In the File Save Settings window, select the Type setting and then click OK.
|
 Note:
Note:|
If the Show this dialog box before next scan check box is cleared, Epson Scan starts scanning immediately without displaying the File Save Settings window.
|
Your scanned image is saved.
