 |
|
|||
 |
||||
Previewing and Adjusting the Scan Area
Selecting a preview mode
Once you have selected your basic settings and resolution, you can preview your image and select or adjust the image area in a Preview window. There are two types of preview.
Normal preview displays your previewed image(s) in their entirety. You can select the scan area and make any image quality adjustments manually.
Thumbnail preview displays your previewed image(s) as thumbnail(s). Epson Scan automatically locates the edges of your scan area, applies automatic exposure settings to the image(s), and rotates the image(s) if necessary.
 Note:
Note:|
Some of the settings that you change after previewing an image are reset if you change the preview mode.
Depending on your document type and the Epson Scan mode you are using, you may not be able to change the preview type.
If you preview image(s) without the Preview dialog displayed, image(s) are displayed in the default preview mode. If you preview with the Preview dialog displayed, image(s) are displayed in the preview mode that was displayed just before previewing.
To resize the Preview window, click and drag the corner of the Preview window.
See the Help for more details on Epson Scan.
|

Creating a marquee
A marquee is a moving dotted line that appears on the edges of your preview image to indicate the scan area.
Do one of the following to draw a marquee.
To draw the marquee manually, position the pointer in the area where you want to place the corner of your marquee and click. Drag the cross-hairs over the image to the opposite corner of the desired scan area.
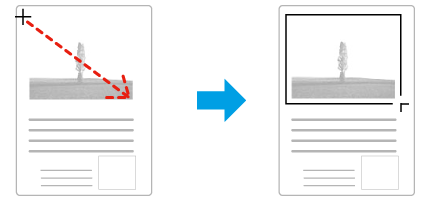
To draw the marquee automatically, click the  auto locate icon. You can only use this icon when you are viewing a normal preview and you only have one document on the document glass.
auto locate icon. You can only use this icon when you are viewing a normal preview and you only have one document on the document glass.To draw the marquee at a specified size, type in a new width and height in the Document Size setting.
For best results and image exposure, make sure all sides of the marquee are located inside the preview image. Do not include any areas around the preview image in the marquee.
Adjusting a marquee
You can move the marquee and adjust its size. If you are viewing a normal preview, you can create multiple marquees (up to 50) on each image to scan different image areas as separate scan files.
 |
To move the marquee, position your cursor inside the marquee. The pointer becomes a hand. Click and drag the marquee to the desired location.
|
 |
To resize the marquee, position your cursor over the edge or corner of the marquee.
The pointer becomes a straight or angled double-arrow. Click and drag the edge or corner to the desired size.
|
 |
To create additional marquees of the same size, click this icon.
|
 |
To delete a marquee, click inside the marquee and click this icon.
|
 |
To activate all marquees, click this icon.
|
Note:|
To restrict the movement of the marquee to vertical or horizontal only, hold down the Shift key as you move the marquee.
To restrict the size of the marquee to the current proportions, hold down the Shift key as you resize the marquee.
If you draw multiple marquees, make sure you click All in the Preview window before you scan. Otherwise, only the area inside the last marquee you drew will be scanned.
|