Placing Film or Slides (Perfection 3590 Photo)
 Removing the Document Mat Removing the Document Mat
Placing Film in the Auto Film Loader
Placing a Slide in the Slide Holder
Storing the Slide Holder
Replacing the Document Mat
Removing the Document Mat
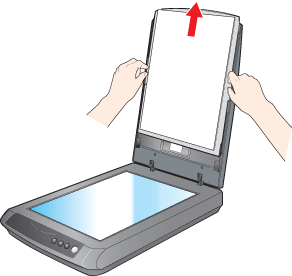
To scan film strips or slides, you need to remove the document mat from the scanner cover.
 |
Make sure the cover cable is connected to the scanner’s OPTION port.
|
 |  |
Note: |
| |
|
Before connecting or disconnecting the cover cable, unplug the scanner’s power cord to turn it off.
|
|
 |
Open the scanner cover and gently slide up the document mat to remove it.
|
 |
Use a soft cloth to wipe the transparency unit window and the document table before placing your film or slides.
|

To place film for scanning, see Placing Film in the Auto Film Loader.
To place a slide for scanning, see Placing a Slide in the Slide Holder.
Placing Film in the Auto Film Loader
The Perfection 3590 Photo comes with an auto film loader on the scanner cover that lets you load a film strip for scanning automatically.
Before loading a filmstrip in the Auto Film Loader, make sure it meets these requirements to avoid damaging your film or the film loader:


|
|
Make sure you have installed EPSON Scan and have turned on your computer.
|
|
|
Close the scanner cover.
|

| |
Note: |
| |
|
Make sure nothing is on the document table before you close it.
|
|
 |
Press and release the back of the auto film loader cover to open it.
|

 |
Flip out the metal film guide and press it all the way down.
|

| |
Note: |
| |
|
Always open the film guide whenever you use the auto film loader, no matter how short a film strip is; otherwise, it may cause a film jam.
|
|
 |
Place a film strip into the auto film loader with its shiny base side facing down. Your images and any wording on the film strip should appear backwards on the side that faces up. Slowly slide the film into the loader. Let go of the film when the scanner begins to automatically feed it into position.
|

| |
Note: |
| |
|
If you have difficulty inserting your film, slightly bend the film so that it straightens out.
|
|

To scan your film, see Starting a Scan With the Scanner Buttons.
 |
Caution: |
|
-
Do not touch the film, close the auto film loader cover, press the  Eject button, or open the scanner cover during scanning. Eject button, or open the scanner cover during scanning.
|
|
When you are ready to eject your film, see Ejecting Film.
When you finish scanning, eject the film from the auto film loader.
|
|
Press the Eject button.
|

|
|
Remove the film after the  Start light turns on. Start light turns on.
|
| |
Note: |
|
|
Flip the metal film guide back in and close the auto film loader cover.
|
| |
Note: |
When you are finished scanning film, be sure to replace the document mat before scanning documents or photos. See Replacing the Document Mat.
Placing a Slide in the Slide Holder
You can scan one 35 mm slide at a time using the 35 mm slide holder.
|
Note: |
|
|
You cannot scan negative slides.
|
|
|
|
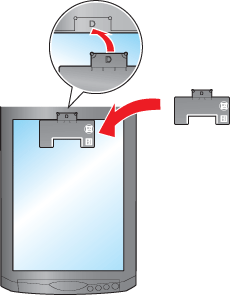
Place the 35 mm slide holder on the top of the document table. Make sure the tab labelled “D” on the slide holder fits into the area labelled “D” on the scanner.
|
| |
Note: |
| |
|
Make sure the white sticker on the back of the slide holder and the areas around them are not scratched, dusty, or covered in any way. If the areas are obscured, the scanner may have trouble recognizing your film in Full Auto Mode.
|
|
|
|
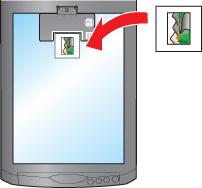
Place the slide in the slide holder with its shiny base side facing down. Your image should appear backwards on the side that faces up. For landscape-oriented slides, place the top of the image toward the left. For portrait-oriented slides, place the top of the image toward the top of the scanner.
|
| |
Note: |
| |
|
Do not place the long edge of the slide horizontally in the film holder.
|
|
|
|
Close the scanner cover.
|
To scan your slide, see Starting a Scan With the Scanner Buttons.
When you are finished scanning slides, be sure to store the slide holder and replace the document mat before scanning documents or photos. See Storing the Slide Holder and Replacing the Document Mat.
When you are not using the slide holder, you can store it inside the scanner cover.
|
|
Slide the slide holder into the scanner cover.
|

Be sure to replace the document mat before scanning documents or photos. See Replacing the Document Mat.
Replacing the Document Mat
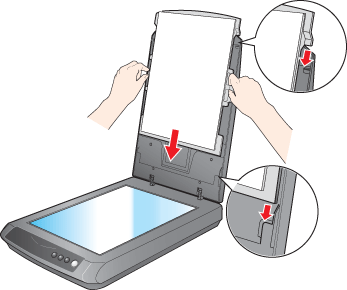
Replace the document mat by sliding it into the notches beneath the scanner cover. Make sure the white surface faces outwards.
| 

 Top
Top