 |
|
|||
 |
||||
Basic Printing

 Note:
Note:|
The screen shots in this section may vary depending on the model.
|
Preparing the print file
When you print a borderless photo, part of the image will be cropped off because this option enlarges the image slightly beyond the paper size.
You need to adjust the image file to the size of the paper. If your application has margin settings, make sure they are set to zero before printing.

Paper compatible with borderless printing
If you want to print borderless photos, refer to the table below because borderless printing is not available for all types of paper.
|
Epson Photo Paper
|
A4, 10 × 15 cm (4 × 6 in.), 13 × 18 cm (5 × 7 in.)
|
|
Epson Glossy Photo Paper
|
A4, 10 × 15 cm (4 × 6 in.), 13 × 18 cm (5 × 7 in.)
|
|
Epson Ultra Glossy Photo Paper
|
A4, 10 × 15 cm (4 × 6 in.), 13 × 18 cm (5 × 7 in.)
|
|
Epson Matte Paper - Heavyweight
|
A4
|
|
Epson Premium Glossy Photo Paper
|
A4, 10 × 15 cm (4 × 6 in.), 13 × 18 cm (5 × 7 in.), 16:9 wide size (102 × 181 mm)
|
|
Epson Premium Semigloss Photo Paper
|
A4, 10 × 15 cm (4 × 6 in.)
|
Note:|
Borderless printing takes longer than normal printing.
Print quality may decline in the top and bottom areas of the printout, or the area may be smeared when printing on papers other than those listed above. Print a single sheet to check the quality before printing large jobs.
|
Loading paper or envelopes
Refer to the section below for details on loading paper.
When using special Epson paper, refer to the section below.
For details on the printable area, click the Appendix tab in the upper right corner of the User’s Guide window. Then click Product Information and Technical Specifications.
Basic Printer settings for Windows
 |
Open the file you want to print.
|
 |
Access the printer settings.
|

 |
Click the Main tab.
|
 |
Select the appropriate Paper Source setting.
|
Note:|
Paper Source options may not be available with some models.
|
 |
Select the appropriate Document Size setting. You can also define a custom paper size. For details, see the online help.
|
 |
Check Borderless to print borderless photos.
|
If you want to control the amount of the image that extends beyond the edges of the paper, click the Settings button, select Auto Expand as the Method of Enlargement, and then adjust the Amount of Enlargement slider.
 |
Select Portrait (tall) or Landscape (wide) to change the orientation of your printout.
|
Note:|
Select Landscape when printing on envelopes.
|
 |
Select the appropriate Paper Type setting.
|
Note:|
Print quality is automatically adjusted for the selected Paper Type.
|
 |
Click OK to close the printer settings window.
|
Note:|
To make changes to advanced settings, refer to the relevant section.
|
 |
Print your file.
|
Basic Printer settings for Mac OS X 10.5 or 10.6
|
Open the file you want to print.
|
|
Access the Print dialog box.
|

|
Click the
 button to extend this dialog box. button to extend this dialog box. |
|
Select the printer you are using as the Printer setting, and then make suitable settings.
|
 Note:
Note:|
Select Landscape when printing on envelopes.
Depending on your application, you may not be able to select some of the items in this dialog box. If so, click Page Setup on the File menu of your application, and then make suitable settings.
Select XXX (Borderless) as the Paper Size if you want to print borderless photos.
|
|
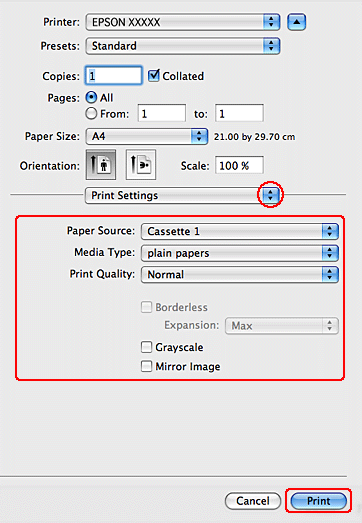
Select Print Settings from the pop-up menu.
|
|
Make the settings that you want to use to print. See the online help for more details on Print Settings.
|
Note:|
To make changes to advanced settings, refer to the relevant section.
|
|
Click Print to start printing.
|
Basic Printer settings for Mac OS X 10.4
|
Open the file you want to print.
|
|
Access the Page Setup dialog box.
|

|
Select the printer you are using as the Format for setting and then make suitable settings.
|
Note:|
Select Landscape when printing on envelopes.
Select XXX (Borderless) as the Paper Size if you want to print borderless photos.
|
|
Click OK to close the Page Setup dialog box.
|
|
Access the Print dialog box.
|

|
Select the printer you are using as the Printer setting. Then make the Copies & Pages settings.
|
|
Select Print Settings from the pop-up menu.
|

|
Make the settings that you want to use to print. See the online help for more details on Print Settings.
|
Note:|
To make changes to advanced settings, refer to the relevant section.
|
|
Click Print to start printing.
|