 |
 |
|
||
 |
||||
Using the Scanner as a Copier
You can use your scanner along with a printer connected to your computer just like you would use a copy machine. You can even enlarge and reduce, restore faded colors, remove dust, enhance text, and adjust image brightness and contrast as you copy.
 |
Place your original(s) on the document table. See one of these sections for instructions.
|
Documents or photos: Placing Documents or Photos
Film or slides (Perfection V300 Photo only): Placing Film or Slides (Perfection V300 Photo Only)
 |
Start the Copy Utility in one of these ways.
|
Press the  Copy button on the scanner.
 Copy button on the scanner.
Windows: Select the start button or Start > Programs or All Programs > Epson Software > Copy Utility.
Mac OS X: Select Applications > Epson Software > Copy Utility, and double-click the Copy Utility icon.
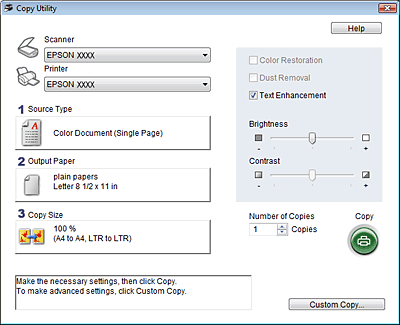
You see the Copy Utility window.

 |
Select your scanner from the Scanner list at the top of the window.
|
 |
Select your printer from the Printer list.
|
 |
Click the Source Type box, select the type of original(s) you are copying, and click OK. See the table below for guidance.
|
|
Source Type setting
|
Type of document
|
|
Color Document (Single Page)
|
One-page color documents containing text or text and graphics, such as a flyer.
|
|
Black & White Document (Single Page)
|
One-page black and white documents containing text or text and graphics, such as a letter.
|
|
Color Document (Multiple Pages)
|
Multiple page color documents containing text or text and graphics, such as a brochure.
|
|
Black & White Document (Multiple Pages)
|
Multiple page black and white documents containing text or text and graphics, such as a manual.
|
|
Photo
|
Color or black-and-white photographs.
|
|
Negative Film
|
Color negative film strips.
|
|
Positive Film
|
Color positive slides or positive film strips.
|
 |
Click the Output Paper box, select the type and size of paper you loaded in your printer, and click OK.
|
 Note:
Note:|
If you are printing on certain Epson printers, you see the printer settings window. See your printer documentation for instructions on selecting settings.
|
 |
If you want to enlarge or reduce your image(s) as you copy it, click the Copy Size box, select the enlargement/reduction, and click OK.
|
 Note:
Note:|
If you are printing on an Epson printer that supports borderless printing, you can select options for Margins (borders) or No Margins (borderless).
|
 |
If you are copying a faded photo and want to restore the colors, click the Color Restoration check box. It is available only when the Source Type is Photo, Negative Film, or Positive Film.
|
 |
If you need to remove dust marks as you copy, click the Dust Removal check box. It is available only when the Source Type is Negative Film or Positive Film.
|
 |
If you are copying a color or black-and-white document, you can improve the definition of text and line art by leaving the Text Enhancement check box checked. It is available only when the Source Type is Color Document (Single Page), Black & White Document (Single Page), Color Document (Multiple Pages), or Black & White Document (Multiple Pages).
|
 |
If you need to adjust the lightness or darkness of your original(s) or adjust the contrast between them as you copy, click the slider beneath the Brightness and/or Contrast settings. Contrast is only adjustable when the Source Type is Photo, Negative Film, or Positive Film.
|
 |
Click the arrow in the Number of Copies box to select the number of copies you want, if necessary.
|
 |
When you are ready to scan and print, click Copy.
|
 Note:
Note:|
If you want to preview your scan before printing it or select additional copy settings, click Custom Copy at the bottom of the window. Click Help in the Copy Utility for instructions on using the Custom Copy features.
|