 |
|
|||
 |
||||
Ad Hoc mode
In Ad Hoc mode, the printer and computer communicate wirelessly without using an access point. First, set the computer’s Ad Hoc settings (SSID) to connect using Ad Hoc mode.
Ad Hoc setup on the computer
 Note:
Note:|
Even if you have a Wi-Fi connection the printer and the computer may not be able to communicate in your environment. You should still be able to set up an Ad Hoc connection. This is a direct connection between printer and computer. This will allow only one PC to connect. Other PCs will not be able to make a Wi-Fi connection to the printer.
The procedure to set up Ad Hoc by computer depends on your OS, computer, and the manufacturer of your wireless devices. For details, refer to the documentation of the wireless devices or contact the manufacturer’s customer support. The following section describes setup for Windows 7, Vista, XP or Mac OS X standard settings.
|
For Windows 7/Vista
 |
Select Start > Control Panel > View network status and tasks.
|
 |
Click Change adapter settings (for 7) or Manage network connections (for Vista).
|
 |
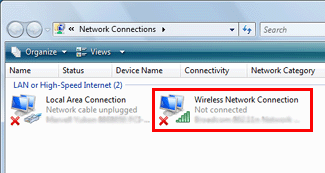
Double-click the Wireless Network Connection icon.
|
 |
For Windows 7: Click Open Network and Sharing Center, and then click Set up a new connection or network.
For Windows Vista: Click Set up a connection or network. |
 |
Select Set up a wireless ad hoc (computer-to-computer) network, and then click Next.
|
 |
Click Next.
|
 |
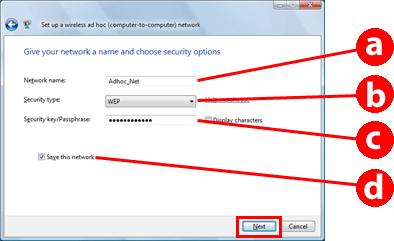
See the following table to make your settings, and then click Next.
|
|
a
|
Network name (SSID): enter a name using any of the following characters.
0123456789
!”#$%&’()*+,-./:; ABCDEFGHIJKLMNOPQRSTUVWXYZ abcdefghijklmnopqrstuvwxyz [\]^_`{│}~<=>?@ |
|
b
|
Security type: select WEP.
|
|
c
|
Security key: enter a word using 5 to 13 characters (e.g. epson).
|
|
d
|
(Windows 7/Vista)
Save this network: select this check box. |
 |
Click Close.
|
 |
Double-click the Wireless Network Connection icon.
|
 |
Make sure the Ad Hoc connection has been registered, and then click appropriate place on the Desktop (for 7) or Cancel (for Vista).
|
Note: |
If the Connect button is displayed when you select the network name (SSID), click Connect.
|
For Windows XP
|
Select Start > Control Panel > Network and Internet Connections.
|
|
Click Network Connections.
|
|
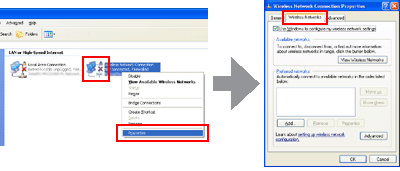
Right-click Wireless Network Connection, select Properties, and then click the Wireless Networks tab.
|
Note: |
If you are using a utility that was supplied with your wireless device, the Wireless Networks tab may not be displayed. For more details, see the documentation supplied with your wireless device.
|
|
Select Use Windows to configure my wireless network settings and then click Advanced.
|
|
Select Computer-to-computer (ad hoc) networks only.
|
|
Clear Automatically connect to non-preferred networks and then click Close.
|
|
Click Add.
|
|
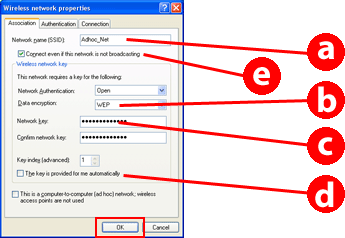
See the following table to make your settings, and then click OK.
|
|
a
|
Network name (SSID): enter a name using any of the following characters.
0123456789
!”#$%&’()*+,-./:; ABCDEFGHIJKLMNOPQRSTUVWXYZ abcdefghijklmnopqrstuvwxyz [\]^_`{│}~<=>?@ |
|
b
|
Security type: select WEP.
|
|
c
|
Security key: enter a word using 5 to 13 characters (e.g. epson).
|
|
d
|
(Windows XP)
The key is provided for me automatically: clear this box to enter the security key. |
|
e
|
(Windows XP SP3)
Connect even if this network is not broadcasting: select this check box. |
|
Click the Connection tab.
|
|
Select Connect when this network is in range, and then click OK.
|
 |
Right-click Wireless Network Connection, select Properties., and then click the Wireless Networks tab again.
|
 |
Check that the icon has a blue circle, and then click OK.
|

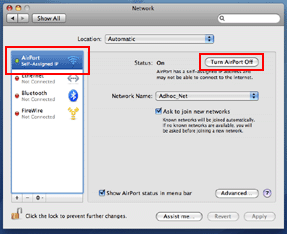
For Mac OS X
|
Select System Preferences from the Apple Menu.
|
|
Click Network icon.
|
|
Select AirPort, and then click Turn AirPort On.
|
|
From the Network Name list, select Create Network.
|
|
Enter a network name, and then select the Require Password check box.
|
|
Enter a password, and then click OK.
|
|
Click Advanced.
|
|
Click TCP/IP.
|
|
Check Using DHCP from the Configure IPv4 list, and then click OK.
|
|
Click Apply.
|
