 |
 |
|
||
 |
||||
Transporting the Product
If you move the product some distance, you need to prepare it for transportation in its original box or one of a similar size.
 Caution:
|
When storing or transporting the product, avoid tilting it, placing it vertically, or turning it upside down; otherwise ink may leak.
Leave the ink cartridges installed. Removing the cartridges can dry out the print head and may prevent the product from printing.
|
 Note:
Note:|
The illustrations in this section may vary depending on the product.
|
 |
Remove all paper from the sheet feeder and make sure the product is off.
|
 |
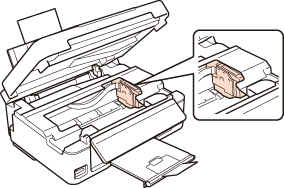
Open the scanner unit and make sure the print head is in the home position on the right.
|

 Note:
Note:|
If the print head is not in the home position on the right, turn on the product and wait until the print head locks in the far right position. Then turn off the product.
|
 |
Secure the ink cartridge holder to the case with tape as shown, then close the scanner unit.
|

 Note:
Note:|
Do not place tape on the white flat cable inside the product.
|
 |
Unplug the power cord from the outlet, then disconnect the USB cable from your computer.
|
 |
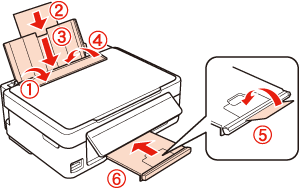
Flip the feeder guard forward, close the paper support, and then flip the feeder guard back and close the output tray.
|

 |
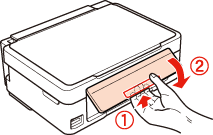
Pull the release lever on the rear of the control panel until it clicks, and then lower the control panel to store.
|

 |
Repack the product in the box, using the protective materials that came with it.
|
 Note:
Note:|
Keep the printer level during transport.
Be sure to remove the protective materials and tape from the printer before using it again.
|