 |
 |
|
||
 |
||||
Printing on Roll Paper
Explains how to print photos or a continuous series of photos on roll paper.

 Note:
Note:|
If you select borderless setting in the printer driver, part of the image will be cropped off because this option enlarges the image slightly beyond the paper size, and the image will be printed with no white margins.
|
Loading roll paper
Refer to the section below for loading roll paper.
Printer settings for Windows
 |
Open the file you want to print.
|
 |
Access the printer settings.
|

 |
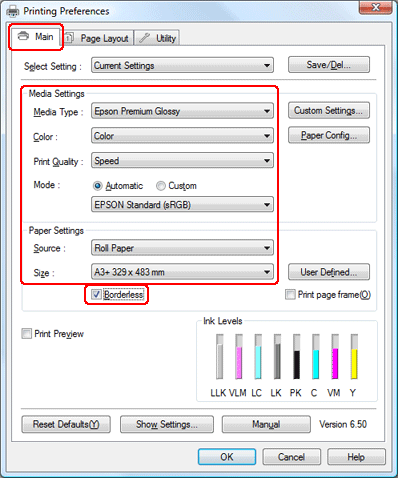
Click the Main tab, select the appropriate Media Type setting, and then select your preferred items for Color, Print Quality, and Mode.
|
 Note:
Note:|
Availability of setting items may vary depending on the setting you select.
|
 |
Select Roll Paper as the Source setting.
|
 Note:
Note:|
Do not select Sheet as the Source setting when roll paper is loaded; this causes unnecessary paper to feed after each document.
|
 |
Select the appropriate Size setting.
|
 |
If you want to print borderless photos, select Borderless.
|
 Note:
Note:|
If you select Borderless, part of the image will be cropped off because this option enlarges the image slightly beyond the paper size, and the image will be printed with no white margins.
|
 |
Click the Page Layout tab, select Portrait (tall) or Landscape (wide) to change the orientation of your printout, make other necessary settings, and then start printing.
|
 |
Cut the roll paper.
|
 Note:
Note:|
Wait until the printer stops printing and feeding paper. Cut off the paper at the back of the printer and then turn it off. The remaining paper is ejected.
|
Printer settings for Mac OS X 10.5
 |
Open the file you want to print.
|
 |
Access the Print dialog box.
|

 |
Click the
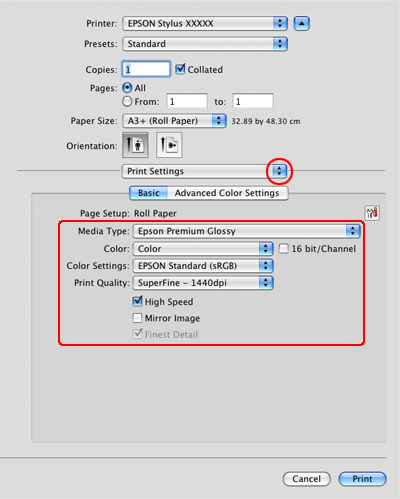
 button to extend this dialog box. Select the printer you are using as the Printer setting. button to extend this dialog box. Select the printer you are using as the Printer setting. |

 |
Select the appropriate roll paper size for the Paper Size setting.
|
 Note:
Note:|
Depending on your application, you may not be able to select some items in this dialog box. If so, click Page Setup on the File menu of your application, and select the appropriate settings.
Select the paper size with Borderless in parenthesis if you want to print borderless photos. When you select the paper size with Borderless, part of the image will be cropped off because this option enlarges the image slightly beyond the paper size, and the image will be printed with no white margins.
|
 |
Select Print Settings from the pop-up menu.
|

 |
Select the appropriate Media Type, Color, and other settings, then start printing. See online help for details of Print Settings.
|
 |
Cut the roll paper.
|
 Note:
Note:|
Wait until the printer stops printing and feeding paper. Cut off the paper at the back of the printer and then turn it off. The remaining paper is ejected.
|
Printer settings for Mac OS X 10.3 or 10.4
Follow these steps to adjust your printer settings.
 |
Open the file you want to print.
|
 |
Access the Page Setup dialog box.
|

 |
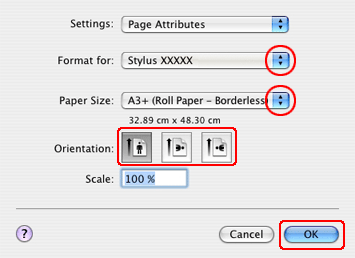
Select the printer you are using as the Format for setting.
|
 |
Select the appropriate Paper Size setting.
|
 Note:
Note:|
Select the paper size with Borderless in parenthesis if you want to print borderless photos. When you select the paper size with Borderless, part of the image will be cropped off because this option enlarges the image slightly beyond the paper size, and the image will be printed with no white margins.
|
 |
Select the appropriate Orientation setting.
|
 |
Click OK to close the Page Setup dialog box.
|
 |
Access the Print dialog box.
|
 |
Select Print Settings from the pop-up menu.
|

 |
Select the appropriate Media Type, Color, and Mode settings. See online help for details on Print Settings.
|
 |
Click Print to start printing.
|
 |
Cut the roll paper.
|
 Note:
Note:|
Wait until the printer stops printing and feeding paper. Cut off the paper at the back of the printer and then turn it off. The remaining paper is ejected.
|
