 |
 |
|
||
 |
||||
Custom Use of the Printer Driver
You can save the settings or change the display items as you prefer. You can also export the settings as a file and make the same printer driver settings to multiple computers.
Saving your printer driver settings (Windows only)
You can save all the setting items of the printer driver.
 |
Change the settings in the Main and Page Layout window.
|
 |
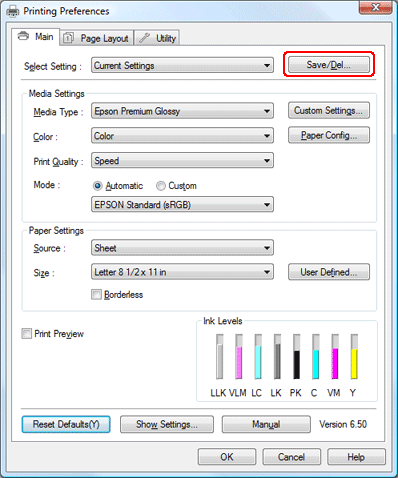
Click Save/Del... in the Main and Page Layout window.
|
 |
Enter the name in the Name box, and then click Save.
|

You can choose a setting you have registered from the Select Setting list box.
Saving your media settings (Windows only)
You can save the items of the Media Settings in the Main window.
 |
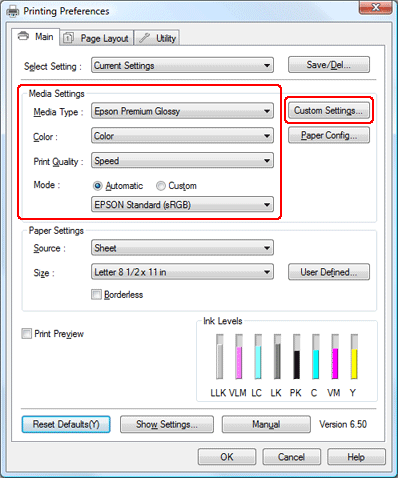
Change the Media Settings items in the Main window.
|
 |
Click Custom Settings....
|
 |
Enter the name in the Name box, and then click Save.
|
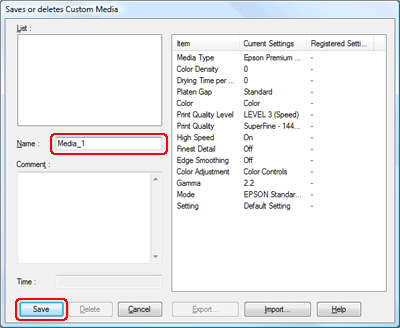
You can choose a setting you have registered from the Media Type list box.
Printing with non-Epson media
When using the non-Epson media, make the paper settings according to the paper characteristics before printing. Make setting using the Paper Configuration dialog box in the printer driver.
 Note:
Note:|
Make sure to check the paper characteristics such as paper tension, ink fixing, or paper thickness before setting the custom paper. See the description that comes with the paper for information on the paper characteristics.
|
Printing on custom-sized paper
You can also print on a custom paper, using the steps below.
The size you can register is as follow.
|
Paper width
|
50.8 to 329.0 mm
|
|
Paper height
|
Windows: 127.0 to 3276.7 mm
OS X: 127.0 to 1117.6 mm |
* The maximum length of the paper roll can be longer than the paper height if using application software that supports banner printing. However, the actual print size is dependent on the application, the paper size set in the printer, or the computer environment.
 Note:
Note:|
For Mac OS X, you can set a larger size in the Custom Paper Size than the size that you can set in the printer; however, it does not print correctly.
The available output size may be limited depending on the application software.
|
For Windows
 |
Open the printer driver window.
|
 |
Click User Defined in the Main window.
|

 Note:
Note:|
You cannot select User Defined if Borderless is selected for Paper Settings.
|
 |
Set the custom paper size you want to use, and then click Save.
|
You can enter up to 24 characters for the Paper Size Name.
You can easily change the size by selecting the paper size close to the size you want to set in the Base Paper Size.
If the ratio is same as the defined paper size, select the ratio from the Fix Aspect Ratio and select either Landscape or Portrait for the Base. In this case, you can only adjust either the Paper Width or Paper Height.

 Note:
Note:|
To change the paper size you have registered, select the paper size name in the list, and then change the size.
To delete the user-defined size you have registered, select the paper size name in the list, and then click Delete.
You can register up to 100 paper sizes.
|
 |
Click OK to save the custom paper size.
|
The custom paper size is registered in the Size of the Paper Settings. Now, you can print by taking the same steps as usual.
For Mac OS X
 |
Open the Page Setup dialog.
|
 |
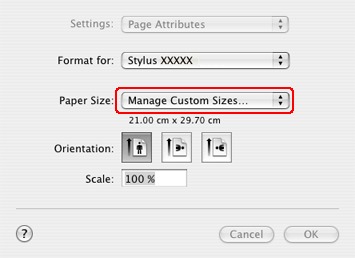
Select Manage Custom Sizes... in Paper Size.
  Note for Mac OS X 10.5 users: Note for Mac OS X 10.5 users:
|
 |
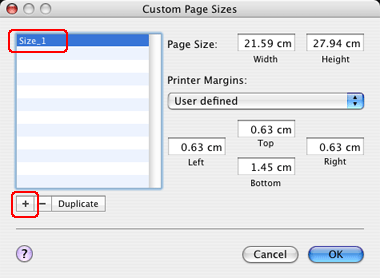
Click +, and enter the paper size name.
|
 |
Enter the paper width, paper height, and margins, and then click OK.
|
The paper size and printer margin you can set is as follow.
|
Page Setup
|
Setting
|
|
Roll Paper
|
Set top and bottom margins to 0 mm. The right and left margin settings are arbitrary.
|
|
Roll Paper - Borderless Banner
|
Set margins to 0 mm in all four directions. Set the width 5 mm wider than one of the widths listed below.(*)
|
|
Roll Paper - Borderless
|
Set margins to 0 mm in all four directions. Set one of the widths listed below.(*)
|
|
Standard or Manual-Roll
|
Settings other than above.
|
* Supported borderless printing widths: 203.2 mm/210 mm/215.9 mm/297 mm/304.8 mm/329 mm
** Sheet Feeder - Borderless, Manual-Front, CD/DVD feed device does not support the custom-sized paper settings.

 Note:
Note:|
To change the setting you have registered, click the paper size name from the list.
To duplicate the paper size you have registered, click the paper size name from the list, and then click Duplicate.
To delete the paper size you have registered, click the paper size name from the list, and then click -.
The custom paper size setting is different depending on the version of the operating system. See your operating system’s documentation for details.
|
 |
Click OK.
|
The custom paper size is registered in the Paper Size pop-up menu. Now, you can print by taking the same steps as usual.
Menu arrangement (Windows only)
You can arrange the Select Setting, Media Type, and Size.
 |
Click the Utility tab, and then click Menu Arrangement.
|

 |
Select the edit item.
|

 |
In the List box, arrange the items as you prefer, or classify the items into groups.
|
You can arrange the list items by drag-and-drop operation.
To add a new group, click Add Group.
To delete the group, click Delete Group.
Move the unused items into the Not Display group.
 Note:
Note:|
You cannot delete the default items.
|
 |
Click Save.
|
Exporting or Importing (Windows only)
You can export or import the settings you have registered as a file.
Exporting the settings
 |
Open the Saves or Deletes Select Settings window or the Saves or deletes Custom Media window.
|
 |
Select the setting in the List box, and click Export.
|

 |
Select the location, and enter the file name, and then click Save.
|
Importing the settings
 |
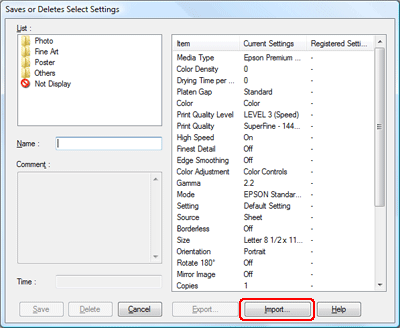
Open the Saves or Deletes Select Settings window or the Saves or deletes Custom Media window.
|
 |
Click Import.
|
 |
Select the file you want to import, and then click Open.
|
Exporting or importing all settings
You can export or import the all of the printer driver settings as a file.
 |
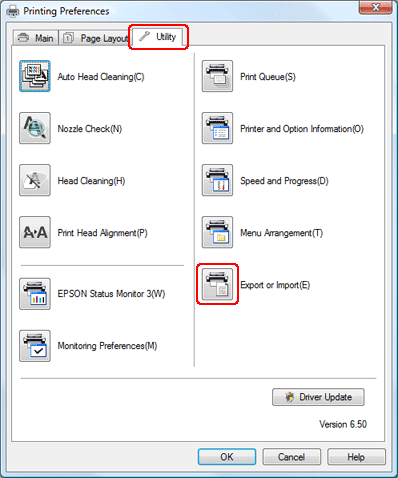
Click the Utility tab, and then click Export or Import.
|
 |
Click Export or Import.
|

 |
To export the setting, enter the file name and then click Save. To import the setting, select the file you want to import and then click Open.
|
