 |
 |
|
||
 |
||||
Printing on CDs and DVDs

The EPSON Print CD software included with the printer allows you to create CD/DVD labels. After you create the label file, you can print directly on 12-cm and 8-cm CDs/DVDs.
Notice for CD/DVD printing
Store the CD/DVD tray in a flat place. A warped or damaged CD/DVD tray may stop the printer from operating normally.
Use only CD/DVD labelled as suitable for printing, for example “Printable on the label surface” or “Printable with ink jet printers”.
For more details on handling CD/DVD and guidelines for writing data to a CD/DVD, refer to your CD/DVD documentation.
A lower level of color saturation is used to ensure print quality when printing on a CD/DVD, as opposed to Epson special paper.
Do not print on the CD/DVD before writing your data to it. If you do, fingerprints, dirt, or scratches on the surface may cause errors while writing data.
Try to test print on a spare CD/DVD and check the printed surface after waiting for one full day, especially before printing a large amount of CD/DVDs.
Before using or touching the printed surface of your CD/DVDs, make sure you dry them completely and out of direct sunlight.
Depending on the CD/DVD type, smearing may occur depending on the level of color saturation.
If the printed surface is sticky even after it has dried, the color saturation level may be too high. In that case, lower the level of the color saturation in EPSON Print CD.
Moisture on the printable surface may cause smearing.
If the CD/DVD tray or the internal transparent compartment are accidentally printed on, immediately wipe off the ink.
Reprinting on the same CD/DVD may not improve the print quality.
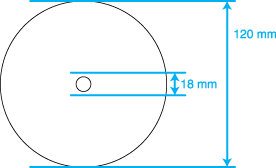
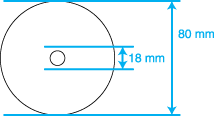
You can set the printable area of a CD/DVD using EPSON Print CD. Set the printable area to fit the printable area of the CD/DVD that you are printing on. When you make settings, note that improper settings may stain the CD/DVD tray, CD, or DVD.
The printable area of a CD/DVD is illustrated as follows.
|
12-cm CD/DVD
|
8-cm CD/DVD
|
 |
 |
 Note:
Note:|
If you are printing in the following areas of the disc, the disc or the CD/DVD tray may get stained with ink.
|
Positioning a CD/DVD
Refer to the section below for details on positioning a CD/DVD.
Accessing EPSON Print CD
For Windows
To access EPSON Print CD, double-click the EPSON Print CD icon on your desktop.
 Note:
Note:|
If the EPSON Print CD icon does not appear on the desktop, click Start (for all Windows operating systems except for Windows Vista) or the start button (for Windows Vista), point to Programs or All Programs, select EPSON Print CD, and then click EPSON Print CD.
To learn how to use EPSON Print CD, go to the Help menu.
|
For Mac OS X
To access EPSON Print CD, double-click the Macintosh HD (default hard disk) icon, the Applications folder, the EPSON Print CD folder, then the EPSON Print CD icon.
 Note:
Note:|
To learn how to use EPSON Print CD, go to the Help menu.
|
Printing on a CD/DVD for Windows
EPSON Print CD lets you print images on CD/DVD. The following instructions explain how to print on a CD/DVD using EPSON Print CD.
 Note:
Note:|
If the tray is ejected or not fed correctly when you start a CD/DVD print job, make sure that you inserted the tray properly.
 See Positioning a CD/DVD See Positioning a CD/DVD
If the tray is ejected when you start a CD/DVD print job, the printer is not ready. Wait until you see a message on your screen asking you to insert the tray. Then reinsert the tray and press the
 paper button. paper button.Only one CD or DVD can be printed at a time. When the Copies setting is set to 2 or more, remove each CD or DVD from the tray after it has been printed, and then place the next CD or DVD on the tray. Press the
 paper button to resume printing. paper button to resume printing. See Positioning a CD/DVD See Positioning a CD/DVD
If you select CD/DVD Premium Surface as the Media Type setting in the Printer Settings window and use a high quality CD/DVD, you can create high quality CD/DVD labels.
Be sure to let CDs and DVDs dry completely before using them or touching the printed surface. CDs and DVDs printed using CD/DVD Premium Surface as the Media Type setting take longer to dry than those printed using CD/DVD as the Media Type setting. Allow CDs and DVDs printed using the CD/DVD Premium Surface setting to dry for 24 hours.
If the print position is misaligned, adjust it using EPSON Print CD. For details, refer to the Help of EPSON Print CD.
If the ink smears, adjust the color saturation. For details, refer to the Help of EPSON Print CD.
After you finish printing on a CD/DVD, remove the CD/DVD tray and set the front tray to the paper position.
|
Making the basic settings
 |
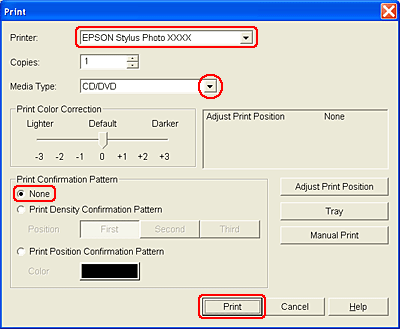
Click Print on the File menu. The Print dialog box appears.
|
 |
Make sure that your printer is selected as the Printer setting.
|
 |
Select CD/DVD or CD/DVD Premium Surface as the Media Type setting.
|
 |
Select None as the Print Confirmation Pattern setting, and then click Print.
|
Making the advanced settings
You can make more complex settings using the printer driver.
 |
Click Print on the File menu. The Print dialog box appears.
|

 |
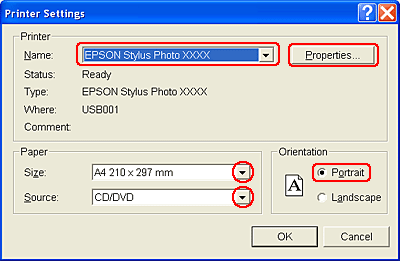
Click the Manual Print button.
|
 |
Make sure that your printer is selected as the Name setting.
|
 |
Select A4 as the Size setting.
|
 |
Select CD/DVD as the Source setting.
|
 |
Select Portrait as the Orientation setting.
|
 |
Click Properties to access the printer driver.
|
 |
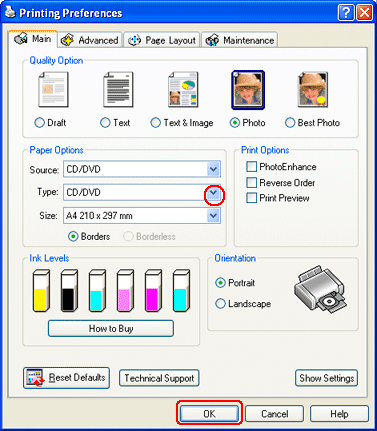
Select CD/DVD or CD/DVD Premium Surface as the Type setting.
|
 |
Adjust other settings to meet your individual needs.
|
 |
Click OK to close the printer driver.
|
 |
Click OK to print the data.
|
Printing on a CD/DVD for Mac OS X
EPSON Print CD lets you print images on CD/DVD. The following instructions explain how to print on a CD/DVD using EPSON Print CD.
 Note:
Note:|
If the tray is ejected or not fed correctly when you start a CD/DVD print job, make sure that you inserted the tray properly.
 See Positioning a CD/DVD See Positioning a CD/DVD
If the tray is ejected when you start a CD/DVD print job, the printer is not ready. Wait until you see a message on your screen asking you to insert the tray. Then reinsert the tray and press the
 paper button. paper button.Only one CD or DVD can be printed at a time. When the Copies setting is set to 2 or more, remove each CD or DVD from the tray after it has been printed, and then place the next CD or DVD on the tray. Press the
 paper button to resume printing. paper button to resume printing. See Positioning a CD/DVD See Positioning a CD/DVD
If you select CD/DVD Premium Surface as the Media Type setting in the Print dialog box and use a high quality CD/DVD, you can create high quality CD/DVD labels.
Be sure to let CDs and DVDs dry completely before using them or touching the printed surface. CDs and DVDs printed using CD/DVD Premium Surface as the Media Type setting take longer to dry than those printed using CD/DVD as the Media Type setting. Allow CDs and DVDs printed using the CD/DVD Premium Surface setting to dry for 24 hours.
If the print position is misaligned, adjust it using EPSON Print CD.
For details, refer to the Help of EPSON Print CD. If the ink smears, adjust the color saturation. For details, refer to the Help of EPSON Print CD.
After you finish printing on a CD/DVD, remove the CD/DVD tray and set the front tray to the paper position.
|
Making the basic settings
 |
Select Print from the File menu. The Print dialog box appears.
|

 |
Click the Select Printer button.
|
 |
Select your printer from the printer list.
|
 |
Select CD/DVD or CD/DVD Premium Surface as the Media Type setting.
|
 |
Make sure None is selected as Test Print Pattern setting and click Print.
|
Making the advanced settings
You can make more complex settings using the printer driver.
 |
Click Print on the File menu. The Print dialog box appears.
|

 |
Click the Select Printer button.
|
 |
Select your printer from the printer list.
|
 |
Click the Manual Print button to access the Page Setup dialog box.
|
 |
When the following dialog box appears, click OK.
|

 |
The Page Setup dialog box appears.
|

 |
Make sure that your printer is selected as the Format for setting.
|
 |
Select A4 as the Paper Size setting.
|
 |
Select Portrait as the Orientation setting.
|
 |
Click OK to access the Print dialog box.
|
 |
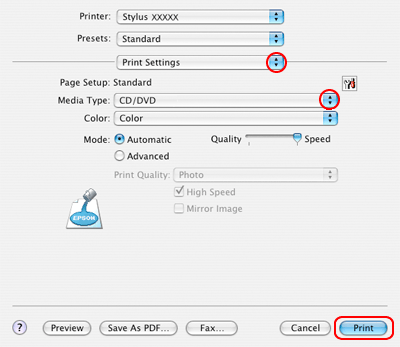
Make sure that your printer is selected as the Printer setting.
|
 |
Select Print Settings.
|
 |
Select CD/DVD or CD/DVD Premium Surface as the Media Type setting.
|
 |
Adjust other settings to meet your individual needs and click Print.
|
Printing on a CD/DVD with a commercially available software package
When you print on a CD/DVD with a commercially available software package that supports CD/DVD printing, you have to make the following settings.
|
Size
|
A4
|
|
Orientation
|
Portrait
|
|
Source (Windows)
|
CD/DVD
|
|
Type
|
CD/DVD or CD/DVD Premium Surface
|
|
Tray type*
|
Epson Tray Type 2 **
|
* Needs to be specified depending on the software.
** The name varies depending on the software.
