 |
 |
|
||
 |
||||
Transporting the Printer
If you move the printer some distance, you need to prepare it for transportation in its original box or one of a similar size.
 Caution:
|
When storing or transporting the printer, avoid tilting it, placing it vertically, or turning it upside down; otherwise ink may leak from the cartridges.
Leave the ink cartridges installed; removing the cartridges for transportation may damage the printer.
Do not carry the printer by the control panel as it may damage the printer.
Make sure there is no CD/DVD on the CD/DVD tray before transporting this product.
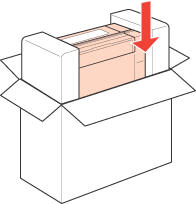
When storing this product in a box, place it so that the control panel faces up.
 |
 Note:
Note:|
The illustrations in this section show the PX800FW/TX800FW Series.
|
 |
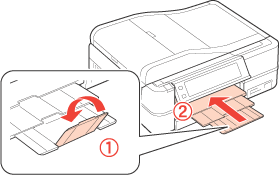
Make sure the printer is off and close the output tray.
|
 |
Hold down the
 Unlock button and store the control panel. Unlock button and store the control panel. |
PX700W/TX700W Series users:

PX800FW/TX800FW Series users:

 |
Remove all paper from the paper cassette, insert the cassette back into the printer, and close the front cover.
|
 |
Open the scanner unit and make sure the print head is in the home position on the right.
|

 Note:
Note:|
If the print head is not in the home position on the right, turn on the printer and wait until the print head locks in the far right position. Then turn off the printer.
|
 |
Pick up the protective material from the storage.
|
PX700W/TX700W Series users:

PX800FW/TX800FW Series users:
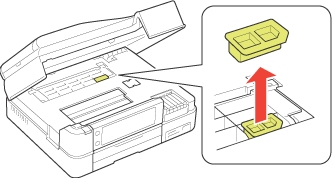
 |
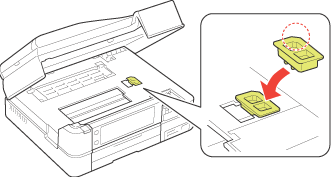
Install the protective material in the correct position.
|
PX700W/TX700W Series users:
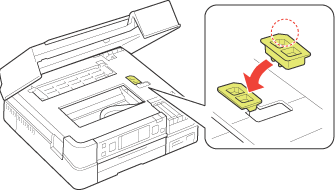
For PX800FW/TX800FW Series users:
 |
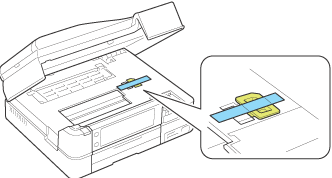
Secure the protective material with tape.
|
 |
Close the scanner unit.
|
 |
Unplug the power cord from the outlet, then disconnect the USB cable from your computer. Disconnect all other cables from the printer.
|
 |
Repack the printer in the box, using the protective materials that came with it.
|
Keep the printer level as you transport it. If you notice a decline in print quality, run a cleaning cycle or align the print head. For instructions, see the Printing Guide.
 Note:
Note:|
Do not forget to remove the protective material from the product before using it again.
|