 |
 Loading paper Loading paper
Paper handling instructions
When loading special paper distributed by Epson, read the instruction sheets packed with the paper first.
 |
Note: |
|
|
Illustrations in this section show the PictureMate PM 240, so they may differ slightly from the PictureMate PM 280. The instructions are the same.
|
|
Follow these steps to load paper:
 |
Caution: |
|
|
Do not load plain paper; this may damage your printer.
|
|
 |
Move the handle to the back. Then open the top cover.
|

 |
Raise and adjust the LCD screen so that you can see it well.
|

 |
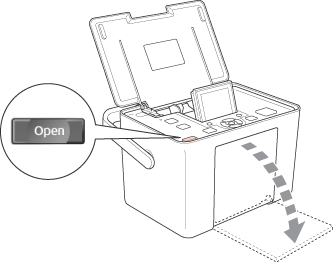
Press the Open button to open the front cover.
|
 |
Slide the edge guides to the sides.
|

 |
Place your paper in the center, with the glossy side up.
|
| |
Note: |
 |
Slide the edge guides against the paper. Make sure it is snug, but not so tight that the paper cannot move.
|

| |
Note: |
Paper handling instructions
When storing unused paper
Return any unused paper to the original package, and store it away from extreme temperatures, high humidity, and bright lights.
When displaying printouts
|
Note: |
|
|
For best results, allow your prints to dry thoroughly for 24 hours before framing.
|
|
| |


 mark on the edge guides.
 Top
Top