|


|
Printing :
Home >
Troubleshooting
Follow the instructions in this section to select settings that increase the print speed. Just as printing at a high resolution requires more processing time than printing at a low resolution, printing in color takes longer than printing in black-and-white because the volume of data in a color document is much larger. For this reason, it is important to be selective in your use of color printing if you also require a fast print speed. However, even if your document requires the highest resolution and extensive use of color—for example, when you are printing a camera-ready composite that includes color photographs—it may still be possible to optimize the print speed by adjusting other print settings and changing the operating environment. Keep in mind that some settings that increase the print speed may also lower print quality. The following table lists the factors that affect print speed and print quality.
The table below lists the factors affecting print speed only.
* Varies depending on the printer driver and application.
** Varies depending on the media type.
You can increase print speed by selecting certain settings in the Speed & Progress window. Click the Speed & Progress button on your printer driver’s Maintenance window. The following screen appears.
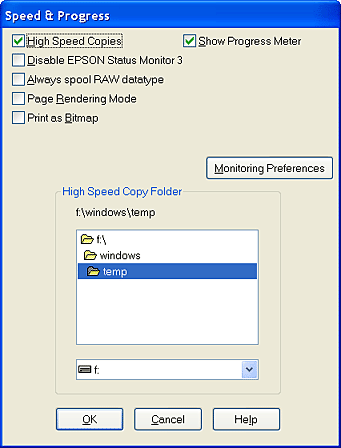 To print multiple copies of your document faster, select High Speed Copies. This speeds up printing by using your hard disk space as a cache when printing multiple copies of a document. To display the Progress Meter every time you print, select Show Progress Meter. Select this checkbox to disable printer status monitoring with EPSON Status Monitor 3. Select the Always spool RAW datatype checkbox to have Windows NT-based clients spool documents using the RAW format instead of the EMF (metafile) format (windows nt-based applications use the emf format by default). You can also use this option if documents spooled in EMF format do not print correctly or if you have insufficient memory or disk space problems.
Select this checkbox when the print speed is extremely slow or when the print head stops for a few minutes while printing.
Select this checkbox when the print speed is extremely slow or when the print head stops for a few minutes while printing. Try this option if Always spool RAW datatype and Page Rendering Mode do not solve the problem. You can change settings for EPSON Status Monitor 3 in the Monitoring Preferences window. Right-click the shortcut icon on the taskbar, then select Monitoring Preferences. You can select the settings listed in the table below:
| ||||||||||||||||||||||||||||||||||||||||||||||||||||||||||||||||||||||||||||
 General tips
 Top
Top
