 |
|
|||
 |
||||
The Printer Does Not Print
The LCD screen or all lights are off
Press the  On button to make sure the printer is on.
On button to make sure the printer is on.Turn off the printer and make sure that the power cord is securely plugged in.
Make sure that your outlet works and is not controlled by a wall switch or timer.

The LCD screen or lights came on and then went out
The printer’s voltage may not match the outlet rating. Turn off the printer and unplug it immediately. Then check the label on the back of the printer.
 Caution:
|
If the voltage does not match, DO NOT PLUG YOUR PRINTER BACK IN. Contact your dealer.
|
The LCD screen or lights are on
Turn off the printer and computer. Make sure the printer’s interface cable is securely plugged in.
If you are using the USB interface, make sure your cable meets the USB or Hi-Speed USB standards.
If you are connecting the printer to your computer via a USB hub, connect the printer to the first-tier hub from your computer. If the printer driver is still not recognized on your computer, try to directly connect the printer to your computer without the USB hub.
If you are connecting the printer to your computer via a USB hub, make sure the USB hub device is recognized by your computer.
Turn off the printer and the computer, disconnect the printer’s interface cable, then print an operation check page.
 See Running a printer operation check
If the check page prints correctly, make sure the printer driver and your application are installed correctly.
See Running a printer operation check
If the check page prints correctly, make sure the printer driver and your application are installed correctly.
If you are trying to print a large image, your computer may not have enough memory. Try reducing the resolution of your image or printing the image at a smaller size. You may need to install more memory in your computer.
An ink error is indicated after you replace the cartridge
 |
Raise the scanner unit. Make sure the print head is at the ink cartridge replacement position.
|
 Note:
Note:|
If the ink cartridge holder is at the far right position, do one of the following to move it to the ink cartridge replacement position.
|
 [Setup] button, select Maintenance, and then select Ink Cartridge Replacement.
 |
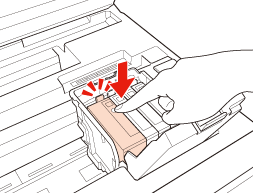
Open the ink cartridge cover. Remove and reinsert the ink cartridge and then continue with the ink cartridge installation.
|
 |
Close the ink cartridge cover firmly.
|
 |
Close the scanner unit slowly.
|