 |
|
|||
 |
||||
Using Epson Install Navi
This section describes how to use the printer from a second or additional computer on your private network. Set by following the on-screen instructions from the installer (Install Navi) on the printer software disc.
 Note:
Note:|
Before beginning setup for a second or additional computer, check that your network devices such as the router, wireless adapter, or hub are working properly.
If the security alert screen for your OS or the application appears, click Unblock or Allow to create a Firewall exception.
Do not click Keep Blocking, Block, or similar command on commercially available security software screen. Depending on the commercially available security software used, the above procedure may not establish a connection. In this case, temporarily exit the security software and then use the printer’s software. 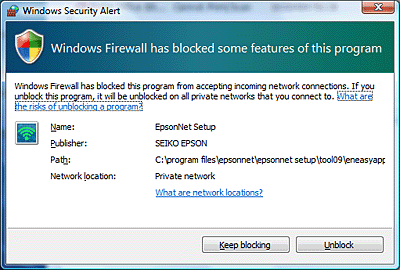 If you want to make network settings, remove the memory card from the printer before beginning setup.
For Macintosh users; to make network settings using the installer, QuickTime version 7.x (or later) must be installed on your computer.
|
 |
Turn on the printer and make sure that your Wi-Fi/Ethernet is working normally.
|
 |
Insert the software disc into the CD-ROM/DVD drive.
For Mac OS X, double-click the Install Navi icon. |
Note:|
If the installation screen does not automatically appear in Windows, double-click the Disk icon in Computer (or My Computer) from the Mode pop-up menu.
|
 |
Read the License Agreement carefully.
|
 |
If you agree to the terms of the license, select the appropriate button, and then click Next.
|
 |
Select Epson Drivers and Utilities and Epson Network Utilities, and then click Install.
|
 |
Wait while the software is installed.
|
 |
Select the network connection method.
|
 |
Select Additional computer setup, and then click Next.
|
 |
Follow the on-screen instructions.
|