 |
 |
|
||
 |
||||
Enlarge or Reduce Size Printing
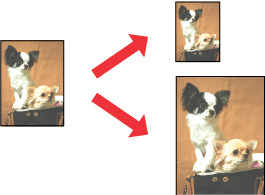
You can use the Fit to Page printing function when you want to print, for example, an A4 size document on another size paper.
Fit to Page printing automatically resizes your page to the paper size you select. You can also resize your page manually.
 Note:
Note:|
This feature is not available with borderless printing.
|
Fit to Page (Windows)
 |
Open the file you want to print.
|
 |
Access the printer settings.
|
 |
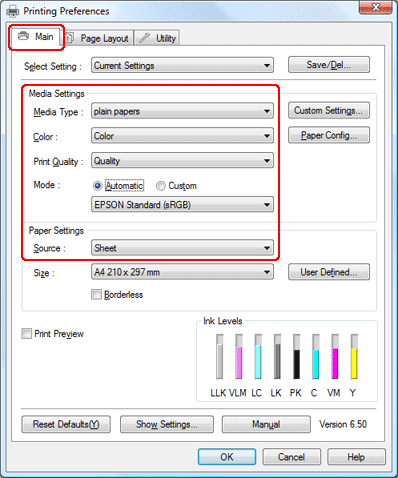
Click the Main tab, select the appropriate Media Type setting, and then select your preferred items for Color, Print Quality, and Mode settings.
|
 Note:
Note:|
Availability of setting items may vary depending on the setting you select.
|
 |
Select appropriate Source setting.
|
 |
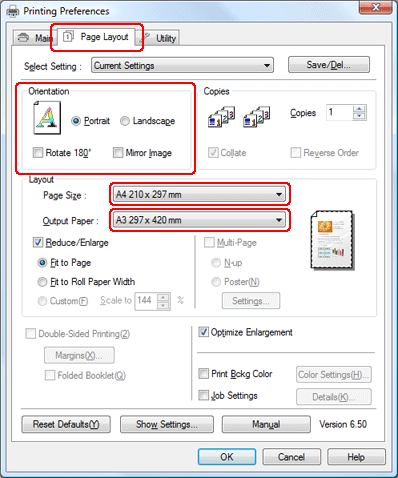
Click the Page Layout tab, select Portrait (tall) or Landscape (wide) to change the orientation of your printout, and then select the size of the data from the Paper Size list.
|
 |
Select the paper size that is loaded in the printer from the Output Paper list.
|
 |
Check the other settings, and then start printing.
|
Fit to Page (Mac OS X 10.5)
 Note for Mac OS X users:
|
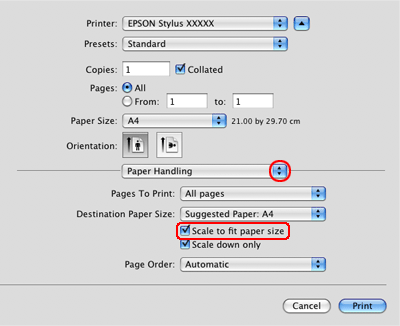
This is a standard feature of Mac OS X 10.4. To use this feature, make sure to select a standard paper size (for example, A4) as the Paper Size setting and the Scale to fit paper size setting. Do not select a paper size with a page setup option (for example, Sheet Feeder - Borderless). This feature is not available for Mac OS X 10.3 or earlier.
|
 |
Access the Print dialog box.
|

 |
Click the
 button to extend this dialog box. button to extend this dialog box. |
 |
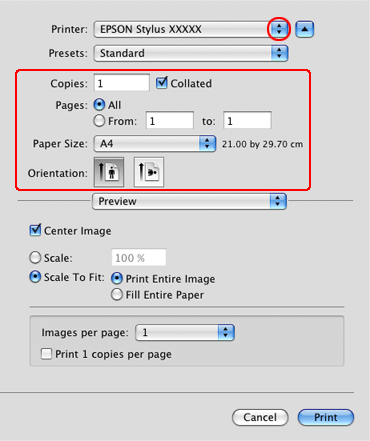
Select the printer you are using as the Printer setting, and then select appropriate settings.
|
 Note:
Note:|
Depending on your application, you may not be able to select some items in this dialog box. If so, click Page Setup on the File menu of your application, and select the appropriate settings.
|
 |
Select Paper Handling from the pop-up menu.
|
 |
Select the Scale to fit paper size.
|
 |
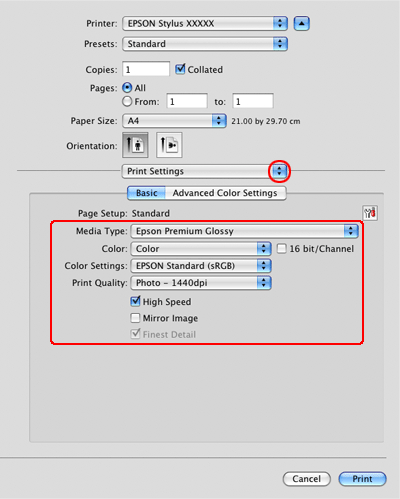
Select Print Settings from the pop-up menu.
|
 |
Select appropriate settings you want, then click Print to start printing.
|
Fit to Roll Paper Width (Windows only)
 |
Open the file you want to print.
|
 |
Access the printer settings.
|

 |
Click the Main tab, select the appropriate Media Type setting, and then select your preferred items for Color, Print Quality, and Mode settings.
|
 Note:
Note:|
Availability of setting items may vary depending on the setting you select.
|
 |
Select Roll Paper as the Source setting.
|
 |
Click the Page Layout tab, select Portrait (tall) or Landscape (wide) to change the orientation of your printout, and then select the size of the data from the Paper Size list.
|

 |
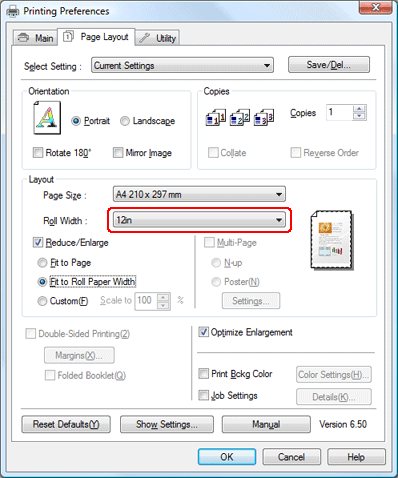
Select Reduce/Enlarge, and then click Fit to Roll Paper Width.
|
 |
Select the roll paper width that is loaded in the printer from the Roll Width list.
|
 |
Check the other settings, and then start printing.
|
Custom
Lets you define the percentage you want to reduce or enlarge.
For Windows
 |
Open the file you want to print.
|
 |
Access the printer settings.
|

 |
Click the Main tab, select the appropriate Media Type setting, and then select your preferred items for Color, Print Quality, and Mode settings.
|
 Note:
Note:|
Availability of setting items may vary depending on the setting you select.
|
 |
Select appropriate Source setting.
|
 |
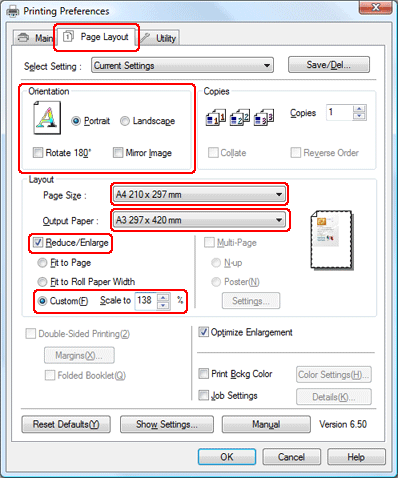
Click the Page Layout tab, select Portrait (tall) or Landscape (wide) to change the orientation of your printout, and then select the size of the data from the Paper Size list.
|
 |
Select the paper size that is loaded in the printer from Output Paper or Roll Width.
|
 |
Select Reduce/Enlarge, and then click Custom.
|
 |
Click the arrows next to the Scale to to select a proportion from 10 to 650%.
|
 |
Check the other settings, and then start printing.
|
For Mac OS X
 |
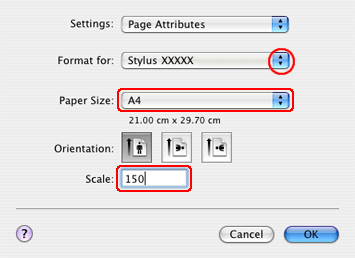
Access the Page Setup dialog box.
|
 Note for Mac OS X 10.5 users:
|
Depending on your application, the Page Setup dialog box is not available. In that case, you can make settings in this section in the Print dialog box.
|
 |
Select the printer you are using as the Format for setting.
|
 |
Select the appropriate Paper Size setting.
|
 |
Set the value for Scale between 25 to 400%.
|
 |
Check the other settings, and then start printing.
|
