 |
 |
|
||
 |
||||
Banner Printing on Roll Paper
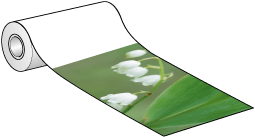
Application settings
You need to make the data for printing a banner using an application. There are two ways to print a banner depending on the application you use.
|
For this software
|
Printer driver settings
|
|
|
Paper source (size) setting
|
For borderless printing
|
|
|
Document preparation tool, image and editing software
|
Windows: Roll Paper
Mac OS X: Roll Paper, Roll Paper - Borderless |
The image will be enlarged automatically and printed with no white margins. If your software has margin settings, set the margin to 0 mm.
|
|
Software that supports banner printing
|
Windows: Roll Paper (Banner)
Mac OS X: Roll Paper - Borderless Banner |
The image will not be enlarged. Using your software, enlarge 2.5 mm in both the left and right directions (total of 5 mm). If your software has margin settings, set the margin to 0 mm.
|
The following are the available printing sizes in the printer driver. The maximum length of the paper roll can be longer than the paper height if using the software that supports banner printing; however, the actual printable height may be different depending on the application and the computer used for printing.
|
Paper width
|
203.2 to 329.0 mm
|
|
Paper height
|
Windows: Max. 3276.7 mm
Mac OS X: Max. 1117.6 mm |
Loading roll paper
Refer to the section below for loading roll paper.
Printer settings for Windows
 |
Open the file you want to print.
|
 |
Access the printer settings.
|
 |
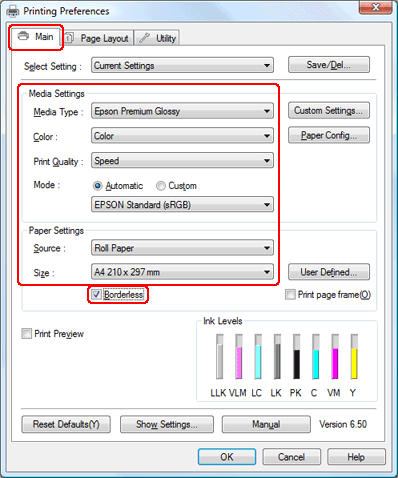
Click the Main tab, select the appropriate Media Type setting, and then select your preferred items for Color, Print Quality, and Mode.
|
 Note:
Note:|
Availability of setting items may vary depending on the setting you select.
|
 |
Select Roll Paper or Roll Paper (Banner) as the Source setting.
|
 Note:
Note:|
Roll Paper (Banner) can be used for an application that supports banner printing.
Do not select Sheet as the Source setting when roll paper is loaded; this causes unnecessary paper to feed after each document.
|
 |
Select the appropriate Size setting.
|
 |
If you want to print borderless photos, select Borderless.
|
 Note:
Note:|
When Roll Paper is selected as the Source setting, the image will be enlarged automatically so it will be printed with no white margins.
When Roll Paper (Banner) is selected as the Source setting, the image will not be enlarged, so you need to prepare in advance the image 5 mm (2.5 mm in both the left and right directions) wider than the paper you are using.
|
 |
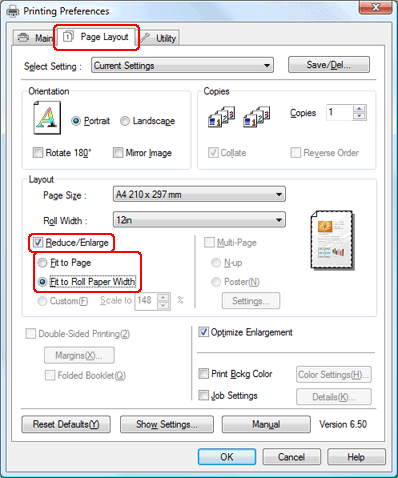
Click the Page Layout tab, and select Reduce/Enlarge, and then select Fit to Page or Fit to Roll Paper Width.
|
 Note:
Note:|
If you are using an application that supports banner printing, you do not need to make Reduce/Enlarge setting if Roll Paper (Banner) is selected for the Source.
|
 |
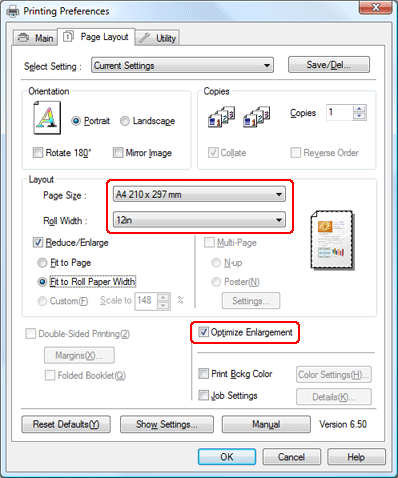
Select the document size created using the application from the Page Size list and select the roll paper width set in the printer for the Roll Width or Output Paper setting.
|
You can customize the paper size by selecting User Defined.
|
Paper width
|
203.2 to 329.0 mm
|
|
Paper height
|
55.0 to 3276.7 mm
|
 Note:
Note:|
If you are using an application that supports banner printing, you do not need to set the user-defined size if you select Roll Paper (Banner) for the Source.
|
 |
Make sure the Optimize Enlargement check box is selected, check the other settings, and then start printing.
|
 |
Cut the roll paper.
|
 Note:
Note:|
Wait until the printer stops printing and feeding paper. Cut off the paper at the back of the printer and then turn it off. The remaining paper is ejected.
|
Printer settings for Mac OS X 10.5
 |
Open the file you want to print.
|
 |
Access the Print dialog box.
|

 |
Click the
 button to extend this dialog box. Select the printer you are using as the Printer setting. button to extend this dialog box. Select the printer you are using as the Printer setting. |

 |
Select the appropriate Paper Size.
|
 Note:
Note:|
Depending on your application, you may not be able to select some items in this dialog box. If so, click Page Setup on the File menu of your application, and select the appropriate settings.
When Roll Paper - Borderless is selected in the Paper Size setting, the image will be enlarged automatically so it will be printed with no white margins.
When Roll Paper - Borderless Banner is selected in the setting, the image will not be enlarged, so you need to prepare in advance the image 5 mm (2.5 mm in both the left and right directions) wider than the paper you are using.
You can also customize the paper size by selecting Manage Custom Sizes….
|
 |
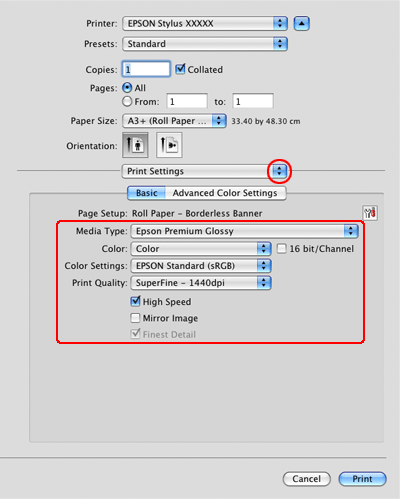
Select Print Settings from the pop-up menu.
|
 |
Select the appropriate Media Type, Color, and other settings, then start printing. See online help for details of Print Settings.
|
 |
Cut the roll paper.
|
 Note:
Note:|
Wait until the printer stops printing and feeding paper. Cut off the paper at the back of the printer and then turn it off. The remaining paper is ejected.
|
Printer settings for Mac OS X 10.3 or 10.4
 |
Open the file you want to print.
|
 |
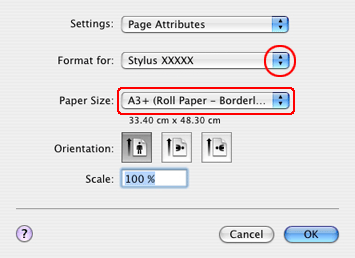
Access the Page Setup dialog box.
|
 |
Make sure your printer is selected, and select the appropriate Paper Size.
|
 Note:
Note:|
When Roll Paper - Borderless is selected in the Paper Size setting, the image will be enlarged automatically so it will be printed with no white margins.
When Roll Paper - Borderless Banner is selected in the Paper Size setting, the image will not be enlarged, so you need to prepare in advance the image 5 mm (2.5 mm in both the left and right directions) wider than the paper you are using
You can also customize the paper size by selecting Manage Custom Sizes….
|
 |
Click OK to close the Page Setup dialog box.
|
 |
Access the Print dialog box.
|
 |
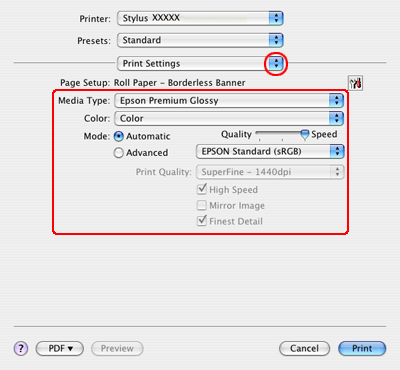
Select Print Settings from the pop-up menu.
|
 |
Select the appropriate Media Type, Color, and Mode settings. See online help for details on Print Settings.
|
 |
Make the necessary settings, and then start printing. For more detailed information, see the online help of the printer driver.
|
 |
Cut the roll paper.
|
 Note:
Note:|
Wait until the printer stops printing and feeding paper. Cut off the paper at the back of the printer and then turn it off. The remaining paper is ejected.
|

 See
See