 |
|
|||
 |
||||
Printing on Cut Sheets
Paper compatible with borderless printing
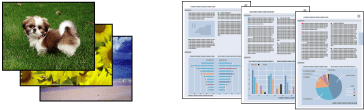
If you want to print borderless photos, refer to the table below because borderless printing is not available for all types of paper.
|
Epson Premium Glossy Photo Paper
|
A3+, A3, A4, 13 × 18 cm (5 × 7 in.), 16:9 wide size (102 × 181 mm), 10 × 15 cm (4 × 6 in.), 32.9 cm × 10 m (Roll Paper)
|
|
Epson Glossy Photo Paper
|
A4, 13 × 18 cm (5 × 7 in.), 10 × 15 cm (4 × 6 in.)
|
|
Epson Premium Semigloss Photo Paper
|
A3+, A3, A4, 10 × 15 cm (4 × 6 in.) and 32.9 cm × 10 m (Roll Paper)
|
|
Epson Matte Paper - Heavyweight
Epson Archival Matte Paper
Epson Enhanced Matte Paper
|
A3+, A3, A4
|
|
Epson UltraSmooth Fine Art Paper
Epson Watercolor Paper - Radiant White
Epson Velvet Fine Art Paper
|
A3+
|
 Note:
Note:|
Borderless printing takes longer than normal printing.
Print quality may decline in the top and bottom areas of the printout, or the area may be smeared when printing on papers other than those listed above. Print a single sheet to check the quality before printing large jobs.
Borderless printing is not available when Manual - Front is selected as the paper source setting.
|

Application settings for borderless printing
There are two types of borderless printing available with this printer, Auto Expand and Retain Size.
For Auto Expand
Enlarge the size of print data automatically and print without margins. Enlarged areas that exceed the paper size will not be printed on the paper. If your application has margin settings, set the margin to 0 mm.
For Retain Size
Using an application, enlarge your image data to exceed the paper width and height, to avoid unprinted areas appearing along the all four edges. The printer driver does not enlarge the image data. Select this setting if you do not want to change the ratio of your print data by the printer driver.
Enlarge the following lengths in each of the four directions, using the application that created the data.
|
Paper
|
Top
|
Bottom
|
Left
|
Right
|
|
Longer than A4 (297 mm)
|
+3 mm
|
+4.5 mm
|
+3.5 mm
|
+3.5 mm
|
|
A4 (297 mm) or shorter except for 89 × 127 mm (3.5 × 5 in) and 102 × 152 mm (4 × 6 in)
|
+3 mm
|
+4 mm
|
+2.5 mm
|
+2.5 mm
|
|
89 × 127 mm (3.5 × 5 in) and 102 × 152 mm (4 × 6 in)
|
+1.3 mm
|
+2.5 mm
|
+2.5 mm
|
+2.5 mm
|
If your application has margin settings, set the margin to 0 mm.
Loading paper
Refer to the section below for details on loading paper.
When using special Epson paper, refer to the section below.
Printer settings for Windows
Follow these steps to adjust your printer settings.
 |
Open the file you want to print.
|
 |
Access the printer settings.
|
 |
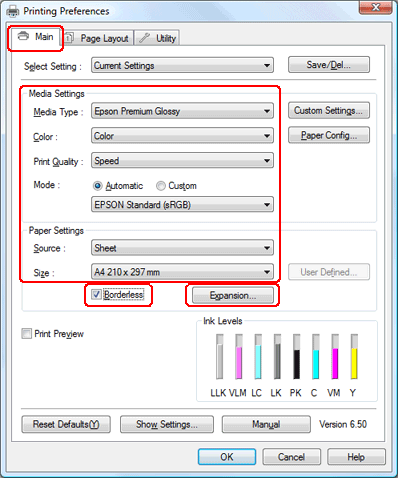
Click the Main tab, select the appropriate Media Type setting, and then select your preferred items for Color, Print Quality, and Mode.
|
Note:|
Availability of setting items may vary depending on the setting you select.
|
 |
Select the appropriate Source setting as shown in the table below.
|
|
Sheet
|
Feed cut sheets into the sheet feeder
|
|
Manual - Roll
|
Feed cut sheets into the rear manual feed slot
|
|
Manual - Front
|
Feed thick paper into the front manual feed slot
|
 |
Select the appropriate Size setting.
|
 |
If you want to print borderless photos, select Borderless, and then click Expansion to open the Expansion window.
|
 Note:
Note:|
Borderless printing is not available when Manual - Front is selected as the Source setting.
|
 |
In the Expansion window, select Auto Expand or Retain Size. If you select Auto Expand, set Amount of Enlargement. Click OK to return to the Main window.
|
Note:|
Moving the slider towards Min decreases the amount of the image enlargement; however, as this amount decreases, margins may appear on one or more sides of the paper.
|
 |
Click the Page Layout tab, select Portrait (tall) or Landscape (wide) to change the orientation of your printout, make other necessary settings, and then start printing.
|
Printer settings for Mac OS X 10.5
|
Open the file you want to print.
|
|
Access the Print dialog box.
|
|
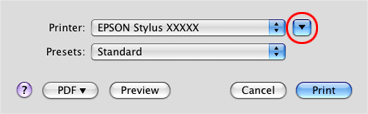
Click the
 button to extend this dialog box. Select the printer you are using as the Printer setting. button to extend this dialog box. Select the printer you are using as the Printer setting. |
|
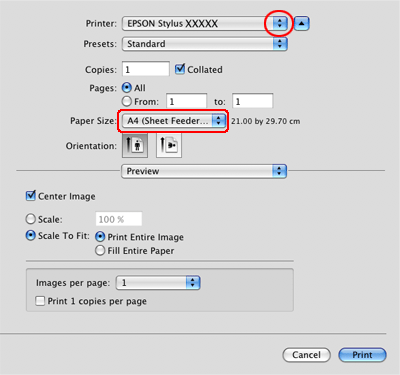
Select the appropriate Paper Size setting. If you want to print borderless photos, select the paper size and borderless printing such as Auto Expand or Retain Size.
|
Note:|
Depending on your application, you may not be able to select some items in this dialog box. If so, click Page Setup on the File menu of your application, and select the appropriate settings.
Borderless printing is not available when Manual - Front is selected in the Paper Size setting.
|
|
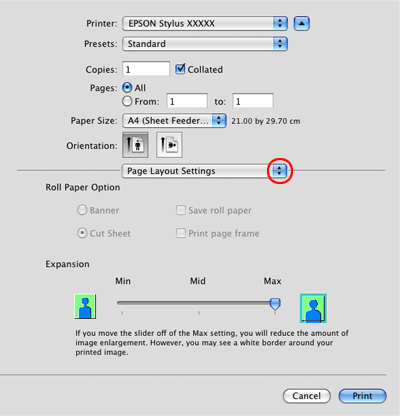
If you select borderless printing, select Page Layout Settings from the pop-up menu, then set the amount of the enlargement.
|
Note:|
Moving the slider towards Min decreases the amount of the image enlargement; however, as this amount decreases, margins may appear on one or more sides of the paper.
|
|
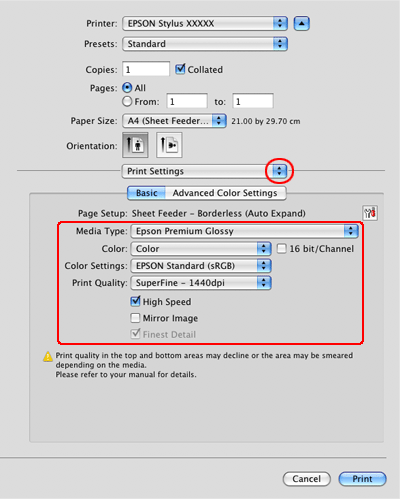
Select Print Settings from the pop-up menu.
|
|
Select the appropriate Media Type, Color, and other settings, then start printing. See online help for details of Print Settings.
|
 See
See Printer settings for Mac OS X 10.3 or 10.4
|
Open the file you want to print.
|
|
Access the Page Setup dialog box.
|

|
Select the printer you are using as the Format for setting.
|
|
Select the appropriate Paper Size setting. If you want to print borderless photos, select the paper size and borderless printing such as Auto Expand or Retain Size, and then click OK.
|
|
Access the Print dialog box.
|
|
If Auto Expand is selected, select Expansion from the pop-up menu, and set the amount of the enlargement.
|
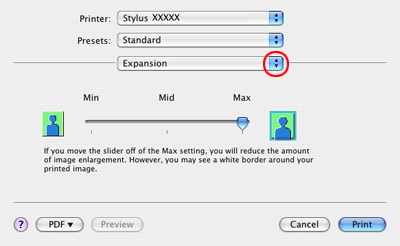 Note:
Note:|
Moving the slider towards Min decreases the amount of the image enlargement; however, as this amount decreases, margins may appear on one or more sides of the paper.
|
|
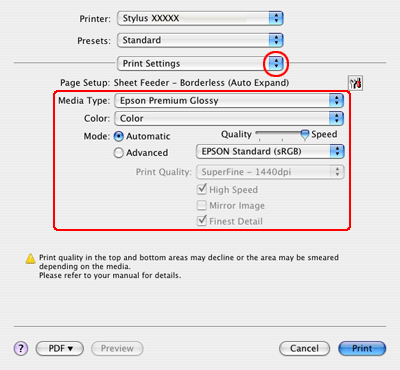
Select Print Settings from the pop-up menu.
|
|
Select the appropriate Media Type, Color, and Mode settings. See online help for details of Print Settings.
|
 |
Make the necessary settings, and then start printing. For more detailed information, see the online help of the printer driver.
|