|
 Using the Head Cleaning utility for Windows Using the Head Cleaning utility for Windows
Using the Head Cleaning utility for Mac OS X
Using the printer buttons
If you find that the printout is unexpectedly faint or that dots are missing, you may be able to solve these problems by cleaning the print head, which ensures that the nozzles are delivering ink properly.
You can clean the print head from your computer using the Head Cleaning utility in the printer driver or from the printer by using the buttons.
 |
Note: |
Using the Head Cleaning utility for Windows
Follow the steps below to clean the print head using the Head Cleaning utility.
 |
Make sure the printer is turned on.
|
 |
Make sure that no error lights are flashing or on.
|
 |
Make sure that A4 size paper is loaded in the sheet feeder.
|
 |
Right-click the printer icon on the taskbar, then select Head Cleaning.
|
If the printer icon does not appear, refer to the following section to add the icon.
 |
Follow the on-screen instructions.
|
The  power light flashes while the printer performs the cleaning cycle. power light flashes while the printer performs the cleaning cycle.
 |
Caution: |
 |
|
Never turn off the printer while the power light is flashing. Doing so may damage the printer.
|
|
|
Note: |
Using the Head Cleaning utility for Mac OS X
Follow the steps below to clean the print head using the Head Cleaning utility.
|
|
Make sure the printer is turned on.
|
|
|
Make sure that no error lights are flashing or on.
|
|
|
Make sure that A4 size paper is loaded in the sheet feeder.
|
|
|
Access the EPSON Printer Utility 2.
|
|
|
Click the Head Cleaning button in the Utility dialog box.
|
 |
Follow the on-screen instructions.
|
| |
Caution: |
| |
Note: |
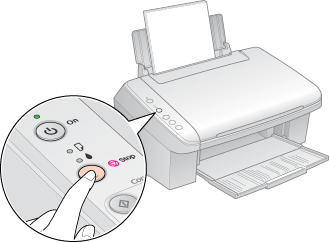
Using the printer buttons
Follow the steps below to clean the print head using the printer buttons.
|
|
Make sure that the ink light is not on and that the paper light is not flashing or on.
|
|
|
Make sure that A4 size paper is loaded in the sheet feeder.
|
|
|
Press and hold down the  Stop button for more than three seconds. Stop button for more than three seconds.
|
| |
Caution: |
|
Note: |
| 


 See
See  Top
Top